8NR-FTS ENGINE CONTROL ECM INSTALLATION
PROCEDURE

 89668
1.INSTALL NO. 2 ECM BRACKET
Install the No. 2 ECM bracket to the ECM with the 2 screws.
- Torque:
- 4.5 N*m (46 kgf*cm, 40 in.*lbf)
89667E
2.INSTALL NO. 1 ECM BRACKET
Install the No. 1 ECM bracket to the ECM with the 2 screws.
- Torque:
- 4.5 N*m (46 kgf*cm, 40 in.*lbf)
89661
3.INSTALL ECM
- HINT:
- ·
Perform "reset memory", "deceleration sensor 0 point calibration", "CVT oil pressure calibration" after replacing the ECM.
Click hereDrivetrain>K114 (MULTIDRIVE / CVT)>CONTINUOUSLY VARIABLE TRANSAXLE SYSTEM>INITIALIZATION
·Perform "Vehicle Identification Number (VIN) or frame number registration" after replacing the ECM.
Click hereEngine / Hybrid System>8NR-FTS (ENGINE CONTROL)>SFI SYSTEM>INITIALIZATION
·When replacing the ECM, use the GTS to save "Heavy Knock History" and then upload it to the new ECM.
Click hereEngine / Hybrid System>8NR-FTS (ENGINE CONTROL)>SFI SYSTEM>REGISTRATION
Install the ECM with the bolt and nut.
- Torque:
- Bolt : 12.5 N*m (127 kgf*cm, 9 ft.*lbf)
- Nut : 8.0 N*m (82 kgf*cm, 71 in.*lbf)
- NOTICE:
-
If the ECM has been struck or dropped, replace it.
Engage the 2 claws to connect the engine wire to the No. 1 engine room relay block.
Connect the 3 connectors to the No. 1 engine room relay block.
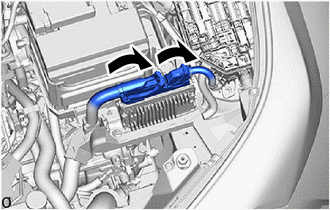
Connect the 2 ECM connectors and lower the 2 levers.
- NOTICE:
- ·
When connecting the ECM connectors, make sure that dirt, water or other foreign matter does not contact the connecting parts of the ECM connectors.
·Be sure to securely connect the ECM connectors.
Install the No. 1 relay block cover to the No. 1 engine room relay block.
17701
4.INSTALL AIR CLEANER CASE SUB-ASSEMBLY
17705
5.INSTALL AIR CLEANER CAP SUB-ASSEMBLY
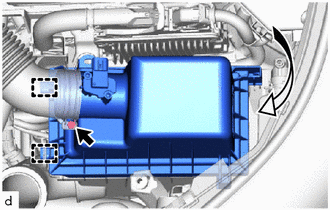
Connect the air cleaner cap with air cleaner hose and tighten the hose clamp.
- Torque:
- 2.0 N*m (20 kgf*cm, 18 in.*lbf)
Engage the 2 guides to install the air cleaner cap sub-assembly to the air cleaner case sub-assembly.
Engage the 2 air cleaner cap sub-assembly clamps.
Engage the clamp to the air cleaner cap sub-assembly.
Connect the mass air flow meter connector.
17751
6.INSTALL NO. 1 AIR CLEANER INLET
53141F
7.INSTALL RADIATOR COVER
8.CONNECT CABLE TO NEGATIVE BATTERY TERMINAL
9. INITIALIZATION AFTER RECONNECTING BATTERY TERMINAL
Click hereGeneral>SETUP>WHEN DISCONNECTING OR RECONNECTING BATTERY TERMINAL>WORK PROCEDURE
- HINT:
-
When disconnecting and reconnecting the battery, there is an automatic learning function that completes learning when the respective system is used.
-
Click hereGeneral>SETUP>WHEN DISCONNECTING OR RECONNECTING BATTERY TERMINAL>AUTOMATIC LEARNING CHART
10.PERFORM INITIALIZATION
Perform "reset memory", "deceleration sensor 0 point calibration", "CVT oil pressure calibration" after replacing the ECM.
Click hereDrivetrain>K114 (MULTIDRIVE / CVT)>CONTINUOUSLY VARIABLE TRANSAXLE SYSTEM>INITIALIZATION
Perform "Vehicle Identification Number (VIN) or frame number registration" after replacing the ECM.
Click hereEngine / Hybrid System>8NR-FTS (ENGINE CONTROL)>SFI SYSTEM>INITIALIZATION
When replacing the ECM, use the GTS to save "Heavy Knock History" and then upload it to the new ECM.
Click hereEngine / Hybrid System>8NR-FTS (ENGINE CONTROL)>SFI SYSTEM>REGISTRATION