DOOR / HATCH REAR DOOR DISASSEMBLY
CAUTION / NOTICE / HINT
The necessary procedures (adjustment, calibration, initialization or registration) that must be performed after parts are removed and installed, or replaced during the rear door disassembly/reassembly are shown below.
| Replacement Part or Procedure | Necessary Procedures | Effect/Inoperative Function when Necessary Procedure not Performed | Link |
|---|---|---|---|
|
*1: When performing learning using the GTS. Click here( |
|||
| Disconnect cable from negative battery terminal | Memorize steering angle neutral point | Panoramic view monitor system | ( ) |
·
Door window regulator assembly ·
Door glass ·
Door glass run |
Initialize Power Window Control System | ·
Auto up and down function ·
Jam protection function ·
Catch protection function ·
Remote control function ·
Key-linked function ·
Wireless transmitter-linked function ·
Key-off operation function ·
Window open warning function |
()
|
- NOTICE:
- ·
After the ignition switch is turned off, the radio and display receiver assembly records various types of memory and settings. As a result, after turning the ignition switch off, make sure to wait at least 120 seconds before disconnecting the cable from the negative (-) battery terminal (for Audio and Visual System).
·After the ignition switch is turned off, the radio and display receiver assembly records various types of memory and settings. As a result, after turning the ignition switch off, make sure to wait at least 120 seconds before disconnecting the cable from the negative (-) battery terminal (for Navigation System (for Radio and Display Type)).
- HINT:
- ·
Use the same procedure for the RH side and LH side.
·The following procedure is for the LH side.
·When the cable is disconnected / reconnected to the battery terminal, systems temporarily stop operating. However, each system has a function that completes learning the first time the system is used.
-Learning completes when vehicle is driven
Effect/Inoperative Function When Necessary Procedures are not Performed Necessary Procedures Link *1: When performing learning using the GTS.
Click here(
)
Lane tracing assist system Drive the vehicle straight ahead at 35 km/h (22 mph) or more for 5 second or more. ( )
Pre-collision system Pre-collision system Parking support brake system*1
-Learning completes when vehicle is driven
Effect/Inoperative Function When Necessary Procedures are not Performed Necessary Procedures Link Power door lock control system
·Back door opener
Perform door unlock operation with door control switch or electrical key transmitter sub-assembly switch. ( )
Air conditioning system After the ignition switch is turned to ON, the servo motor standard position is recognized. -
PROCEDURE

 1. PRECAUTION
- NOTICE:
-
After turning the ignition switch off, waiting time may be required before disconnecting the cable from the negative (-) battery terminal. Therefore, make sure to read the disconnecting the cable from the negative (-) battery terminal notices before proceeding with work.
-
Click hereGeneral>INTRODUCTION>REPAIR INSTRUCTION>PRECAUTION
2.DISCONNECT CABLE FROM NEGATIVE BATTERY TERMINAL
for 8NR-FTS:
for 3ZR-FAE:
67498
3.REMOVE REAR DOOR REAR FRAME BRACKET
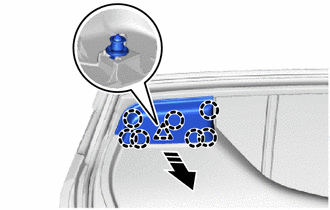

|
Remove in this Direction |
Disengage the claws and clip to remove the rear door rear frame bracket as shown in the illustration.
69284D
4.REMOVE REAR DOOR INSIDE HANDLE BEZEL PLUG
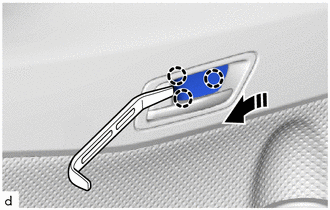
|
|
Remove in this Direction |
Using a moulding remover A, disengage the claws to remove the rear door inside handle bezel plug as shown in the illustration.
84810D
5.REMOVE REAR POWER WINDOW REGULATOR SWITCH ASSEMBLY WITH REAR DOOR ARMREST BASE UPPER PANEL
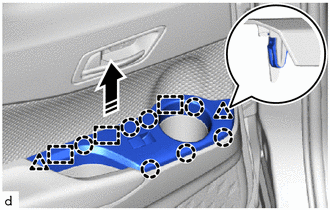
|
|
Remove in this Direction |
Disengage the claws, clips and guides as shown in the illustration.
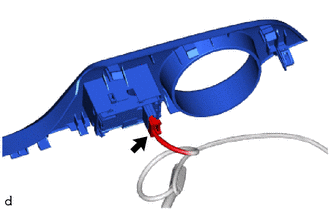
Disconnect the connector to remove the rear power window regulator switch assembly with rear door armrest base upper panel.
67604
6.REMOVE REAR DOOR TRIM BOARD SUB-ASSEMBLY
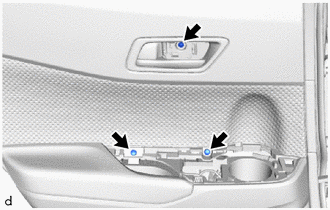
Remove the 3 screws.
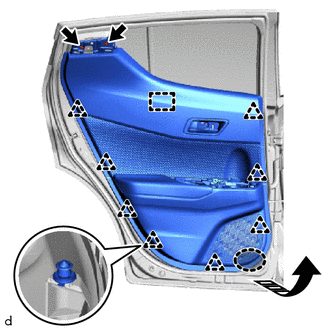

|
Place Hands Here |
|
|
Remove in this Direction |
Remove the 2 screws.
Disengage the clips and guide as shown in the illustration.
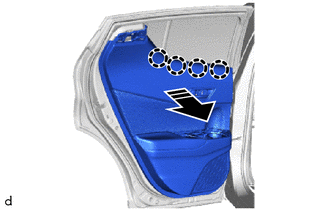
|
|
Remove in this Direction |
Disengage the claws as shown in the illustration.
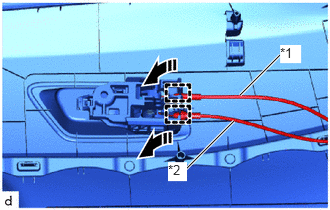
| *1 | Rear Door Inside Locking Cable Assembly |
| *2 | Rear Door Lock Remote Control Cable Assembly |
|
|
Remove in this Direction |
Disengage the guides to disconnect the rear door inside locking cable assembly and rear door lock remote control cable assembly to remove the rear door trim board sub-assembly as shown in the illustration.
69206C
7.REMOVE REAR DOOR INSIDE HANDLE SUB-ASSEMBLY
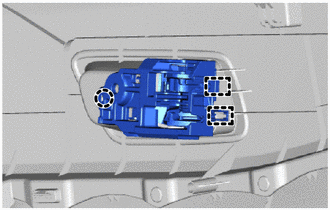
Disengage the claw and guides to remove the front door inside handle sub-assembly.
68199
8.REMOVE REAR DOOR BELT REAR SEAL
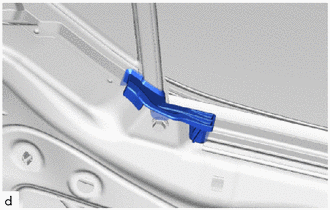
Remove the rear door belt rear seal.
68174A
9.REMOVE REAR DOOR GLASS INNER WEATHERSTRIP
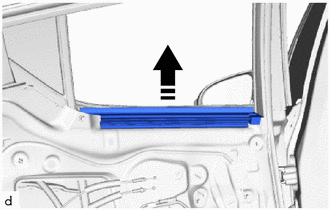
|
|
Remove in this Direction |
Remove the rear door glass inner weatherstrip with the rear door belt seal as shown in the illustration.
68197
10.REMOVE REAR DOOR BELT SEAL
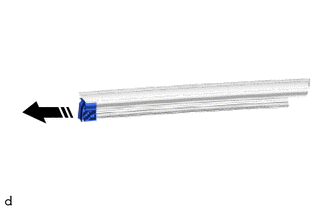
|
|
Remove in this Direction |
Remove the rear door belt seal from the rear door glass inner weatherstrip as shown in the illustration.
11.REMOVE HOLE PLUG
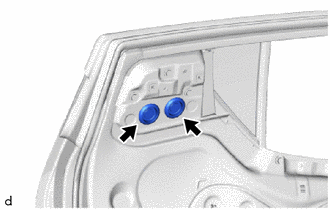
Remove the 2 hole plugs.
67676C
12.REMOVE NO. 2 REAR DOOR FRAME GARNISH
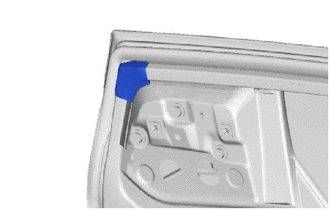
Remove the No. 2 rear door frame garnish.
67628
13.REMOVE REAR DOOR TRIM BRACKET
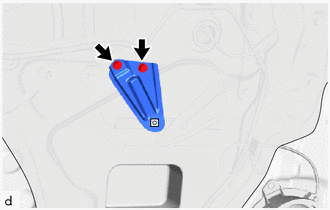
Remove the 2 screws and rear door trim bracket.
67842E
14.REMOVE REAR DOOR SERVICE HOLE COVER
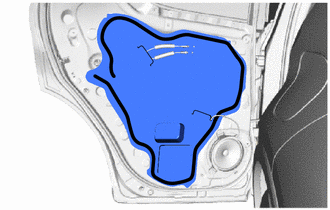

|
Butyl Tape |
Remove the rear door service hole cover.
- HINT:
-
Remove any remaining butyl tape from the rear door panel.
68640A
15.REMOVE REAR DOOR CHECK ASSEMBLY
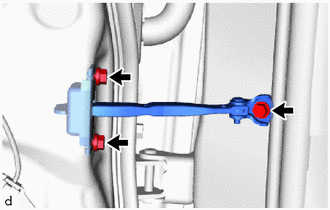
Remove the 3 bolts and rear door check assembly.
67868D
16.REMOVE REAR DOOR WEATHERSTRIP
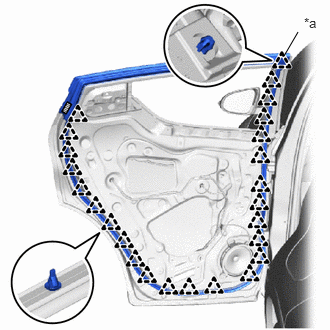
| *a | Clip (A) |

|
Double-sided Tape |
Using a clip remover, disengage the clip (A) and other clips.
Remove the double-sided tape and rear door weatherstrip.
- NOTICE:
-
Remove any remaining double-sided tape from the rear door panel.
67408F
17.REMOVE REAR DOOR WINDOW REAR LOWER FRAME SUB-ASSEMBLY
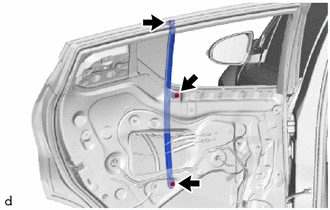
Remove the screw and 2 bolts.
Remove the rear door window rear lower frame sub-assembly from the rear door glass run.
68104
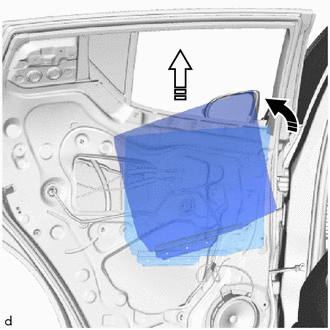
18.REMOVE REAR DOOR GLASS SUB-ASSEMBLY
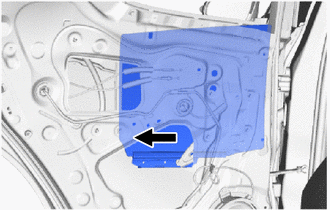
Disengage the rear door glass sub-assembly from the rear door window regulator sub-assembly as shown in the illustration.
- NOTICE:
-
After separating the rear door glass sub-assembly, do not allow it to fall.
|
|
Remove in this Direction (1) |

|
Remove in this Direction (2) |
Remove the rear door glass sub-assembly as shown in the illustration.
- NOTICE:
-
Do not damage the rear door glass sub-assembly.
69906B
19.REMOVE REAR DOOR GLASS CHANNEL SUB-ASSEMBLY (for LED Type Turn Signal Light)
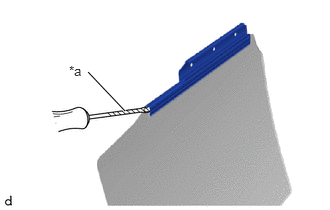
| *a | Protective Tape |
Using a screwdriver with its tip wrapped in protective tape, remove the rear door glass channel sub-assembly.
69975A
20.REMOVE REAR DOOR GLASS CHANNEL FILLER (for LED Type Turn Signal Light)
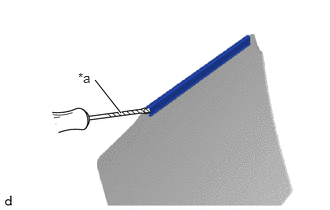
| *a | Protective Tape |
Using a screwdriver with its tip wrapped in protective tape, remove the rear door glass channel filler from the rear door glass sub-assembly.
67674A
21.REMOVE REAR DOOR FRAME GARNISH
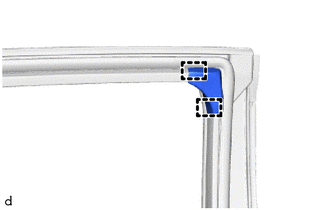
Disengage the guides to remove the rear door frame garnish.
68152C
22.REMOVE REAR DOOR GLASS RUN
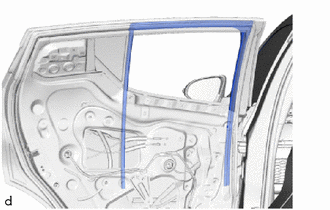
Remove the rear door glass run.
23.REMOVE REAR DOOR WINDOW REGULATOR SUB-ASSEMBLY
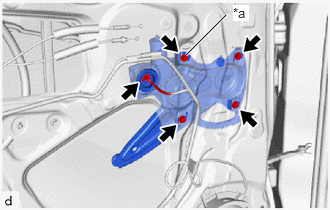
| *a | Temporary Bolt |
Disconnect the connector.
Loosen the temporary bolt.
- NOTICE:
-
Do not remove the temporary bolt. If the temporary bolt is removed, the rear door window regulator sub-assembly may fall and cause damage.
Remove the 3 bolts and rear door window regulator sub-assembly.
Remove the temporary bolt from the rear door window regulator sub-assembly.
68124B
24.REMOVE REAR DOOR QUARTER WINDOW GLASS
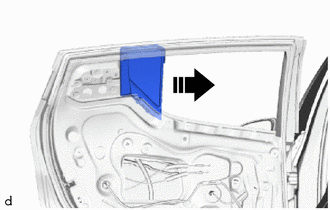
|
|
Remove in this Direction |
Remove the rear door quarter window glass with rear door quarter window weatherstrip as shown in the illustration.
68189
25.REMOVE REAR DOOR QUARTER WINDOW WEATHERSTRIP
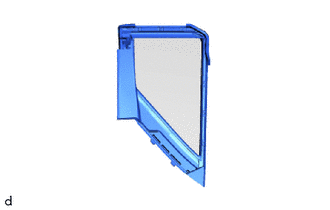
Remove the rear door quarter window weatherstrip from the rear door quarter window glass.
75740
26.REMOVE REAR DOOR BELT MOULDING ASSEMBLY
69240
27.REMOVE REAR DOOR OUTSIDE HANDLE ASSEMBLY
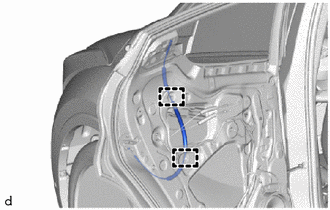
Disconnect the No. 1 rear door lock remote control cable assembly from the clamps.
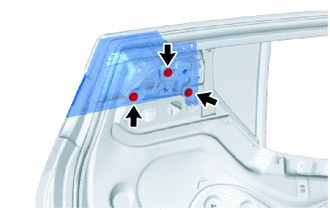
Remove the 3 bolts.
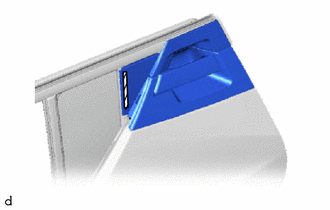
|
|
Double-sided Tape |
Peel back the double-sided tape.
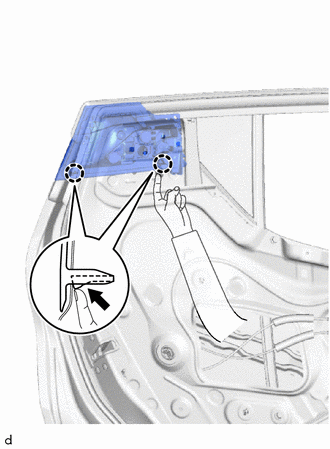

|
Push |
Disengage the claws from the rear door service hole as shown in the illustration to separate the rear door outside handle assembly together with the rear door outside handle cover as a single unit.
- CAUTION:
-
Be careful not to cut your hands or fingers on the edge of the rear door panel.
- HINT:
-
If your hands cannot fit, use a tool such as a screwdriver with its tip wrapped in protective tape to disengage the claws.
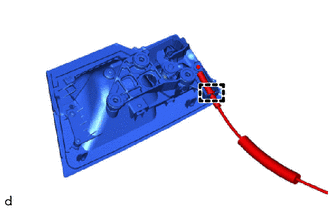
Disengage the guide to disconnect the No. 1 rear door lock remote control cable assembly to remove the rear door outside handle assembly with the rear door outside handle cover.
- NOTICE:
-
Remove any remaining double-sided tape from the rear door panel.
69227L
28.REMOVE REAR DOOR OUTSIDE HANDLE COVER
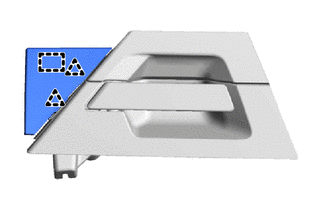
Disengage the clips and guide to remove the rear door outside handle cover.
69229A
29.REMOVE NO. 3 DOOR OUTSIDE HANDLE CAP
|
|
Remove in this Direction |
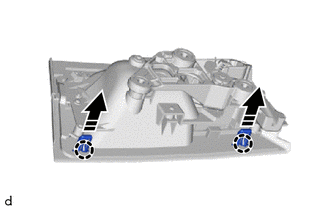
Disengage the claws to remove the 2 No. 3 door outside handle caps.
69060A
30.REMOVE REAR DOOR LOCK WITH MOTOR ASSEMBLY
67837C
31.REMOVE REAR DOOR DUST PROOF SEAL (for TMMT Made)
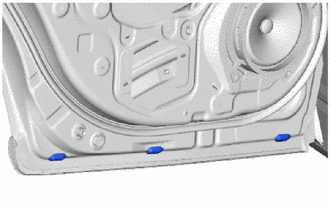
Remove the 3 rear door dust proof seals.
67837C
32.REMOVE REAR DOOR DUST PROOF SEAL (for TMC Made)
for Type A:
Remove the 3 rear door dust proof seals.
- NOTICE:
-
When installing, install 2 dust proof seals in the same way as for type B.
for Type B:
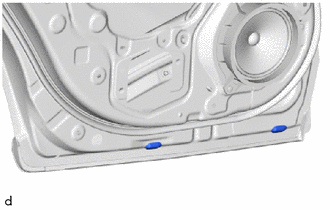
Remove the 2 rear door dust proof seals.
86160B
33.REMOVE REAR SPEAKER ASSEMBLY
67003C
34.REMOVE REAR DOOR PANEL CUSHION
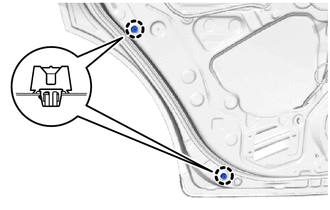
Disengage the claws to remove the 2 rear door panel cushions.
75076
35.REMOVE REAR DOOR OUTSIDE MOULDING SUB-ASSEMBLY
75742
36.REMOVE REAR DOOR OUTSIDE MOULDING
75764A
37.REMOVE REAR DOOR UPPER WINDOW FRAME MOULDING
75766A
38.REMOVE REAR DOOR REAR WINDOW FRAME MOULDING
75978H
39.REMOVE REAR DOOR LOWER OUTSIDE STRIPE (w/ Stripe Tape)
75988E
40.REMOVE REAR DOOR OUTSIDE STRIPE (w/ Stripe Tape)