Front Passenger Side Seat Belt Warning Light Malfunction
Circuit diagnosis · Vehicles built from Jun 2009
Versions by build date: Jun 2006 – Sep 2006 Oct 2006 – May 2009 from Jun 2009
DESCRIPTION
- When the passenger seat belt is not fastened with the ignition switch on (IG) and the passenger seat occupied, check that the passenger seat belt warning light on the clock display blinks. The occupant detection sensor detects if the passenger seat is occupied and sends signals to the combination meter assembly. The inner belt detects the passenger seat belt condition and sends signals to the combination meter assembly. After receiving both signals from the occupant detection sensor and inner belt, the combination meter assembly sends signals to the clock assembly to request the passenger seat belt warning light to blink or go off.
- When the passenger seat belt is not fastened with the ignition switch on (IG) and the passenger seat occupied, check that the seat belt warning light on the combination meter assembly blinks. The occupant detection sensor detects if the passenger seat is occupied and sends signals to the combination meter assembly. The inner belt detects the passenger seat belt condition and sends signals to the combination meter assembly. If receiving the signals from the occupant detection sensor and inner belt, the seat belt warning light blinks or goes off.
- HINT:
- The driver seat belt warning light and front passenger seat belt warning light are the same indicator light.
WIRING DIAGRAM
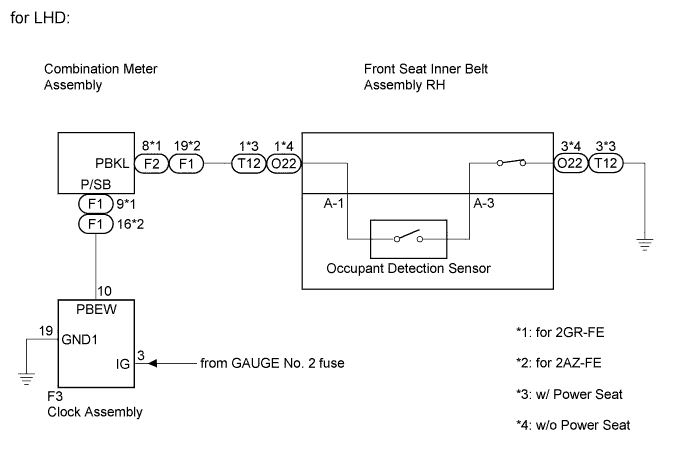

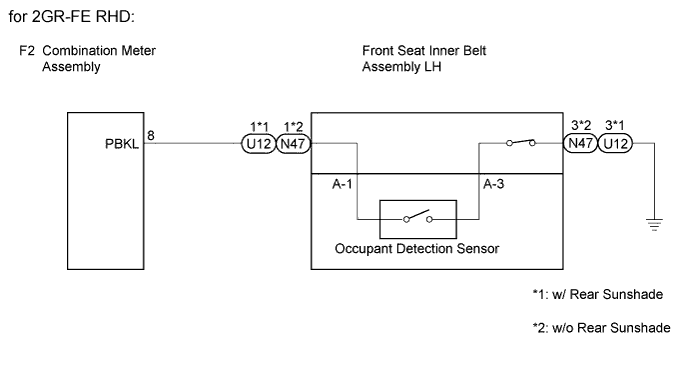
INSPECTION PROCEDURE
| 1. CHECK VEHICLE SPECIFICATION |

Check the specification of the vehicle.
Result Result
Proceed to
LHD
A
RHD
B
|
|
||||

| A | |
 |
| 2. PERFORM ACTIVE TEST USING INTELLIGENT TESTER |
Connect the intelligent tester to the DLC3.
Turn the ignition switch on (IG).
Turn the intelligent tester main switch on.
Select the item below in the Active Test and then check that the indicator operates.
METER Tester Display
Test Part
Control Range
Diagnostic Note
P-BELT REMIND
P-SEAT BELT indicator light
OFF/ON
-
- OK:
- The front passenger side seat belt warning light on the clock assembly turns on or goes off in accordance with the tester operation.
|
|
||||
| OK | |
|
| 3. CHECK HARNESS AND CONNECTOR (COMBINATION METER - FRONT SEAT INNER BELT ASSEMBLY RH) |
for 2GR-FE
Disconnect the F2 combination meter assembly and O22*1 or T12*2 front seat inner belt assembly connectors.
Measure the resistance according to the value(s) in the table below.
- Standard resistance:
Tester Connection
Condition
Specified Condition
F2-8 (PBKL) - O22-1*1
Always
Below 1 Ω
F2-8 (PBKL) - T12-1*2
Always
Below 1 Ω
O22-3*1 - Body ground
Always
Below 1 Ω
T12-3*2 - Body ground
Always
Below 1 Ω
F2-8 (PBKL) - Body ground
Always
10 kΩ or higher
- HINT:
- *1: w/o Power Seat
- *2: w/ Power Seat
- *1: w/o Power Seat
for 2AZ-FE
Disconnect the F1 combination meter assembly and O22 front seat inner belt assembly connectors.
Measure the resistance according to the value(s) in the table below.
- Standard resistance:
Tester Connection
Condition
Specified Condition
F1-19 (PBKL) - O22-1
Always
Below 1 Ω
O22-3 - Body ground
Always
Below 1 Ω
F1-19 (PBKL) - Body ground
Always
10 kΩ or higher
|
|
||||

| OK | |
|
| 4. INSPECT SEPARATE TYPE FRONT SEAT CUSHION COVER (OCCUPANT DETECTION SENSOR) |
Remove the separate type front seat cushion cover (Occupant detection sensor) (Click here)*1 or (Click here)*2.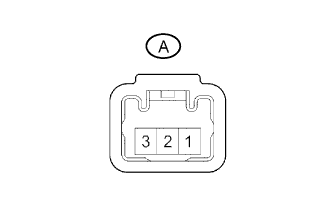
Measure the resistance according to the value(s) in the table below.
- Standard resistance:
Tester Connection
Condition
Specified Condition
A-1 - A-3
The passenger seat is occupied
Below 100 Ω
A-1 - A-3
The passenger seat is not occupied
Below 1 MΩ
- HINT:
- *1: w/o Power Seat
- *2: for 2GR-FE with Power Seat
- *1: w/o Power Seat
Result Result
Proceed to
OK
A
NG (w/o Power Seat)
B
NG (w/ Power Seat)
C
|
|
||||
|
|
||||
| A | |
|
| 5. INSPECT FRONT SEAT INNER BELT ASSEMBLY RH |
For 2GR-FE with Power Seat:
Remove the front seat inner belt assembly RH (Click here).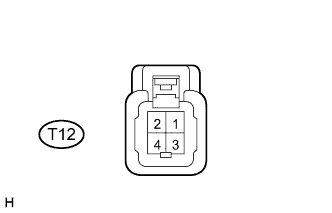
Measure the resistance according to the value(s) in the table below.
- Standard resistance:
Tester Connection
Condition
Specified Condition
T12-1 - T12-3
The passenger seat is occupied, with the seat belt fastened
Below 1 Ω
T12-1 - T12-3
The passenger seat is occupied, with the seat belt unfastened
10 kΩ or higher
w/o Power Seat:
Remove the front seat inner belt assembly RH (Click here)*1 or (Click here)*2.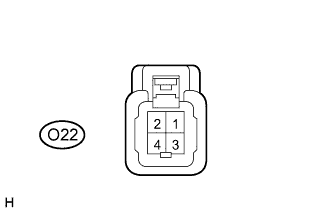
Measure the resistance according to the value(s) in the table below.
- Standard resistance:
Tester Connection
Condition
Specified Condition
O22-1 - O22-3
The passenger seat is occupied, with the seat belt fastened
Below 1 Ω
O22-1 - O22-3
The passenger seat is occupied, with the seat belt unfastened
10 kΩ or higher
- HINT:
- *1: for 2GR-FE
- *2: for 2AZ-FE
- *1: for 2GR-FE
Result Result
Proceed to
OK
A
NG (for 2GR-FE)
B
NG (for 2AZ-FE)
C
|
|
||||
|
|
||||
| A | ||
 |
||
| ||
| 6. CHECK HARNESS AND CONNECTOR (CLOCK ASSEMBLY - BATTERY) |
Disconnect the F3 clock assembly connector.
Measure the voltage according to the value(s) in the table below.
- Standard voltage:
Tester Connection
Condition
Specified Condition
F3-3 (IG) - Body ground
Ignition switch on (IG)
11 to 14 V
|
|
||||
| OK | |
|
| 7. CHECK HARNESS AND CONNECTOR (CLOCK ASSEMBLY - BODY GROUND) |
Measure the resistance according to the value(s) in the table below.
- Standard resistance:
Tester Connection
Condition
Specified Condition
F3-19 (GND1) - Body ground
Always
Below 1 Ω
|
|
||||
| OK | |
|
| 8. INSPECT CLOCK ASSEMBLY (PASSENGER SEAT BELT WARNING LIGHT) |
Remove the clock assembly (Click here).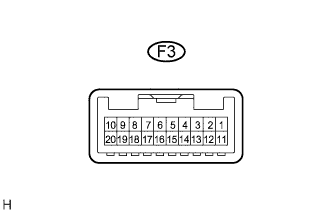
Apply battery voltage to the connector according to the table below.
- Standard condition:
Condition
Specified Condition
Battery positive (+) → Terminal F3-3 (IG)
Battery negative (-) → Terminal F3-10 (PBEW), 19 (GND1)
Comes on (Seat belt warning light)
|
|
||||
| OK | |
|
| 9. CHECK HARNESS AND CONNECTOR (CLOCK ASSEMBLY - COMBINATION METER ASSEMBLY) |
Disconnect the F3 clock assembly and F1 combination meter assembly connectors.
Measure the resistance according to the value(s) in the table below.
- Standard resistance:
Tester Connection
Condition
Specified Condition
F3-10 (PBEW) - F1-16 (P/SB)*1
Always
Below 1 Ω
F3-10 (PBEW) - F1-9 (P/SB)*2
Always
Below 1 Ω
F1-16 (P/SB)*1 - Body ground
Always
10 kΩ or higher
F1-9 (P/SB)*2 - Body ground
Always
10 kΩ or higher
- HINT:
- *1: for 2AZ-FE
- *2: for 2GR-FE
- *1: for 2AZ-FE
|
|
||||
| OK | ||
|
||
| ||
| 10. CHECK HARNESS AND CONNECTOR (COMBINATION METER - FRONT SEAT INNER BELT ASSEMBLY LH) |
Disconnect the F2 combination meter assembly and U12*1 or N47*2 front seat inner belt assembly connectors.
Measure the resistance according to the value(s) in the table below.
- Standard resistance:
Tester Connection
Condition
Specified Condition
F2-8 (PBKL) - U12-1*1
Always
Below 1 Ω
F2-8 (PBKL) - N47-1*2
Always
Below 1 Ω
U12-3*1 - Body ground
Always
Below 1 Ω
N47-3*2 - Body ground
Always
Below 1 Ω
F2-8 (PBKL) - Body ground
Always
10 kΩ or higher
- HINT:
- *1: w/ Rear Sunshade
- *2: w/o Rear Sunshade
- *1: w/ Rear Sunshade
|
|
||||
| OK | |
|
| 11. INSPECT SEPARATE TYPE FRONT SEAT CUSHION COVER (OCCUPANT DETECTION SENSOR) |
Remove the separate type front seat cushion cover (Occupant detection sensor) (Click here)*1 or (Click here)*2.
Measure the resistance according to the value(s) in the table below.
- Standard resistance:
Tester Connection
Condition
Specified Condition
A-1 - A-3
The passenger seat is occupied
Below 100 Ω
A-1 - A-3
The passenger seat is not occupied
Below 1 MΩ
- HINT:
- *1: w/o Power Seat
- *2: for 2GR-FE with Power Seat
- *1: w/o Power Seat
Result Result
Proceed to
OK
A
NG (w/o Power Seat)
B
NG (w/ Power Seat)
C
|
|
||||
|
|
||||
| A | |
|
| 12. INSPECT FRONT SEAT INNER BELT ASSEMBLY LH |
Remove the front seat inner belt assembly LH (Click here).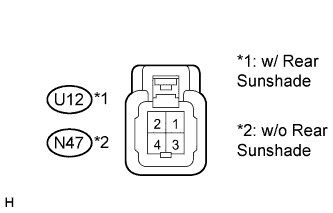
Measure the resistance according to the value(s) in the table below.
- Standard resistance:
Tester Connection
Condition
Specified Condition
U12-1 - U12-3*1
The passenger seat is occupied, with the seat belt fastened
Below 1 Ω
N47-1 - N47-3*2
The passenger seat is occupied, with the seat belt fastened
Below 1 Ω
U12-1 - U12-3*1
The passenger seat is occupied, with the seat belt unfastened
10 kΩ or higher
N47-1 - N47-3*2
The passenger seat is occupied, with the seat belt unfastened
10 kΩ or higher
- HINT:
- *1: w/ Rear Sunshade
- *2: w/o Rear Sunshade
- *1: w/ Rear Sunshade
|
|
||||
| OK | ||
|
||
| ||