Supercharger System
Supercharger
PARTS LOCATION
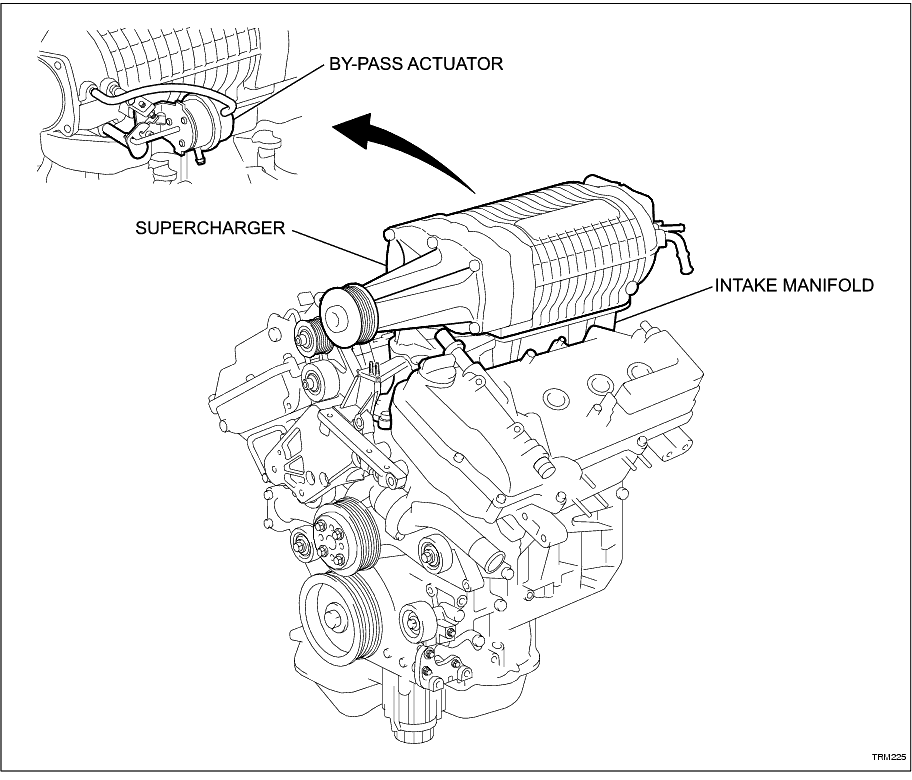
HOW TO PROCEED WITH TROUBLESHOOTING
HINT:
Use the following table to assist in diagnosing problems with the supercharger system.
1
.
VEHICLE BROUGHT TO WORKSHOP
NEXT

2
.
CUSTOMER PROBLEM ANALYSIS
HINT:
Discuss the nature of the problem with the customer:
• Determine when the problem occurs and under what conditions, e.g. temperature, vehicle conditions, load, etc.
NOTICE:
Atmospheric conditions such as high temperature may have a significant effect on engine performance
• If required, test drive the vehicle with the customer.
• Ask what type of fuel has been used. The engine is designed to run on 98RON premium unleaded only. Check a sample if required.
NEXT
3
.
PERFORM VISUAL INSPECTION
HINT:
Inspect the following:
• Air cleaner element and hoses.
• Vacuum hose condition and correct fitment.
• V-ribbed belt condition and tension.
NEXT
4
.
INSPECT SFI SYSTEM
HINT:
Connect the intelligent tester to the DLC3 and check for DTCs. (
Click Here
)
NEXT
5
.
INSPECT IGNITION SYSTEM
HINT:
Check the ignition coils and spark plugs. (
Click Here
)
NEXT
6
.
INSPECT INTAKE SYSTEM
HINT:
• Inspect the intake system for air leaks.
• Ensure the IAC valve is fully open at all times while the ignition is on.
NEXT
7
.
INSPECT ENGINE
HINT:
Check mechanical condition of the engine. (
Click Here
)
NEXT
8
.
PERFORM SUPERCHARGER VISUAL / AURAL INSPECTION
HINT:
Inspect the supercharger for oil leakage and abnormal noises. (
Click Here
)
• A small amount of oil staining is normal.
• A whirring sound from the supercharger at idle is normal. A hand placed upon the rotor housing may accentuate the sound.
NEXT
9
.
INSPECT SUPERCHARGER BY-PASS ACTUATOR
HINT:
Inspect the supercharger by-pass actuator operation. (
Click Here
)
NEXT
10
.
PERFORM POWER DOWN TEST
HINT:
Perform the power down test to determine supercharger boost. (
Click Here
)
NEXT
END
ON-VEHICLE INSPECTION
1. INSPECT SUPERCHARGER
(a) Inspect for oil leakage.
HINT:
A small amount of oil staining is normal.
-
(c) Listen for abnormal noise with engine running at idle.
-
(d) Remove the V-ribbed belt from the supercharger pulley. (
Click Here
)
HINT:
Temporarily loosen the tensioner and remove the belt from the supercharger pulley only. Ensure the belt has not dislodged from any pulleys when reinstalling.
-
(e) Inspect the pulley for free rotation.
-
2. INSPECT BY-PASS ACTUATOR
(a) Inspect the by-pass actuator vacuum hose installation and condition.
-
(b) Check by-pass actuator movement.
(1) With the engine not running, check the actuator lever is against the stop bolt.
NOTICE:
Do not adjust the stop bolt. If the actuator lever is not set correctly, adjust the by following the correct procedure. (
Click Here
)
(2) Move the actuator lever by hand and check it moves smoothly.
-
3. POWER DOWN TEST
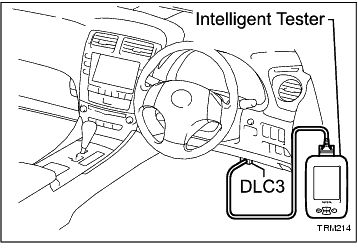
(a) Turn the ignition switch off.
-
(b) Connect the intelligent tester to the DLC3.
-
(c) Turn the ignition on (IG) and the tester on.
-
(d) On the tester, select the following:
1. ‘Auto’
2. ‘Vehicle’: Camry 0605-/TMCA product
3. ‘Vehicle’: W/O memory seat
4. ‘Vehicle’: Others
The tester will auto detect the vehicle.
-
(e) On the tester, select the following:
1. ‘Powertrain’ from the drop-down menu
2. ‘Engine’
The tester will auto detect the engine.
-
(f) On the tester, press ‘Data List’.
-
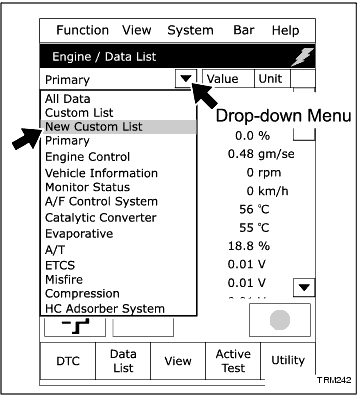
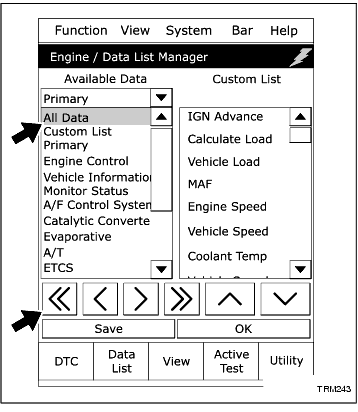
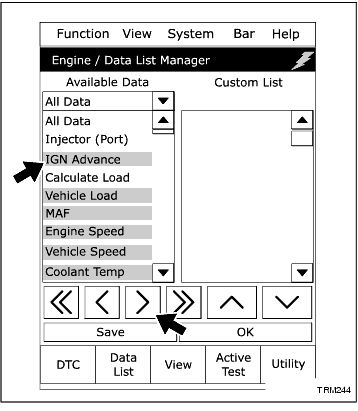
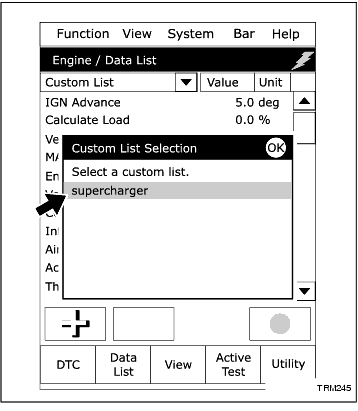
(g) Create a Custom List.
HINT:
The Custom List will enable vehicle data recorded during the acceleration test to be efficiently downloaded and reviewed.
(1) Select ‘New Custom List’ from the drop-down menu.
(2) Select ‘All Data’ from the drop-down menu.
(3) Press ‘<<’ to clear the right-hand screen.
(4) On the left-hand screen, select the following items, scrolling down the list as required:
• ‘IGN Advance’
Ignition timing measured in degrees before top dead centre (?BTDC).
• ‘Vehicle Load’
Measured MAF divided by a theoretical MAF calculated at an international standard temperature/density. This is expressed as a percentage (%), e.g. actual airflow divided by potential airflow.
• ‘MAF’
Actual air volume entering the engine measured in grams per second (gm/sec).
• ‘Engine Speed’
Number of revolutions of the crankshaft measured per minute (rpm).
• ‘Vehicle Speed’
Current vehicle speed measured in kilometres per hour (km/h).
• ‘Coolant Temp’
Temperature of the engine coolant measured in degrees celsius (?C).
• ‘Intake Air’
Temperature of the air entering the engine measured in degrees celsius (?C).
• ‘Air-Fuel Ratio’
Ratio of air to fuel measured as a number; 1 being optimal.
• ‘Throttle Position’
Angle of the throttle plate measured in degrees (?).
• ‘AFS B1 S1’
Bank 1 pre-catalytic converter air-flow sensor output measured as voltage (V).
• ‘AFS B2 S1’
Bank 2 pre-catalytic converter air-flow sensor output measured as voltage (V).
• ‘Atmosphere Press’
Atmospheric pressure measured in kilopascals (kPa).
Press ‘>’ to move the selected items to the right-hand screen.
(5) Press ‘Save’.
(6) Enter a name for the List (e.g. supercharger) and press ‘Save’, then OK.
(7) Select ‘Custom List’ from the drop-down menu.
(8) Select the saved List and press OK.
-
(h) Start the engine and warm it up to normal operating temperature.
-
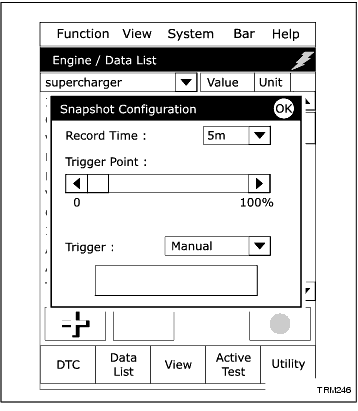
(i) Commence Snapshot Record.
(1) Select: Function / Snapshot Configuration and set the following:
• Record Time = 5m
• Trigger point = 0
• Trigger = Manual
(2) Press OK.
-
(j) Perform acceleration test.
CAUTION:
• Perform this test in a safe location with ample room and away from other vehicles and pedestrians.
• Do not exceed the speed limit.
NOTICE:
The test area surface is to be dry and sealed.
(1) Press ‘Record’ on the tester.
(2) Move the transmission selector to Drive.
(3) Accelerate the vehicle from standing start, gradually increasing the throttle opening to full-open at approximately 3000 rpm.Continue accelerating with full-open throttle until 6000 rpm.
NOTICE:
• Ensure the VSC does not become active during the test.
• The test range does not commence until 3600 rpm as traction may be broken if full throttle is applied from low speed.
(4) Repeat the test several times while continuing to record the data.
(5) Stop the recording when the last test is completed. The snapshot recording will be saved for later analysis.
-
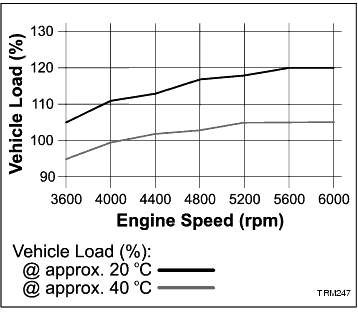
(k) Review the data.
(1) Select: Function / Snapshot Review.
(2) Select the saved snapshot recording and while it plays back, pause at the appropriate engine speeds.
-
MAINTENANCE
1. INSPECT SUPERCHARGER OIL LEVEL
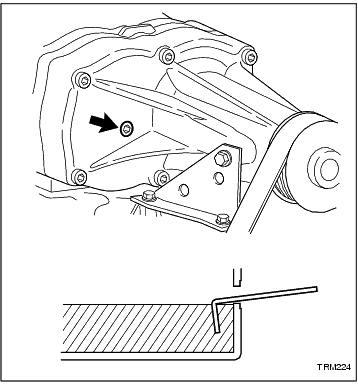
(a) Park the vehicle on a level surface.
-
(b) Remove the oil fill plug.
HINT:
A small amount of oil may drain from the opening.
-
(c) Insert an Allen key or similar into the opening.
-
(d) Inspect the oil level.
HINT:
If the oil level is low, inspect the supercharger for leakage before adding oil.
Standard:
Level with opening
-
2. ADD SUPERCHARGER OIL
(a) Remove the oil fill plug.
-
(b) Add the specified oil to the correct level.
Oil:
Eaton supercharger gearcase oil
-