Ultrasonic Sensor (front Side)
Park Assist / Monitoring
COMPONENTS
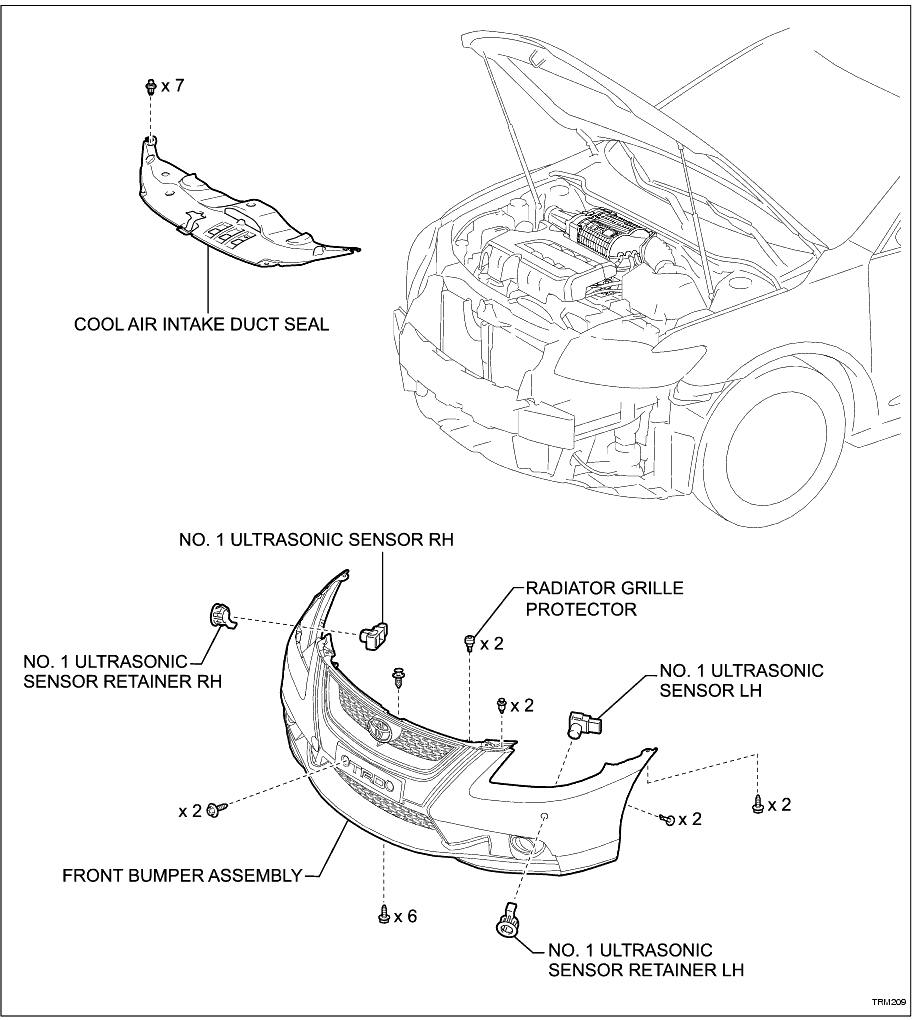
REMOVAL
1. REMOVE COOL AIR INTAKE DUCT SEAL (
Click Here
)
2. REMOVE FRONT BUMPER ASSEMBLY (
Click Here
)
3. REMOVE NO. 1 ULTRASONIC SENSOR
(a) Disconnect the sensor connector.
-
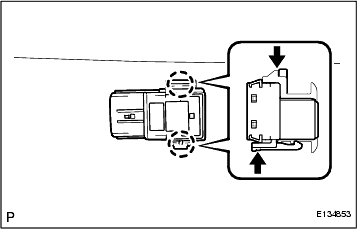
(b) While pushing down on the lever with a finger to release the claw, disengage the claw on the other side to remove the No. 1 ultrasonic sensor.
HINT:
The type of the claw on the top and bottom of the sensor are different. Observe the claws carefully before attempting to remove the sensor.
-
4. REMOVE NO. 1 ULTRASONIC SENSOR RETAINER
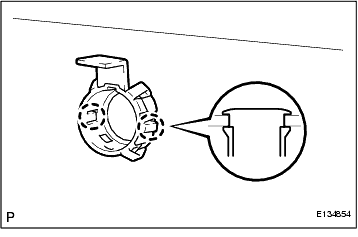
(a) Disengage the 2 claws and remove the No. 1 ultrasonic sensor retainer from the front bumper.
-
INSTALLATION
1. INSTALL NO. 1 ULTRASONIC SENSOR RETAINER
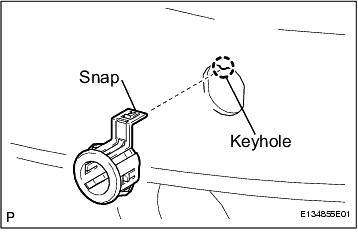
(a) Install the No. 1 ultrasonic sensor retainer to the front bumper.
NOTICE:
Do not damage the bumper with the snap when installing the retainer.
HINT:
When installing the retainer, align the keyhole and snap as shown in the illustration.
-
2. INSTALL NO. 1 ULTRASONIC SENSOR
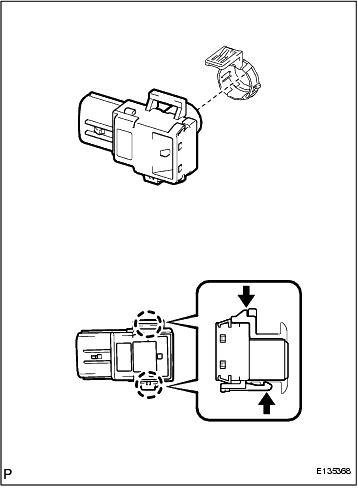
(a) Engage the 2 claws and install the No. 1 ultrasonic sensor.
-
(b) Connect the sensor connector.
-
3. INSTALL FRONT BUMPER ASSEMBLY (
Click Here
)
4. INSTALL COOL AIR INTAKE DUCT SEAL (
Click Here
)
5. VEHICLE PREPARATION FOR FOG LIGHT AIM ADJUSTMENT (
Click Here
)
6. PREPARATION FOR FOG LIGHT AIMING (
Click Here
)
7. FOG LIGHT AIMING INSPECTION (
Click Here
)
8. FOG LIGHT AIMING ADJUSTMENT (
Click Here
)
COMPONENTS
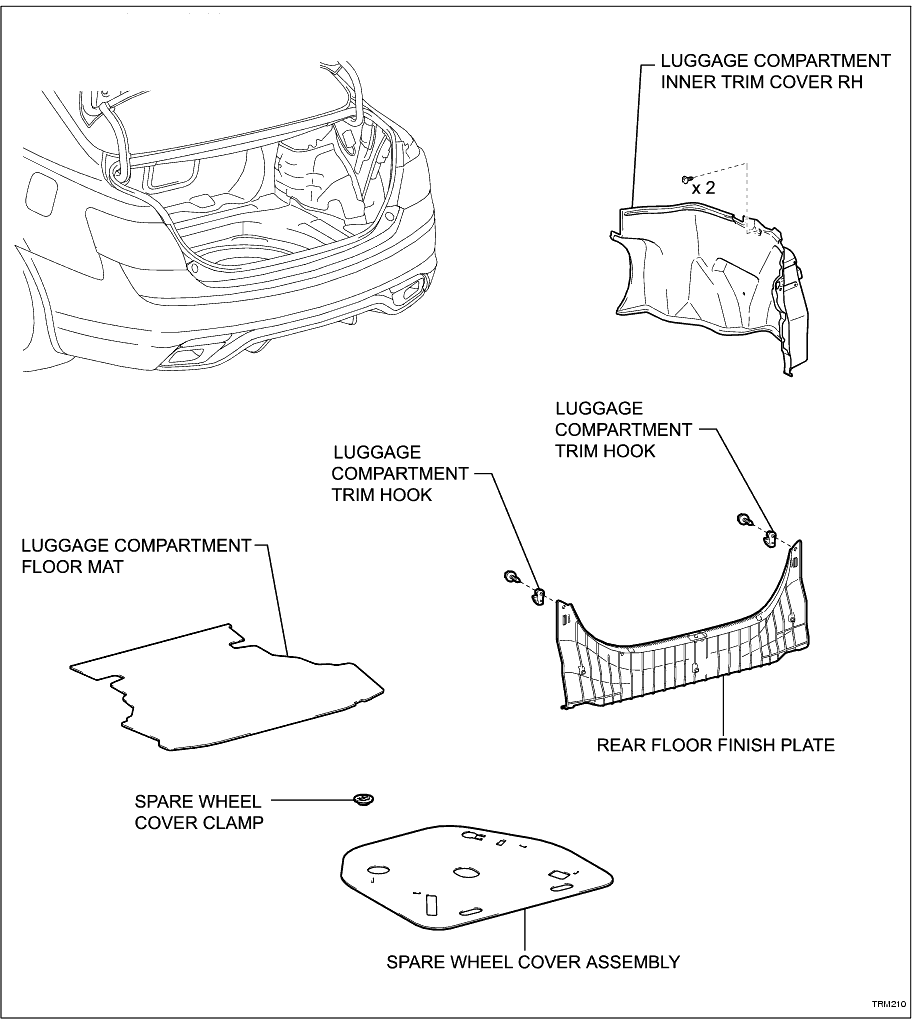
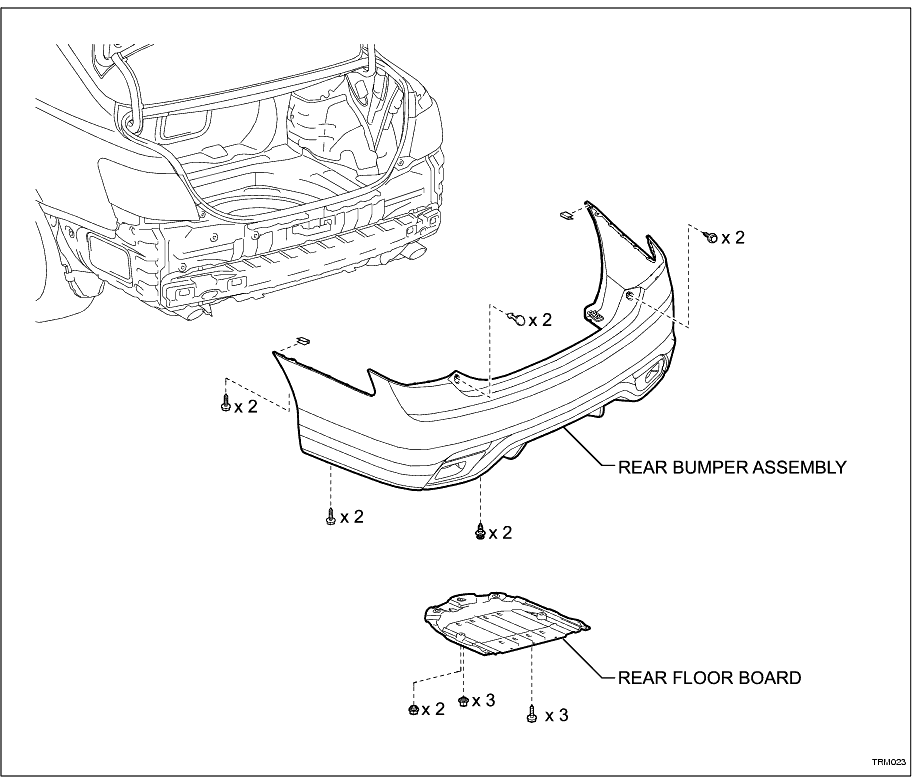
REMOVAL
1. REMOVE LUGGAGE COMPARTMENT FLOOR MAT
2. REMOVE SPARE WHEEL COVER CLAMP
3. REMOVE SPARE WHEEL COVER ASSEMBLY
4. REMOVE LUGGAGE COMPARTMENT TRIM HOOK (
Click Here
)
5. REMOVE REAR FLOOR FINISH PLATE (
Click Here
)
6. REMOVE LUGGAGE COMPARTMENT INNER TRIM COVER RH (
Click Here
)
7. REMOVE REAR FLOOR BOARD (
Click Here
)
8. REMOVE REAR BUMPER ASSEMBLY (
Click Here
)
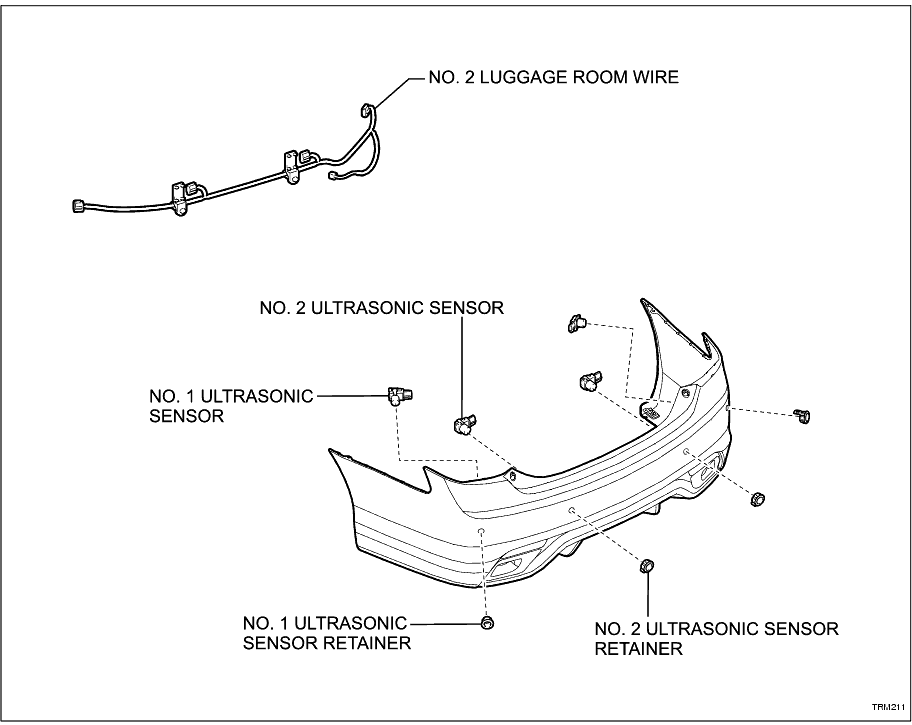
9. REMOVE NO. 2 ULTRASONIC SENSOR
(a) Disconnect the sensor connector.
-
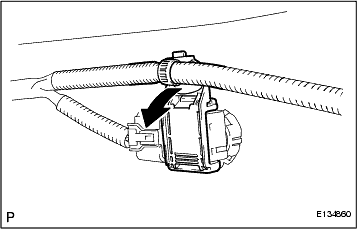
(b) Remove the sensor retainer as shown in the illustration.
-
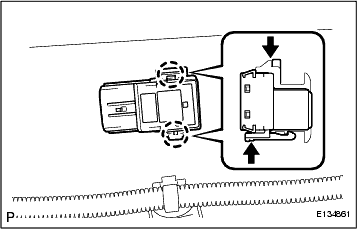
(c) While pushing down on the lever with a finger to release the claw, disengage the claw on the other side to remove the No. 2 ultrasonic sensor.
HINT:
The type of the claw on the top and bottom of the sensor are different. Observe the claws carefully before attempting to remove the sensor.
-
10. REMOVE NO. 2 ULTRASONIC SENSOR RETAINER
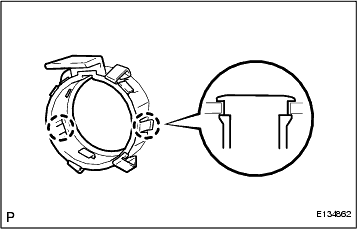
(a) Disengage the 2 claws and remove the No. 2 ultrasonic sensor retainer from the rear bumper.
-
11. REMOVE NO. 1 ULTRASONIC SENSOR
(a) Disconnect the sensor connector.
-
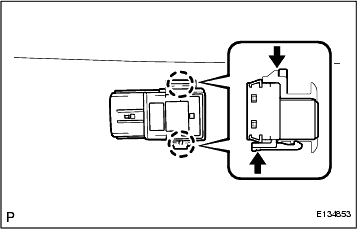
(b) While pushing down on the lever with a finger to release the claw, disengage the claw on the other side to remove the No. 1 ultrasonic sensor.
HINT:
The type of the claw on the top and bottom of the sensor are different. Observe the claws carefully before attempting to remove the sensor.
-
12. REMOVE NO. 1 ULTRASONIC SENSOR RETAINER
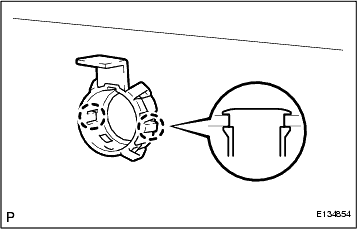
(a) Disengage the 2 claws and remove the No. 1 ultrasonic sensor retainer from the rear bumper.
-
INSTALLATION
1. INSTALL NO. 1 ULTRASONIC SENSOR RETAINER
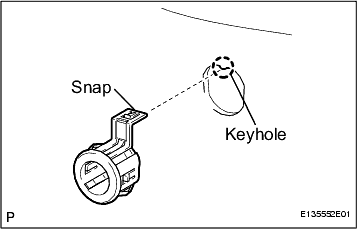
(a) Install the No. 1 ultrasonic sensor retainer to the rear bumper.
NOTICE:
Do not damage the bumper with the snap when installing the retainer.
HINT:
When installing the retainer, align the keyhole and snap as shown in the illustration.
-
2. INSTALL NO. 1 ULTRASONIC SENSOR
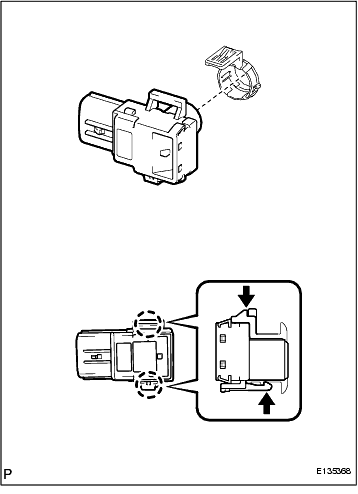
(a) Engage the 2 claws and install the No. 1 ultrasonic sensor.
-
(b) Connect the sensor connector.
-
3. INSTALL NO. 2 ULTRASONIC SENSOR RETAINER
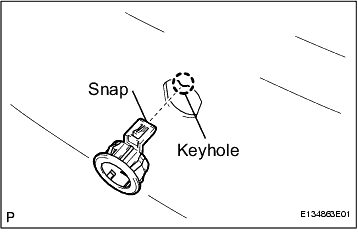
(a) Install the No. 2 ultrasonic sensor retainer to the rear bumper.
NOTICE:
Do not damage the bumper with the snap when installing the retainer.
HINT:
When installing the retainer, align the keyhole and snap as shown in the illustration.
-
4. INSTALL NO. 2 ULTRASONIC SENSOR
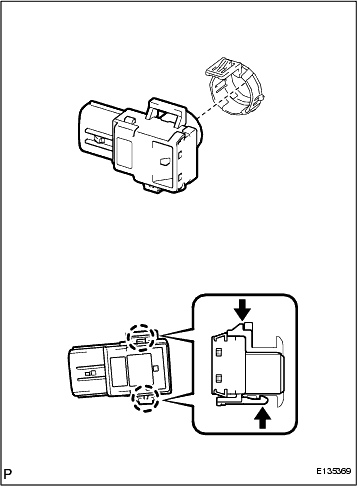
(a) Engage the 2 claws and install the No. 2 ultrasonic sensor.
-
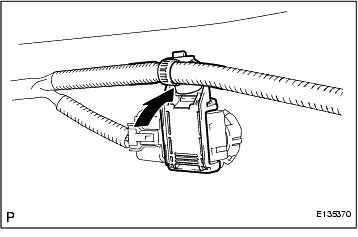
(b) Install the sensor retainer as shown in the illustration.
-
(c) Connect the sensor connector.
-
5. INSTALL REAR BUMPER ASSEMBLY (
Click Here
)
6. INSTALL REAR FLOOR BOARD (
Click Here
)
7. INSTALL LUGGAGE COMPARTMENT INNER TRIM COVER RH (
Click Here
)
8. INSTALL REAR FLOOR FINISH PLATE (
Click Here
)
9. INSTALL LUGGAGE COMPARTMENT TRIM HOOK (
Click Here
)
10. INSTALL SPARE WHEEL COVER ASSEMBLY
11. INSTALL SPARE WHEEL COVER CLAMP
12. INSTALL LUGGAGE COMPARTMENT FLOOR MAT