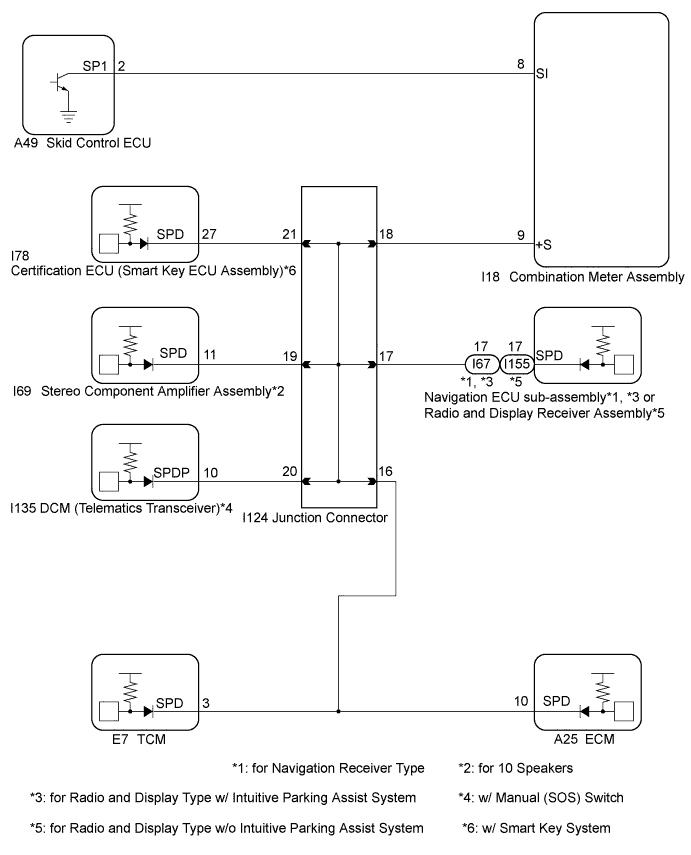
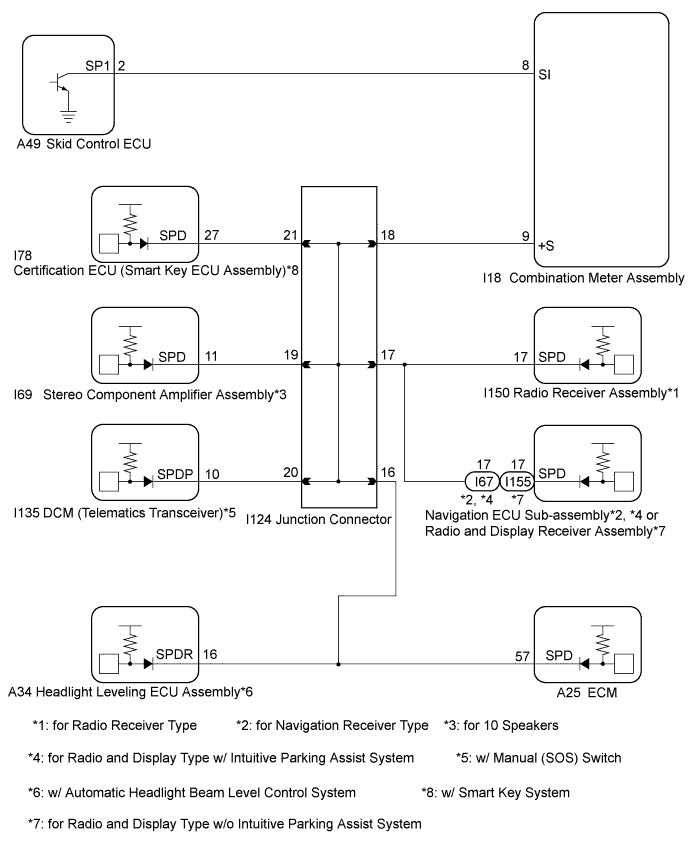
METER / GAUGE SYSTEM > Speed Signal Circuit |
| for 2GR-FE |
| for 2AR-FE |
| 1.INSPECT ECU TERMINAL VOLTAGE (INPUT VOLTAGE) |
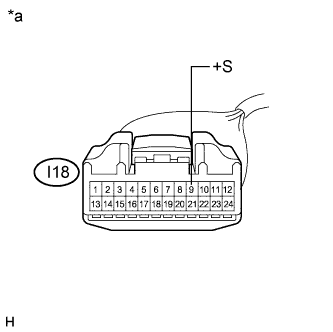 |
Disconnect the I18 combination meter assembly connector.
Measure the voltage according to the value(s) in the table below.
| Tester Connection | Condition | Specified Condition |
| I18-9 (+S) - Body ground | Ignition switch to ON | 4.5 to 14 V |
| *a | Front view of wire harness connector (to Combination Meter Assembly) |
|
| ||||
| OK | |
 |
| 2.INSPECT COMBINATION METER ASSEMBLY (OUTPUT VOLTAGE) |
Reconnect the I18 combination meter assembly connector.
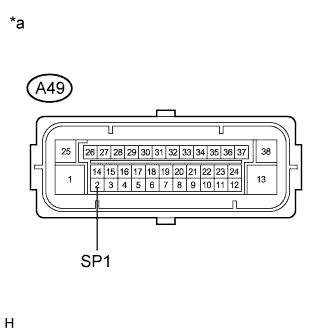 |
Disconnect the A49 skid control ECU connector.
Measure the voltage according to the value(s) in the table below.
| Tester Connection | Condition | Specified Condition |
| A49-2 (SP1) - Body ground | Ignition switch to ON | 11 to 14 V |
| *a | Front view of wire harness connector (to Skid Control ECU) |
|
| ||||
| OK | |
|
| 3.INSPECT SKID CONTROL ECU (INPUT WAVEFORM) |
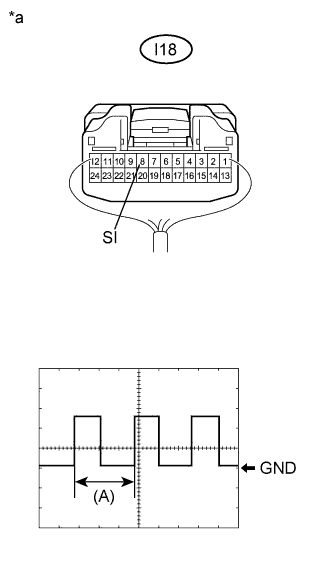 |
Check the input waveform.
Reconnect the A49 skid control ECU connector.
Remove the combination meter assembly with the connector(s) still connected.
Connect an oscilloscope to terminal I18-8 (SI) and body ground.
Turn the ignition switch to ON.
Turn the wheel slowly.
Check the signal waveform according to the condition(s) in the table below.
| Item | Condition |
| Tool setting | 5 V/DIV., 20 ms./DIV. |
| Vehicle condition | Wheel being rotated |
| *a | Component with harness connected (Combination Meter Assembly) |
|
| ||||
| OK | ||
 | ||
| ||
| 4.CHECK HARNESS AND CONNECTOR (COMBINATION METER ASSEMBLY - SKID CONTROL ECU) |
Disconnect the I18 combination meter assembly and A49 skid control ECU connector.
Measure the resistance according to the value(s) in the table below.
| Tester Connection | Condition | Specified Condition |
| A49-2 (SP1) - I18-8 (SI) | Always | Below 1 Ω |
| A49-2 (SP1) - Body ground | Always | 10 kΩ or higher |
|
| ||||
| OK | ||
| ||
| ||
| 5.CHECK HARNESS AND CONNECTOR (COMBINATION METER ASSEMBLY - JUNCTION CONNECTOR) |
Disconnect the I124 junction connector.
Measure the resistance according to the value(s) in the table below.
| Tester Connection | Condition | Specified Condition |
| I18-9 - I124-18 | Always | Below 1 Ω |
| I18-9 - Body ground | Always | 10 kΩ or higher |
|
| ||||
| OK | |
|
| 6.CHECK HARNESS AND CONNECTOR (JUNCTION CONNECTOR) |
Inspect for a short in the circuit that is connected to the junction block connector shown in the wiring diagram.
Disconnect the I124 junction connector.
Measure the voltage according to the value(s) in the table below.
| Tester Connection | Condition | Specified Condition |
| I124-21 - Body ground | Ignition switch to ON | 4.5 to 14 V |
| I124-19 - Body ground | Ignition switch to ON | 4.5 to 14 V |
| I124-17 - Body ground | Ignition switch to ON | 4.5 to 14 V |
| I124-20 - Body ground | Ignition switch to ON | 4.5 to 14 V |
| I124-16 - Body ground | Ignition switch to ON | 4.5 to 14 V |
| I124-16 - Body ground | Ignition switch to ON | 4.5 to 14 V |
| I124-16 - Body ground | Ignition switch to ON | 4.5 to 14 V |
| *a | Front view of wire harness connector (to Junction Connector) |
| Result | Proceed to |
| Voltage is not present in one circuit. | A |
| Voltage is present in all the circuits. | B |
|
| ||||
| A | |
|
| 7.SYSTEM CHECK |
Select the circuit for which voltage was not present in step 6.
| Tester Connection | System that uses the circuit | Proceed to |
| I124-21 - Body ground | Smart key system*1 | A |
| I124-19 - Body ground | Audio/Visual system*2 | B |
| I124-17 - Body ground | Audio/Visual system*3, *4, *5, or Navigation system*6 | C |
| I124-20 - Body ground | Safety connect system*7 | D |
| I124-16 - Body ground | SFI system | E |
| I124-16 - Body ground | Lighting system*8 | E |
| I124-16 - Body ground | U660E automatic transaxle system | E |
|
| ||||
|
| ||||
|
| ||||
|
| ||||
| A | |
|
| 8.CHECK HARNESS AND CONNECTOR (CERTIFICATION ECU (SMART KEY ECU ASSEMBLY) CIRCUIT) |
Disconnect the I78 certification ECU (smart key ECU assembly) connector.
Measure the resistance according to the value(s) in the table below.
| Tester Connection | Condition | Specified Condition |
| I78-27 (SPD) - Body ground | Always | 10 kΩ or higher |
|
| ||||
| OK | ||
| ||
| ||
| 9.CHECK HARNESS AND CONNECTOR (STEREO COMPONENT AMPLIFIER ASSEMBLY CIRCUIT) |
Disconnect the I69 stereo component amplifier assembly connector.
Measure the resistance according to the value(s) in the table below.
| Tester Connection | Condition | Specified Condition |
| I69-11 (SPD) - Body ground | Always | 10 kΩ or higher |
|
| ||||
| OK | ||
| ||
| ||
| 10.CHECK HARNESS AND CONNECTOR (RADIO RECEIVER ASSEMBLY CIRCUIT, RADIO AND DISPLAY RECEIVER ASSEMBLY CIRCUIT, NAVIGATION ECU SUB-ASSEMBLY CIRCUIT) |
Disconnect the I150 radio receiver assembly*1, I155 radio and display receiver assembly*2, or I67 navigation ECU sub-assembly*3, *4 connector.
Measure the resistance according to the value(s) in the table below.
| Tester Connection | Condition | Specified Condition |
| I150-17 (SPD)*1 - Body ground | Always | 10 kΩ or higher |
| I155-17 (SPD)*2 - Body ground | Always | 10 kΩ or higher |
| I67-17 (SPD)*3 - Body ground | Always | 10 kΩ or higher |
| I67-17 (SPD)*4 - Body ground | Always | 10 kΩ or higher |
| Result | Proceed to |
| OK (for Radio Receiver Type) | A |
| OK (for Radio and Display Type (w/o Intuitive Parking Assist System) | B |
| OK (for Radio and Display Type (w/ Intuitive Parking Assist System) | C |
| OK (for Navigation Receiver Type) | C |
| NG | D |
|
| ||||
|
| ||||
|
| ||||
| A | ||
| ||
| ||
| 11.CHECK HARNESS AND CONNECTOR (DCM (TELEMATICS TRANSCEIVER) - COMBINATION METER ASSEMBLY) |
Disconnect the I135 DCM (telematics transceiver) connector.
Measure the resistance according to the value(s) in the table below.
| Tester Connection | Condition | Specified Condition |
| I135-10 (SPDP) - Body ground | Always | 10 kΩ or higher |
|
| ||||
| OK | ||
| ||
| ||
| 12.SYSTEM CHECK |
Select the circuit for which voltage was not present in step 6.
| Tester Connection | System that uses the circuit | Proceed to |
| I124-16 - Body ground | SFI system | A |
| I124-16 - Body ground | Lighting system | B |
| I124-16 - Body ground | U660E Automatic Transaxle system | C |
|
| ||||
|
| ||||
| A | |
|
| 13.CHECK HARNESS AND CONNECTOR (ECM CIRCUIT) |
Disconnect the A25 ECM connector.
Measure the resistance according to the value(s) in the table below.
| Tester Connection | Condition | Specified Condition |
| A25-57 (SPD)*1 - Body ground | Always | 10 kΩ or higher |
| A25-10 (SPD)*2 - Body ground | Always | 10 kΩ or higher |
| Result | Proceed to |
| OK (for 2AR-FE) | A |
| OK (for 2GR-FE) | B |
| NG | C |
|
| ||||
|
| ||||
| A | ||
| ||
| ||
| 14.CHECK HARNESS AND CONNECTOR (HEADLIGHT LEVELING ECU ASSEMBLY CIRCUIT) |
Disconnect the A34 headlight leveling ECU assembly connector.
Measure the resistance according to the value(s) in the table below.
| Tester Connection | Condition | Specified Condition |
| A34-16 (SPDR) - Body ground | Always | 10 kΩ or higher |
|
| ||||
| OK | ||
| ||
| ||
| 15.CHECK HARNESS AND CONNECTOR (TCM CIRCUIT) |
Disconnect the E7 TCM connector.
Measure the resistance according to the value(s) in the table below.
| Tester Connection | Condition | Specified Condition |
| E7-3 (SPD) - Body ground | Always | 10 kΩ or higher |
|
| ||||
| OK | ||
| ||
| ||

