2GR-FE ENGINE MECHANICAL ENGINE UNIT INSTALLATION
CAUTION / NOTICE / HINT
- HINT:
-
Perform "Inspection After Repair" after replacing the engine assembly.
-
Click hereEngine / Hybrid System>2GR-FE ENGINE CONTROL>SFI SYSTEM>INITIALIZATION
PROCEDURE

 89422
1.INSTALL ENGINE COOLANT TEMPERATURE SENSOR
82219A
2.INSTALL KNOCK SENSOR WIRE
Connect the 2 clamps, 2 knock sensor connectors and knock sensor wire connector.
89615
3.INSTALL KNOCK CONTROL SENSOR
83530
4.INSTALL ENGINE OIL PRESSURE SWITCH ASSEMBLY
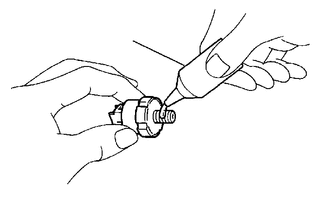
| *1 | Adhesive |
Clean the threads of the oil pressure switch. Apply adhesive to 2 or 3 threads of the oil pressure switch assembly.
- Adhesive:
Toyota Genuine Adhesive 1344, Three Bond 1344 or equivalent
Using a 24 mm deep socket wrench, install the oil pressure switch.
- Torque:
- 15 N*m (153 kgf*cm, 11 ft.*lbf)
- NOTICE:
-
Do not start the engine within 1 hour after installation to prevent oil leaks.
25860A
5.INSTALL NO. 1 VACUUM SWITCHING VALVE
Install the No. 1 vacuum switching valve with the bolt.
- Torque:
- 10 N*m (102 kgf*cm, 7 ft.*lbf)
16173
6.INSTALL WATER PUMP PULLEY
Temporarily install the water pump pulley with the 4 bolts.
Using SST, hold the water pump pulley.
- SST
- 09960-10010 (09962-01000, 09963-00700)
Tighten the 4 bolts.
- Torque:
- 21 N*m (214 kgf*cm, 15 ft.*lbf)
16604
7.INSTALL NO. 2 IDLER PULLEY SUB-ASSEMBLY
Install the idler pulley cover plate, No. 2 idler pulley sub-assembly and No. 2 idler pulley cover plate with the bolt.
- Torque:
- 54 N*m (550 kgf*cm, 40 ft.*lbf)
11322F
8.INSTALL NO. 2 TIMING GEAR COVER
Install the No. 2 timing gear cover with the 2 bolts.
- Torque:
- 6.0 N*m (61 kgf*cm, 53 in.*lbf)
16620
9.INSTALL V-RIBBED BELT TENSIONER ASSEMBLY
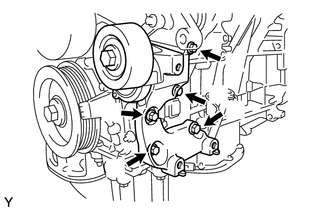
Temporarily install the V-ribbed belt tensioner assembly with the 5 bolts.
- HINT:
-
Each bolt length is as follows:
-
A: 70 mm (2.76 in.)
-
B: 33 mm (1.30 in.)
Install the V-ribbed belt tensioner assembly by tightening the bolt 1 and bolt 2 in the order shown in the illustration.
- Torque:
- 43 N*m (438 kgf*cm, 32 ft.*lbf)
Tighten the other bolts.
- Torque:
- 43 N*m (438 kgf*cm, 32 ft.*lbf)
17105
10.INSTALL EXHAUST MANIFOLD SUB-ASSEMBLY LH
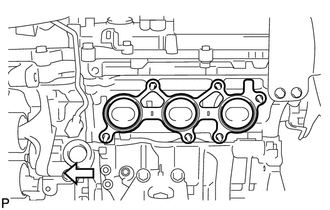

|
Engine Front |
Install a new gasket as shown in the illustration.
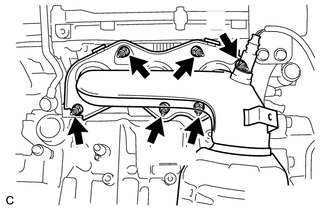
Install the exhaust manifold sub-assembly LH with the 6 nuts in the order shown in the illustration.
- Torque:
- 21 N*m (214 kgf*cm, 15 ft.*lbf)
17168
11.INSTALL NO. 2 EXHAUST MANIFOLD HEAT INSULATOR
17119
12.INSTALL NO. 2 MANIFOLD STAY
12142
13.INSTALL NO. 2 ENGINE OIL LEVEL DIPSTICK GUIDE
Install a new O-ring to the No. 2 engine oil level dipstick guide.
Apply a light coat of engine oil to the O-ring.
Push in the No. 2 engine oil level dipstick guide end into the engine oil level dipstick guide.
Install the No. 2 engine oil level dipstick guide with the bolt.
- Torque:
- 21 N*m (214 kgf*cm, 15 ft.*lbf)
Install the engine oil level dipstick.
17104
14.INSTALL EXHAUST MANIFOLD SUB-ASSEMBLY RH
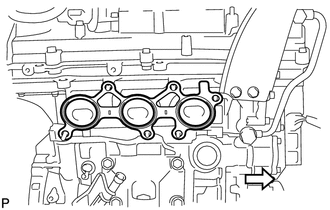
|
|
Engine Front |
Install a new gasket as shown in the illustration.
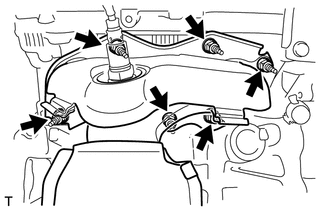
Install the exhaust manifold sub-assembly RH with the 6 nuts in the order shown in the illustration.
- Torque:
- 21 N*m (214 kgf*cm, 15 ft.*lbf)
17111
15.INSTALL INTAKE MANIFOLD
Set a new gasket on each cylinder head.
- NOTICE:
- ·
Align the port holes of the gasket and cylinder head.
·Make sure that the gasket is installed in the correct direction.
Set the intake manifold on the cylinder heads.
Install and tighten the 6 bolts and 4 nuts uniformly in several steps.
- Torque:
- 21 N*m (214 kgf*cm, 15 ft.*lbf)
12327A
16.INSTALL NO. 2 ENGINE MOUNTING STAY RH
Install the No. 2 engine mounting stay RH with the bolt.
- Torque:
- 21 N*m (214 kgf*cm, 15 ft.*lbf)
19500
17.INSTALL IGNITION COIL ASSEMBLY
17125
18.INSTALL NO. 1 SURGE TANK STAY
- NOTICE:
-
Do not apply oil to the bolt as listed below:
Oil Application Prohibited Bolt Bolt for No. 1 surge tank stay and cylinder head cover
Install the No. 1 surge tank stay with the bolt.
- Torque:
- 21 N*m (214 kgf*cm, 15 ft.*lbf)
22267A
19.INSTALL THROTTLE BODY BRACKET
- NOTICE:
-
Do not apply oil to the bolt as listed below:
Oil Application Prohibited Bolt Bolt for throttle body bracket and cylinder head cover
Install the throttle body bracket with the bolt.
- Torque:
- 21 N*m (214 kgf*cm, 15 ft.*lbf)
17190
20.INSTALL INTAKE AIR SURGE TANK ASSEMBLY
21.INSTALL ENGINE HANGERS
Install the 2 engine hangers with the 4 bolts as shown in the illustration.
| Item | Part No. |
|---|---|
| No. 1 engine hanger | 12281-31120 |
| No. 2 engine hanger | 12282-31100 |
| Bolt | 91671-10825 |
- Torque:
- 33 N*m (337 kgf*cm, 24 ft.*lbf)
Attach an engine sling device and hang the engine with a chain block.