HYBRID / BATTERY CONTROL HYBRID CONTROL SYSTEM P0A78-113 Drive Motor "A" Inverter Performance
DESCRIPTION
For a description of the inverter (See page Engine / Hybrid System>HYBRID / BATTERY CONTROL>HYBRID CONTROL SYSTEM>P0A78-266).
If the motor inverter overheats, has a circuit malfunction, or has an internal short, the inverter transmits this information to the MG ECU via the motor inverter fail signal line.
- HINT:
-
The term "drive motor A" indicates MG2.
| DTC No. | Detection Item | DTC Detection Condition | Trouble Area | MIL | Warning Indicate |
|---|---|---|---|---|---|
| P0A78-113 | Drive Motor "A" Inverter Performance | Motor inverter fail signal detection
(System overcurrent) |
·
Hybrid vehicle transaxle assembly ·
Inverter with converter assembly ·
Power management control ECU ·
INV fuse ·
Wire harness or connector |
Comes on | Master Warning Light:
Comes on |
WIRING DIAGRAM
Refer to the wiring diagram for DTC P0A1A-200 (See page Engine / Hybrid System>HYBRID / BATTERY CONTROL>HYBRID CONTROL SYSTEM>P0A1A-200).
Refer to the wiring diagram for DTC P0AA6-526 (See page Engine / Hybrid System>HYBRID / BATTERY CONTROL>HYBRID CONTROL SYSTEM>P0AA6-526).
Refer to the wiring diagram for DTC P324E-788 (See page Engine / Hybrid System>HYBRID / BATTERY CONTROL>HYBRID CONTROL SYSTEM>P324E-788).
Refer to the wiring diagram for DTC U0110-159 (See page Engine / Hybrid System>HYBRID / BATTERY CONTROL>HYBRID CONTROL SYSTEM>U0110-159).
CAUTION / NOTICE / HINT
- CAUTION:
- ·
Before inspecting the high-voltage system or disconnecting the low voltage connector of the inverter with converter assembly, take safety precautions such as wearing insulated gloves and removing the service plug grip to prevent electrical shocks. After removing the service plug grip, put it in your pocket to prevent other technicians from accidentally reconnecting it while you are working on the high-voltage system.
·After removing the service plug grip, wait for at least 10 minutes before touching any of the high-voltage connectors or terminals. After waiting for 10 minutes, check the voltage at the terminals in the inspection point in the inverter with converter assembly. The voltage should be 0 V before beginning work (See page Engine / Hybrid System>HYBRID / BATTERY CONTROL>HYBRID CONTROL SYSTEM>PRECAUTION).
- HINT:
-
Waiting for at least 10 minutes is required to discharge the high-voltage capacitor inside the inverter with converter assembly.
- NOTICE:
-
After turning the power switch off, waiting time may be required before disconnecting the cable from the negative (-) auxiliary battery terminal. Therefore, make sure to read the disconnecting the cable from the negative (-) auxiliary battery terminal notices before proceeding with work (See page General>INTRODUCTION>REPAIR INSTRUCTION>PRECAUTION).
PROCEDURE
Connect the intelligent tester to the DLC3.
Turn the power switch on (IG).
Enter the following menus: Powertrain / Hybrid Control / DTC.
- Powertrain > Hybrid Control > Trouble Codes
- 50001 236
Check if DTCs are output.
- Result:
Result Proceed to P0A78-113 is set before any of the DTCs in the table below are set. A Any of the DTCs in the table 1 below are set before P0A78-113 is set. B Any of the DTCs in the table 2 below are set before P0A78-113 is set. C
| DTC No. | Relevant Diagnosis |
|---|---|
| P0ADB-227 | Hybrid Battery Positive Contactor Control Circuit Low |
| P0ADC-226 | Hybrid Battery Positive Contactor Control Circuit High |
| P0ADF-229 | Hybrid Battery Negative Contactor Control Circuit Low |
| P0AE0-228 | Hybrid Battery Negative Contactor Control Circuit High |
| P3004-803 | High Voltage Power Resource |
| DTC No. | Relevant Diagnosis |
|---|---|
| P0A9C-123 | Hybrid Battery Temperature Sensor "A" Range / Performance |
| P0A9D-123 | Hybrid Battery Temperature Sensor "A" Circuit Low |
| P0A9E-123 | Hybrid Battery Temperature Sensor "A" Circuit High |
| P0AC0-123 | Hybrid Battery Pack Current Sensor Circuit Range / Performance |
| P0AC1-123 | Hybrid Battery Pack Current Sensor Circuit Low |
| P0AC2-123 | Hybrid Battery Pack Current Sensor Circuit High |
| P0AC6-123 | Hybrid Battery Temperature Sensor "B" Range / Performance |
| P0AC7-123 | Hybrid Battery Temperature Sensor "B" Circuit Low |
| P0AC8-123 | Hybrid Battery Temperature Sensor "B" Circuit High |
| P0ACB-123 | Hybrid Battery Temperature Sensor "C" Range / Performance |
| P0ACC-123 | Hybrid Battery Temperature Sensor "C" Circuit Low |
| P0ACD-123 | Hybrid Battery Temperature Sensor "C" Circuit High |
| P0AFC-123 | Hybrid Battery Pack Sensor Module |
| P3011-123, P3012-123, P3013-123, P3014-123, P3015-123, P3016-123, P3017-123, P3018-123, P3019-123, P3020-123, P3021-123, P3022-123, P3023-123, P3024-123, P3035-123, P3036-123, P3037-123 | Battery Block # Becomes Weak |
| P3065-123 | Hybrid Battery Temperature Sensor Range / Performance Stuck "A" |
| P308A-123 | Hybrid Battery Voltage Sensor All Circuits Low |
- HINT:
- ·
Refer to the Freeze Frame data to determine the order in which the DTCs were set.
·P0A78-113 may be set due to a malfunction which also causes DTCs in the preceding table to be set. In this case, first troubleshoot the output DTCs in the preceding table. Then, perform a test to attempt to reproduce the problems, and check that no DTCs are output.
Turn the power switch off.
A
B
(Click here Engine / Hybrid System>HYBRID / BATTERY CONTROL>HYBRID CONTROL SYSTEM>DIAGNOSTIC TROUBLE CODE CHART)
C
(Click here Engine / Hybrid System>HYBRID / BATTERY CONTROL>HYBRID BATTERY SYSTEM>DIAGNOSTIC TROUBLE CODE CHART)
Connect the intelligent tester to the DLC3.
Turn the power switch on (IG).
Enter the following menus: Powertrain / Hybrid Control / DTC.
- Powertrain > Hybrid Control > Trouble Codes
- 50001 236
Check if DTCs are output.
- Result:
Result Proceed to P0A78-202 is not output. A P0A78-202 is also output. B
- NOTICE:
- ·
If P0A78-202 is output, troubleshoot it first. After completing the troubleshooting for P0A78-202, return to perform troubleshooting for this DTC.
·Parts repaired or replaced during troubleshooting for P0A78-202 do not need to be re-inspected in this diagnosis procedure.
Turn the power switch off.
A
B
Connect the intelligent tester to the DLC3.
Turn the power switch on (IG).
Enter the following menus: Powertrain / Hybrid Control / DTC.
- Powertrain > Hybrid Control > Trouble Codes
- 50001 236
Check if DTCs are output.
- HINT:
- ·
If P0A78-202 was not output in step 2 of this diagnosis procedure, check Table 1 below.
·If P0A78-202 was output in step 2 of this diagnosis procedure, repair that DTC first, then check Table 2 below.
- Result:
Result Proceed to P0A78-113 only is output. A Any of the following DTCs are also output. B
| DTC No. | Relevant Diagnosis |
|---|---|
| P0A1A (all INF codes)*1 | Generator Control Module |
| P0A1B (all INF codes)*1 | Drive Motor "A" Control Module |
| P0A1D (all INF codes)*1 | Hybrid Powertrain Control Module |
| P0A3F-243 | Drive Motor "A" Position Sensor Circuit |
| P0A40-500 | Drive Motor "A" Position Sensor Circuit Range / Performance |
| P0A41-245 | Drive Motor "A" Position Sensor Circuit Low |
| P0A4B-253 | Generator Position Sensor Circuit |
| P0A4C-513 | Generator Position Sensor Circuit Range / Performance |
| P0A4D-255 | Generator Position Sensor Circuit Low |
| P0A60 (all INF codes)*1 | Drive Motor "A" Phase V Current |
| P0A63 (all INF codes)*1 | Drive Motor "A" Phase W Current |
| P0A72 (all INF codes)*1 | Generator Phase V Current |
| P0A75 (all INF codes)*1 | Generator Phase W Current |
| P0A78-266, 267, 279, 287, 306, 503, 504, 505, 506, 586, 806, 807, 808 | Drive Motor "A" Inverter Performance |
| P0A7A-325, 344, 517, 518, 809, 810, 811 | Generator Inverter Performance |
| P0A90-509 | Drive Motor "A" Performance |
| P0A92-521 | Hybrid Generator Performance |
| P0A94-442, 547, 548, 549, 554, 555, 556, 585, 587, 589, 590 | DC / DC Converter Performance |
| P0ADB-227 | Hybrid Battery Positive Contactor Control Circuit Low |
| P0ADC-226 | Hybrid Battery Positive Contactor Control Circuit High |
| P0ADF-229 | Hybrid Battery Negative Contactor Control Circuit Low |
| P0AE0-228 | Hybrid Battery Negative Contactor Control Circuit High |
| P0C76-523 | Hybrid Battery System Discharge Time Too Long |
| P3004-803 | High Voltage Power Resource |
| DTC No. | Relevant Diagnosis |
|---|---|
| P0A1A (all INF codes)*1 | Generator Control Module |
| P0A1B (all INF codes)*1 | Drive Motor "A" Control Module |
| P0A1D (all INF codes)*1 | Hybrid Powertrain Control Module |
| P0A3F-243 | Drive Motor "A" Position Sensor Circuit |
| P0A40-500 | Drive Motor "A" Position Sensor Circuit Range / Performance |
| P0A41-245 | Drive Motor "A" Position Sensor Circuit Low |
| P0A4B-253 | Generator Position Sensor Circuit |
| P0A4C-513 | Generator Position Sensor Circuit Range / Performance |
| P0A4D-255 | Generator Position Sensor Circuit Low |
| P0A60-294 | Drive Motor "A" Phase V Current |
| P0A63-302 | Drive Motor "A" Phase W Current |
| P0A72 (all INF codes)*1 | Generator Phase V Current |
| P0A75 (all INF codes)*1 | Generator Phase W Current |
| P0A78-266, 267, 279, 287, 503, 504, 505, 506, 586, 806, 807, 808 | Drive Motor "A" Inverter Performance |
| P0A7A-325, 344, 517, 518, 809, 810, 811 | Generator Inverter Performance |
| P0A92-521 | Hybrid Generator Performance |
| P0A94-442, 547, 548, 549, 554, 555, 556, 585, 587, 589, 590 | DC / DC Converter Performance |
| P0ADB-227 | Hybrid Battery Positive Contactor Control Circuit Low |
| P0ADC-226 | Hybrid Battery Positive Contactor Control Circuit High |
| P0ADF-229 | Hybrid Battery Negative Contactor Control Circuit Low |
| P0AE0-228 | Hybrid Battery Negative Contactor Control Circuit High |
| P0C76-523 | Hybrid Battery System Discharge Time Too Long |
| P3004-803 | High Voltage Power Resource |
- HINT:
- ·
*1: If any INF codes are output for this DTC, refer to the corresponding diagnostic procedure.
·P0A78-113 may be set due to a malfunction which also causes DTCs in the preceding table to be set. In this case, first troubleshoot the output DTCs in the preceding table. Then, perform a test to attempt to reproduce the problems, and check that no DTCs are output.
Turn the power switch off.
A
B
(Click here Engine / Hybrid System>HYBRID / BATTERY CONTROL>HYBRID CONTROL SYSTEM>DIAGNOSTIC TROUBLE CODE CHART)
(Click here Engine / Hybrid System>HYBRID / BATTERY CONTROL>HYBRID CONTROL SYSTEM>P0343-747)
- Result:
Proceed to OK NG
OK
NG
(Click here Engine / Hybrid System>HYBRID / BATTERY CONTROL>HYBRID CONTROL SYSTEM>P0A1A-200)
- Result:
Proceed to OK NG
OK
NG
(Click here Engine / Hybrid System>HYBRID / BATTERY CONTROL>HYBRID CONTROL SYSTEM>P0A1A-200)
- Result:
Proceed to OK NG
OK
NG
(Click here Engine / Hybrid System>HYBRID / BATTERY CONTROL>HYBRID CONTROL SYSTEM>P0A1A-200)
- Result:
Proceed to OK NG
OK
NG
(Click here Engine / Hybrid System>HYBRID / BATTERY CONTROL>HYBRID CONTROL SYSTEM>P0A1A-200)
- Result:
Proceed to OK NG
OK
NG
- CAUTION:
-
Be sure to wear insulated gloves.
Check that the service plug grip is not installed.
- NOTICE:
-
After removing the service plug grip, do not turn the power switch on (READY), unless instructed by the repair manual because this may cause a malfunction.
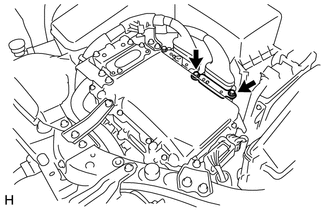
Remove the upper inverter cover (generator cable side) from the inverter with converter assembly.
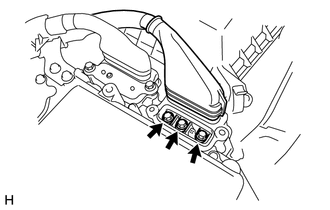
Check that the bolts for the generator cable are tightened to the specified torque, the generator cable is connected securely, and there are no contact problems.
- Specified Condition:
T=8.0 N*m (82 kgf*cm, 71 in.*lbf)
- NOTICE:
-
Make sure that the tightening torque of the bolt is between 6.4 and 9.6 N*m (65 and 98 kgf*cm, 57 and 85 in.*lbf).
Disconnect the generator cable from the inverter with converter assembly.
Check for arc marks at the terminals for the generator cable.
- Result:
Result Proceed to The terminals are connected securely and there are no contact problems. There are no arc marks. A The terminals are not connected securely and there is a contact problem. There are arc marks. B The terminals are not connected securely and there is a contact problem. There are no arc marks. C The terminals are connected securely and there are no contact problems. There are arc marks. B
Connect the generator cable to the inverter with converter assembly.
Install the upper inverter cover.
A
B
C
- CAUTION:
-
Be sure to wear insulated gloves.
Check that the service plug grip is not installed.
- NOTICE:
-
After removing the service plug grip, do not turn the power switch on (READY), unless instructed by the repair manual because this may cause a malfunction.
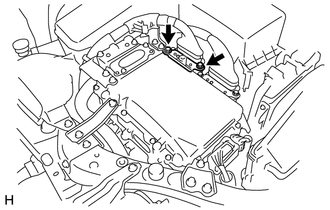
Remove the upper inverter cover (motor cable side) from the inverter with converter assembly.
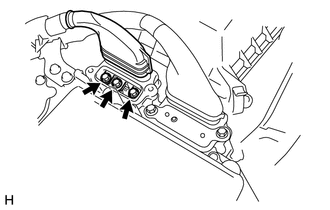
Check that the bolts for the motor cable are tightened to the specified torque, the motor cable is connected securely, and there are no contact problems.
- Specified Condition:
T=8.0 N*m (82 kgf*cm, 71 in.*lbf)
- NOTICE:
-
Make sure that the tightening torque of the bolt is between 6.4 and 9.6 N*m (65 and 98 kgf*cm, 57 and 85 in.*lbf).
Disconnect the motor cable from the inverter with converter assembly.
Check for arc marks at the terminals for the motor cable.
- Result:
Result Proceed to The terminals are connected securely and there are no contact problems There are no arc marks. A The terminals are not connected securely and there is a contact problem. There are arc marks. B The terminals are not connected securely and there is a contact problem. There are no arc marks. C The terminals are connected securely and there are no contact problems. There are arc marks. B
Connect the motor cable to the inverter with converter assembly.
Install the upper inverter cover.
A
B
C
- CAUTION:
-
Be sure to wear insulated gloves.
Check that the service plug grip is not installed.
- NOTICE:
-
After removing the service plug grip, do not turn the power switch on (READY), unless instructed by the repair manual because this may cause a malfunction.
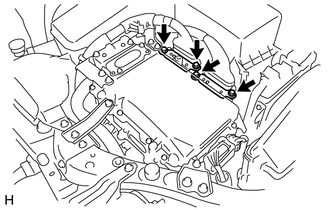
Remove the upper inverter cover (generator cable side) and upper inverter cover (motor cable side) from the inverter with converter assembly.
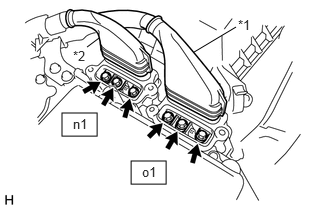
| *1 | Generator Cable |
| *2 | Motor Cable |
Disconnect the generator cable and motor cable from the inverter with converter assembly.
Check MG1 for an interphase short using a milliohmmeter.
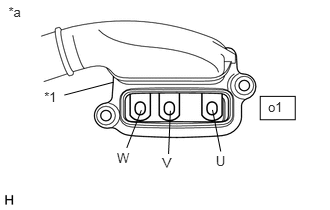
| *1 | Shield Ground |
| *a | Generator Cable
(Inverter with Converter Assembly Side) |
Using a milliohmmeter, measure the resistance according to the value(s) in the table below.
- HINT:
-
If the MG1 temperature is high, the resistance will vary greatly from the specification. Therefore, measure the resistance at least 8 hours after the vehicle is stopped.
- Standard Resistance:
Tester Connection Switch Condition Specified Condition o1-1 (W) - o1-3 (U) Power switch off 59.1 to 67.5 mΩ o1-2 (V) - o1-1 (W) Power switch off 59.1 to 67.5 mΩ o1-3 (U) - o1-2 (V) Power switch off 62.1 to 70.5 mΩ
- HINT:
-
To correct the variation of the measured resistance due to temperature, use the following formula to calculate the resistance at 20°C (68°F).
-
R20 = Rt / {1 + 0.00393 X (T - 20)}
-
The calculation is based on the following:
-
R20: Resistance at 20°C (68°F) (mΩ)
-
Rt: Measured resistance (mΩ)
-
T: Temperature when the resistance is measured (°C)
Using a megohmmeter set to 500 V, measure the resistance according to the value(s) in the table below.
- NOTICE:
-
Be sure to set the megohmmeter to 500 V when performing this test. Using a setting higher than 500 V can result in damage to the component being inspected.
- Standard Resistance:
Tester Connection Switch Condition Specified Condition o1-1 (W) - Body ground and shield ground Power switch off 100 MΩ or higher o1-2 (V) - Body ground and shield ground Power switch off 100 MΩ or higher o1-3 (U) - Body ground and shield ground Power switch off 100 MΩ or higher
Connect the generator cable and motor cable.
Install the upper inverter cover (generator cable side) and upper inverter cover (motor cable side).
- Result:
Proceed to OK NG
OK
NG
- CAUTION:
-
Be sure to wear insulated gloves.
Check that the service plug grip is not installed.
- NOTICE:
-
After removing the service plug grip, do not turn the power switch on (READY), unless instructed by the repair manual because this may cause a malfunction.
Remove the upper inverter cover (generator cable side) and upper inverter cover (motor cable side) from the inverter with converter assembly.
| *1 | Generator Cable |
| *2 | Motor Cable |
Disconnect the generator cable and motor cable from the inverter with converter assembly.
Check MG2 for an interphase short using a milliohmmeter.
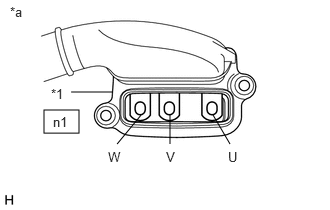
| *1 | Shield Ground |
| *a | Motor Cable
(Inverter with Converter Assembly Side) |
Using a milliohmmeter, measure the resistance according to the value(s) in the table below.
- HINT:
-
If the MG2 temperature is high, the resistance will vary greatly from the specification. Therefore, measure the resistance at least 8 hours after the vehicle is stopped.
- Standard Resistance:
Tester Connection Switch Condition Specified Condition n1-1 (W) - n1-3 (U) Power switch off 71.4 to 81.0 mΩ n1-2 (V) - n1-1 (W) Power switch off 71.4 to 81.0 mΩ n1-3 (U) - n1-2 (V) Power switch off 74.4 to 84.1 mΩ
- HINT:
-
To correct the variation of the measured resistance due to temperature, use the following formula to calculate the resistance at 20°C (68°F).
-
R20 = Rt / {1 + 0.00393 X (T - 20)}
-
The calculation is based on the following:
-
R20: Resistance at 20°C (68°F) (mΩ)
-
Rt: Measured resistance (mΩ)
-
T: Temperature when the resistance is measured (°C)
Using a megohmmeter set to 500 V, measure the resistance according to the value(s) in the table below.
- NOTICE:
-
Be sure to set the megohmmeter to 500 V when performing this test. Using a setting higher than 500 V can result in damage to the component being inspected.
- Standard Resistance:
Tester Connection Switch Condition Specified Condition n1-1 (W) - Body ground and shield ground Power switch off 100 MΩ or higher n1-2 (V) - Body ground and shield ground Power switch off 100 MΩ or higher n1-3 (U) - Body ground and shield ground Power switch off 100 MΩ or higher
Connect the generator cable and motor cable.
Install the upper inverter cover (generator cable side) and upper inverter cover (motor cable side).
- Result:
Proceed to OK NG
OK
NG
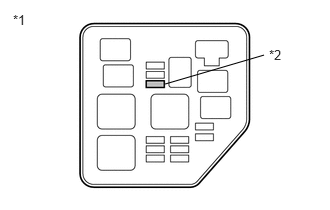
| *1 | No. 2 Engine Room Relay Block |
| *2 | INV Fuse |
Remove the INV fuse from the No. 2 engine room relay block.
Measure the resistance according to the value(s) in the table below.
- Standard Resistance:
Tester Connection Condition Specified Condition INV fuse terminal Always Below 1 Ω
Install the INV fuse.
- Result:
Proceed to OK NG
OK
NG
- CAUTION:
-
Be sure to wear insulated gloves.
Check that the service plug grip is not installed.
- NOTICE:
-
After removing the service plug grip, do not turn the power switch on (READY), unless instructed by the repair manual because this may cause a malfunction.
Disconnect connector A14 from inverter with converter assembly.
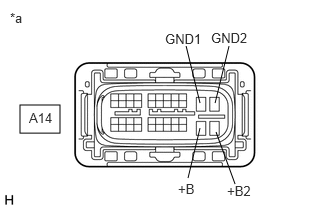
| *a | Front view of wire harness connector
(to Inverter with Converter Assembly) |
Measure the resistance according to the value(s) in the table below.
- Standard Resistance:
Tester Connection Switch Condition Specified Condition A14-10 (GND1) - Body ground Power switch off Below 1 Ω A14-11 (GND2) - Body ground Power switch off Below 1 Ω
Connect the cable to the negative (-) auxiliary battery terminal.
Turn the power switch on (IG).
Measure the voltage according to the value(s) in the table below.
- Standard Voltage:
Tester Connection Switch Condition Specified Condition A14-30 (+B) - Body ground Power switch on (IG) 11 to 14 V A14-31 (+B2) - Body ground Power switch on (IG) 11 to 14 V
- NOTICE:
-
Turning the power switch on (IG) with the inverter with converter assembly connector disconnected causes other DTCs to be stored. Clear the DTCs after performing this inspection.
Turn the power switch off.
Disconnect the cable from the negative (-) auxiliary battery terminal.
Connect the inverter with converter assembly connector.
- Result:
Proceed to OK NG
OK
NG
- CAUTION:
-
Be sure to wear insulated gloves.
Check that the service plug grip is not installed.
- NOTICE:
-
After removing the service plug grip, do not turn the power switch on (READY), unless instructed by the repair manual because this may cause a malfunction.
Disconnect connector A39 from the power management control ECU.
Disconnect connector A14 from the inverter with converter assembly.
Measure the resistance according to the value(s) in the table below.
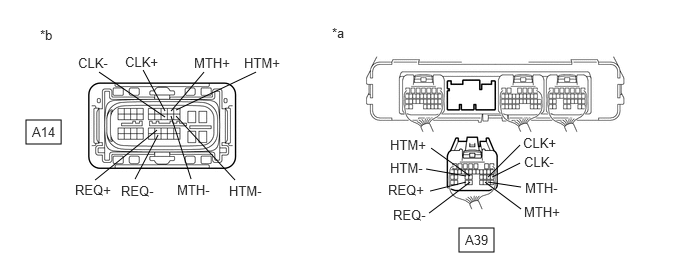
| *a | Rear view of wire harness connector
(to Power Management Control ECU) |
*b | Front view of wire harness connector
(to Inverter with Converter Assembly) |
- Standard Resistance (Check for Open):
Tester Connection Switch Condition Specified Condition A39-24 (HTM+) - A14-9 (HTM+) Power switch off Below 1 Ω A39-25 (HTM-) - A14-20 (HTM-) Power switch off Below 1 Ω A39-30 (MTH+) - A14-8 (MTH+) Power switch off Below 1 Ω A39-29 (MTH-) - A14-19 (MTH-) Power switch off Below 1 Ω A39-33 (REQ+) - A14-26 (REQ+) Power switch off Below 1 Ω A39-32 (REQ-) - A14-37 (REQ-) Power switch off Below 1 Ω A39-21 (CLK+) - A14-7 (CLK+) Power switch off Below 1 Ω A39-20 (CLK-) - A14-18 (CLK-) Power switch off Below 1 Ω
- Standard Resistance (Check for Short):
Tester Connection Switch Condition Specified Condition A39-24 (HTM+) or A14-9 (HTM+) - Body ground and other terminals Power switch off 10 kΩ or higher A39-25 (HTM-) or A14-20 (HTM-) - Body ground and other terminals Power switch off 10 kΩ or higher A39-30 (MTH+) or A14-8 (MTH+) - Body ground and other terminals Power switch off 10 kΩ or higher A39-29 (MTH-) or A14-19 (MTH-) - Body ground and other terminals Power switch off 10 kΩ or higher A39-33 (REQ+) or A14-26 (REQ+) - Body ground and other terminals Power switch off 10 kΩ or higher A39-32 (REQ-) or A14-37 (REQ-) - Body ground and other terminals Power switch off 10 kΩ or higher A39-21 (CLK+) or A14-7 (CLK+) - Body ground and other terminals Power switch off 10 kΩ or higher A39-20 (CLK-) or A14-18 (CLK-) - Body ground and other terminals Power switch off 10 kΩ or higher
Connect the cable to the negative (-) auxiliary battery terminal.
Turn the power switch on (IG).
Measure the voltage according to the value(s) in the table below.
- Standard Voltage:
Tester Connection Switch Condition Specified Condition A39-24 (HTM+) or A14-9 (HTM+) - Body ground Power switch on (IG) Below 1 V A39-25 (HTM-) or A14-20 (HTM-) - Body ground Power switch on (IG) Below 1 V A39-30 (MTH+) or A14-8 (MTH+) - Body ground Power switch on (IG) Below 1 V A39-29 (MTH-) or A14-19 (MTH-) - Body ground Power switch on (IG) Below 1 V A39-33 (REQ+) or A14-26 (REQ+) - Body ground Power switch on (IG) Below 1 V A39-32 (REQ-) or A14-37 (REQ-) - Body ground Power switch on (IG) Below 1 V A39-21 (CLK+) or A14-7 (CLK+) - Body ground Power switch on (IG) Below 1 V A39-20 (CLK-) or A14-18 (CLK-) - Body ground Power switch on (IG) Below 1 V
- NOTICE:
-
Turning the power switch on (IG) with the power management control ECU and inverter with converter assembly connector disconnected causes other DTCs to be stored. Clear the DTCs after performing this inspection.
Turn the power switch off.
Disconnect the cable from the negative (-) auxiliary battery terminal.
Connect the inverter with converter assembly connector.
Connect the power management control ECU connector.
- Result:
Proceed to OK NG
OK
NG
Disconnect connector A39 from the power management control ECU.
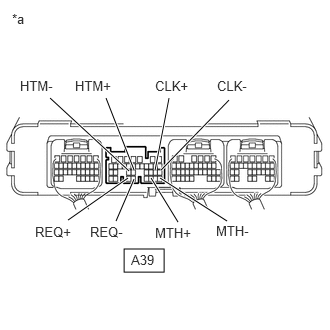
| *a | Component without harness connected
(Power Management Control ECU) |
Measure the resistance according to the value(s) in the table below.
- Standard Resistance:
Tester Connection Switch Condition Specified Condition A39-24 (HTM+) - A39-25 (HTM-) Power switch off 80 to 170 Ω A39-30 (MTH+) - A39-29 (MTH-) Power switch off 80 to 170 Ω A39-33 (REQ+) - A39-32 (REQ-) Power switch off 80 to 170 Ω A39-21 (CLK+) - A39-20 (CLK-) Power switch off 80 to 170 Ω
Connect the power management control ECU connector.
- Result:
Proceed to OK NG
OK
NG
(Click here Engine / Hybrid System>HYBRID / BATTERY CONTROL>HYBRID CONTROL SYSTEM>P0A1A-200)
- Result:
Proceed to OK NG
OK
NG
(Click here Engine / Hybrid System>HYBRID / BATTERY CONTROL>HYBRID CONTROL SYSTEM>P0A1A-200)
- Result:
Proceed to OK NG
OK
NG
(Click here Engine / Hybrid System>HYBRID / BATTERY CONTROL>HYBRID CONTROL SYSTEM>P0A1A-200)
- Result:
Proceed to OK NG
OK
NG
(Click here Engine / Hybrid System>HYBRID / BATTERY CONTROL>HYBRID CONTROL SYSTEM>P0A1A-200)
- Result:
Proceed to OK NG
OK
NG
(Click here Engine / Hybrid System>HYBRID / BATTERY CONTROL>HYBRID CONTROL SYSTEM>P0A1A-200)
- Result:
Proceed to OK NG
OK
NG
(Click here Engine / Hybrid System>HYBRID / BATTERY CONTROL>HYBRID CONTROL SYSTEM>P0A1A-200)
- Result:
Proceed to OK NG
OK
NG
- CAUTION:
-
Be sure to wear insulated gloves.
Check that the service plug grip is not installed.
- NOTICE:
-
After removing the service plug grip, do not turn the power switch on (READY), unless instructed by the repair manual because this may cause a malfunction.
Disconnect connector A14 from the inverter with converter assembly.
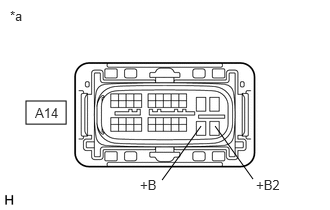
| *a | Front view of wire harness connector
(to Inverter with Converter Assembly) |
Measure the resistance according to the value(s) in the table below.
- Standard Resistance:
Tester Connection Switch Condition Specified Condition A14-30 (+B) - Body ground Power switch off 10 kΩ or higher A14-31 (+B2) - Body ground Power switch off 10 kΩ or higher
Connect the inverter with converter assembly connector.
- Result:
Proceed to OK NG
OK
NG
(Click here Engine / Hybrid System>HYBRID / BATTERY CONTROL>INVERTER WITH CONVERTER>COMPONENTS)
- Result:
Proceed to NEXT
NEXT
- Result:
Proceed to NEXT
NEXT