HYBRID / BATTERY CONTROL INVERTER WITH CONVERTER INSTALLATION
CAUTION / NOTICE / HINT
- NOTICE:
-
If the inverter with converter assembly has been replaced with a new one, make sure to lock the No. 1 inverter cooling hose retainer.
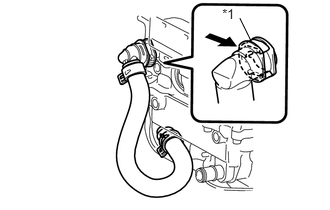
| *1 | Retainer |
PROCEDURE

 82113
1.INSTALL NO. 3 ENGINE ROOM WIRE
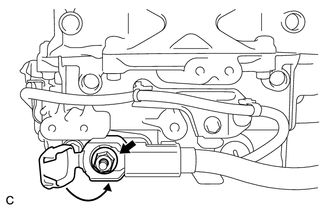
Temporarily install the No. 3 engine room wire with the nut.
Tighten the nut.
- Torque:
- 18 N*m (184 kgf*cm, 13 ft.*lbf)
Close the cover.
G9225J
2.INSTALL NO. 1 INVERTER COOLING HOSE
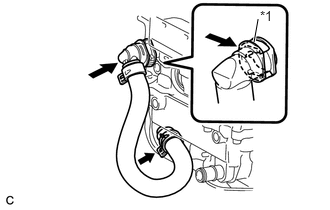
| *1 | Retainer |
Connect the No. 1 inverter cooling hose to the inverter with converter assembly and lock the hose with the retainer.
- NOTICE:
- ·
Insert the retainer until a click sound is heard.
·Pull on the hose to confirm that the hose is securely connected.
·If there is foreign matter on the union or the O-ring, clean it with water and finger scouring.
·To prevent foreign matter from entering the cooling system, do not remove the pieces of cloth or plastic bags from the pipes and disconnected hoses until installation.
Install the No. 1 inverter hose to the inverter with hose clamp.
G1143B
3.INSTALL NO. 2 MOTOR CABLE BRACKET
Install the No. 2 motor cable bracket with the 2 bolts.
- Torque:
- 10 N*m (102 kgf*cm, 7 ft.*lbf)
G1143A
4.INSTALL NO. 1 MOTOR CABLE BRACKET
Install the No. 1 motor cable bracket with the 2 bolts.
- Torque:
- 10 N*m (102 kgf*cm, 7 ft.*lbf)
G9216
5.INSTALL NO. 3 INVERTER BRACKET
Temporarily install the No. 3 inverter bracket with the 2 bolts.
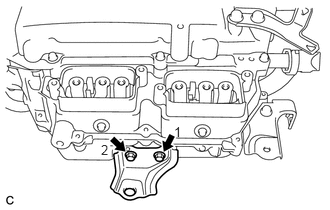
Tighten the 2 bolts in the order shown in the illustration.
- Torque:
- 8.5 N*m (87 kgf*cm, 75 in.*lbf)
G9215
6.INSTALL NO. 2 INVERTER BRACKET
Temporarily install the No. 2 inverter bracket with the 2 bolts.
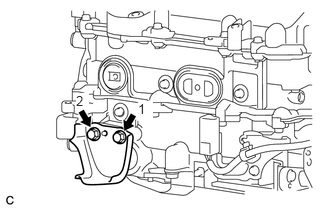
Tighten the 2 bolts in the order shown in the illustration.
- Torque:
- 8.5 N*m (87 kgf*cm, 75 in.*lbf)
G9214
7.INSTALL NO. 1 INVERTER BRACKET
Temporarily install the No. 1 inverter bracket with the 2 bolts.
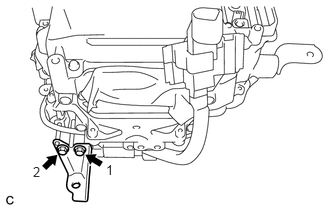
Tighten the 2 bolts in the order shown in the illustration.
- Torque:
- 8.5 N*m (87 kgf*cm, 75 in.*lbf)
17119A
8.INSTALL AIR CLEANER BRACKET
Install the air cleaner bracket with the bolt.
- Torque:
- 5.0 N*m (51 kgf*cm, 44 in.*lbf)
17771A
9.INSTALL AIR CLEANER BRACKET
Install the air cleaner bracket with the bolt.
- Torque:
- 5.0 N*m (51 kgf*cm, 44 in.*lbf)
10.INSTALL HIGH VOLTAGE FUSE
- CAUTION:
-
Wear insulated gloves.
- HINT:
-
Perform this procedure only when replacement of the high voltage fuse is necessary.
Remove the bolt and connector cover assembly.
- NOTICE:
- ·
Make sure to pull the connector cover assembly straight up, as a connector is connected to the bottom of the cover.
·Do not allow any foreign objects or water to enter the inverter with converter assembly.
Install the high voltage fuse with 2 new nuts.
- Torque:
- 4.0 N*m (41 kgf*cm, 35 in.*lbf)
- NOTICE:
-
Be sure to use a torque wrench to tighten the nuts.
Temporarily install the connector cover assembly with the bolt to prevent any foreign objects or water from entering the inverter with converter assembly.
G9200
11.INSTALL INVERTER WITH CONVERTER ASSEMBLY
- CAUTION:
-
Wear insulated gloves.
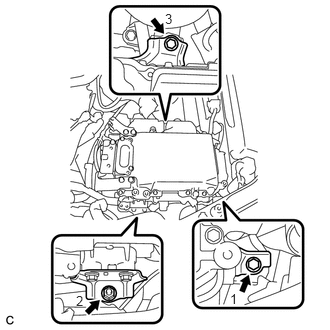
Temporarily install the inverter with converter assembly with the 2 bolts and nut.
- NOTICE:
- ·
Since the inverter with converter assembly is very heavy, 2 people are needed to install the inverter with converter assembly. When installing the inverter with converter assembly, do not damage the parts around it.
·To prevent damage, do not hold the inverter with converter assembly by the connectors.
·To prevent damage due to static electricity, do not touch the terminals of the disconnected connectors.
Fully tighten the 2 bolts and nut in the order shown in the illustration.
- Torque:
- 21 N*m (214 kgf*cm, 15 ft.*lbf)
G90A0A
12.CONNECT NO. 1 INVERTER COOLING HOSE ASSEMBLY
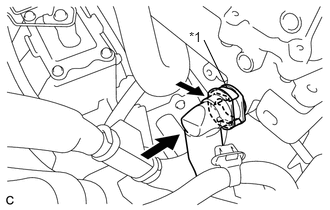
| *1 | Retainer |
Connect the No. 1 inverter cooling hose assembly to the inverter with converter assembly and lock the hose with the retainer.
- NOTICE:
- ·
Insert the retainer until a click sound is heard.
·Pull on the hose to confirm that the hose is securely connected.
·If there is foreign matter on the union or the O-ring, clean it with water and finger scouring.
·To prevent foreign matter from entering the cooling system, do not remove the pieces of cloth or plastic bags from the pipes and disconnected hoses until installation.
G9228A
13.CONNECT NO. 4 INVERTER COOLING HOSE
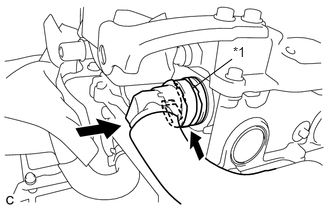
| *1 | Retainer |
Connect the No. 4 inverter cooling hose assembly to the inverter with converter assembly and lock the hose with the retainer.
- NOTICE:
- ·
Insert the retainer until a click sound is heard.
·Pull on the hose to confirm that the hose is securely connected.
·If there is foreign matter on the union or the O-ring, clean it with water and finger scouring.
·To prevent foreign matter from entering the cooling system, do not remove the pieces of cloth or plastic bags from the pipes and disconnected hoses until installation.
82113
14.CONNECT NO. 3 ENGINE ROOM WIRE
Connect the clamp.
Install the No. 3 engine room wire with the nut.
- Torque:
- 8.0 N*m (82 kgf*cm, 71 in.*lbf)
Install the relay block cover.
15.CONNECT LOW VOLTAGE CONNECTOR
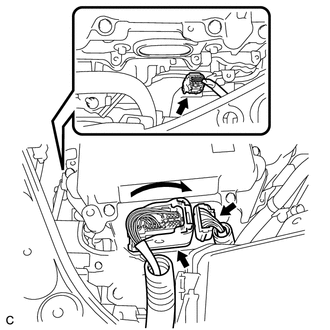
Connect the 3 low voltage connectors and lock the connector with the lock lever.
- NOTICE:
- ·
Do not allow any foreign objects or water to enter the inverter with converter assembly.
·Make sure that the connectors are fully engaged.
16.REMOVE CONNECTOR COVER ASSEMBLY
Remove the bolt and connector cover assembly.
- NOTICE:
- ·
Make sure to pull the connector cover assembly straight up, as a connector is connected to the bottom of the cover.
·Do not allow any foreign objects or water to enter the inverter with converter assembly.
82164C
17.CONNECT NO. 4 FLOOR WIRE
- CAUTION:
-
Wear insulated gloves.
- NOTICE:
- ·
Do not damage the terminals, connector housings or inverter with converter assembly when connecting them.
·Do not touch the connector waterproofing rubber or terminals.
·Do not allow any foreign objects or water to enter the inverter with converter assembly.
·Make sure that the connectors are fully engaged.
·Make sure that the connector does not come out when its body is pulled.
Connect the No. 4 floor wire and wire harness clamp to the inverter with converter assembly.
Secure the No. 4 floor wire to the inverter with converter assembly with the bolt.
- Torque:
- 8.0 N*m (82 kgf*cm, 71 in.*lbf)
82124
18.CONNECT NO. 4 ENGINE WIRE
- CAUTION:
-
Wear insulated gloves.
- NOTICE:
- ·
Do not damage the terminals, connector housings or inverter with converter assembly when connecting them.
·Do not touch the connector waterproofing rubber or terminals.
·Do not allow any foreign objects or water to enter the inverter with converter assembly.
·Make sure that the connectors are fully engaged.
·Make sure that the connector does not come out when its body is pulled.
Connect the No. 4 engine wire to the inverter with converter assembly.
Connect the wire harness clamp.
19.INSTALL CONNECTOR COVER ASSEMBLY
- CAUTION:
-
Wear insulated gloves.
- NOTICE:
- ·
Make sure that the interlock is fully engaged.
·Do not allow any foreign objects or water to enter the inverter with converter assembly.
Install the connector cover assembly with the 2 bolts.
- Torque:
- 8.0 N*m (82 kgf*cm, 71 in.*lbf)
G1143C
20.INSTALL NO. 3 MOTOR CABLE BRACKET
Install the No. 3 motor cable bracket with the 2 bolts.
- Torque:
- 10 N*m (102 kgf*cm, 7 ft.*lbf)
Connect the hose clamp.
G1148
21.CONNECT MOTOR CABLE
- CAUTION:
-
Wear insulated gloves.
- NOTICE:
- ·
Do not damage the terminals, connector housings or inverter with converter assembly when connecting them.
·Do not touch the connector waterproofing rubber or terminals.
·Do not allow any foreign objects or water to enter the inverter with converter assembly.
Connect the motor cable to the inverter with converter assembly.
Connect the 3 wire harness clamps.
Using an insulated tool, install the 3 bolts and motor cable to the inverter with converter assembly.
- Torque:
- 8.0 N*m (82 kgf*cm, 71 in.*lbf)
- NOTICE:
- ·
The connector should be connected securely.
·The bolts should be tightened securely.
G9221B
22.INSTALL UPPER INVERTER COVER
- CAUTION:
-
Wear insulated gloves.
Install the upper inverter cover (motor cable side) with the 2 bolts.
- Torque:
- 8.0 N*m (82 kgf*cm, 71 in.*lbf)
- NOTICE:
- ·
Do not touch the upper inverter cover waterproofing rubber.
·Visually confirm that the upper inverter cover waterproofing rubber is securely installed before installing the upper inverter cover.
·Make sure that the interlock is fully engaged.
G2148
23.CONNECT GENERATOR CABLE
- CAUTION:
-
Wear insulated gloves.
- NOTICE:
- ·
Do not damage the terminals, connector housings or inverter with converter assembly when connecting them.
·Do not touch the connector waterproofing rubber or terminals.
·Do not allow any foreign objects or water to enter the inverter with converter assembly.
Connect the generator cable to the inverter with converter assembly.
Connect the 2 wire harness clamps.
Using an insulated tool, install the 3 bolts and generator cable to the inverter with converter assembly.
- Torque:
- 8.0 N*m (82 kgf*cm, 71 in.*lbf)
- NOTICE:
- ·
The connector should be connected securely.
·The bolts should be tightened securely.
G9221B
24.INSTALL UPPER INVERTER COVER
- CAUTION:
-
Wear insulated gloves.
Install the upper inverter cover (generator cable side) with the 2 bolts.
- Torque:
- 8.0 N*m (82 kgf*cm, 71 in.*lbf)
- NOTICE:
- ·
Do not touch the upper inverter cover waterproofing rubber.
·Visually confirm that the upper inverter cover waterproofing rubber is securely installed before installing the upper inverter cover.
·Make sure that the interlock is fully engaged.
G9217
25.INSTALL NO. 4 INVERTER BRACKET
Temporarily install the No. 4 inverter bracket with the 3 bolts.
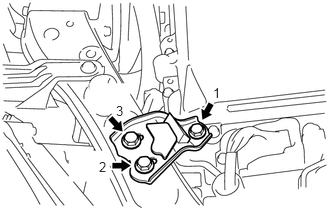
Tighten the 3 bolts in the order shown in the illustration.
- Torque:
- 10 N*m (102 kgf*cm, 7 ft.*lbf)
G9257
26.INSTALL NO. 5 INVERTER BRACKET
Temporarily install the No. 5 inverter bracket with the 2 bolts.
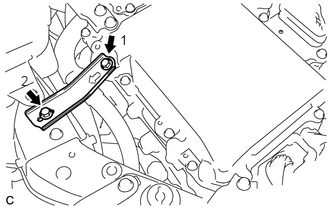
Tighten the 2 bolts in the order shown in the illustration.
- Torque:
- 10 N*m (102 kgf*cm, 7 ft.*lbf)
27.INSTALL AIR CLEANER CASE SUB-ASSEMBLY
17801
28.INSTALL AIR CLEANER FILTER ELEMENT SUB-ASSEMBLY
17735
29.INSTALL AIR CLEANER CAP SUB-ASSEMBLY
17750A
30.INSTALL INLET AIR CLEANER ASSEMBLY
53295E
31.INSTALL COOL AIR INTAKE DUCT SEAL
G3834
32.INSTALL SERVICE PLUG GRIP
33.ADD COOLANT (for Inverter)
34.INSPECT FOR COOLANT LEAK (for Inverter)