2AR-FXE ENGINE MECHANICAL ENGINE ASSEMBLY INSTALLATION
CAUTION / NOTICE / HINT
- HINT:
-
Perform "Inspection After Repair" after replacing the engine assembly.
-
Click hereEngine / Hybrid System>2AR-FXE ENGINE CONTROL>SFI SYSTEM>INITIALIZATION
PROCEDURE

 1.REMOVE ENGINE STAND
Using a chain block and engine sling device, secure the engine assembly.
- NOTICE:
- ·
Adjust the angle of the sling device carefully to prevent the engine assembly or engine hanger from deforming or becoming damaged.
·Servicing an engine assembly while it is hanging is dangerous. This can be done only when installing/removing the engine assembly to/from an engine stand.
Remove the engine stand from the engine.
82121
2.INSTALL ENGINE WIRE
Install the engine wire to the engine with transaxle.
13405
3.INSTALL FLYWHEEL SUB-ASSEMBLY
31270
4.INSTALL TRANSMISSION INPUT DAMPER ASSEMBLY
30900
5.INSTALL HYBRID VEHICLE TRANSAXLE ASSEMBLY
88370
6.INSTALL COMPRESSOR WITH MOTOR ASSEMBLY
12315A
7.INSTALL ENGINE MOUNTING BRACKET RH
Install the engine mounting bracket RH with the 3 bolts.
- Torque:
- 54 N*m (551 kgf*cm, 40 ft.*lbf)
43457
8.INSTALL DRIVE SHAFT BEARING BRACKET
Install the drive shaft bearing bracket with the 3 bolts.
- Torque:
- 64 N*m (653 kgf*cm, 47 ft.*lbf)
12361A
9.TEMPORARILY INSTALL FRONT ENGINE MOUNTING INSULATOR
Temporarily install the front engine mounting insulator with the 3 nuts.
- HINT:
-
Perform this procedure only when replacement of the front engine mounting insulator is necessary.
12372A
10.TEMPORARILY INSTALL ENGINE MOUNTING INSULATOR LH
Temporarily install the engine mounting insulator LH with the 3 nuts.
- HINT:
-
Perform this procedure only when replacement of the engine mounting insulator LH is necessary.
12362
11.TEMPORARILY INSTALL ENGINE MOUNTING INSULATOR RH
Temporarily install the engine mounting insulator RH with the 3 nuts.
- HINT:
-
Perform this procedure only when replacement of the engine mounting insulator RH is necessary.
51100G
12.INSTALL FRONT FRAME ASSEMBLY
Install the engine mounting insulator LH with the nut.
- Torque:
- 95 N*m (969 kgf*cm, 70 ft.*lbf)
Install the engine mounting insulator RH with the nut.
- Torque:
- 95 N*m (969 kgf*cm, 70 ft.*lbf)
Install the front engine mounting insulator with the bolt.
- Torque:
- 87 N*m (887 kgf*cm, 64 ft.*lbf)
Fully tighten the 9 temporarily installed nuts of the engine mounting insulators to the specified torque.
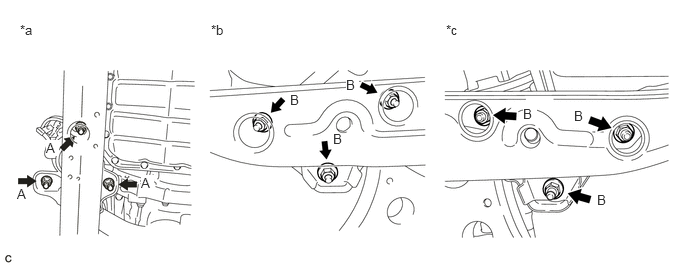
| *a | Front Engine Mounting Insulator | *b | Engine Mounting Insulator RH |
| *c | Engine Mounting Insulator LH | - | - |
- HINT:
-
Perform this procedure only when replacement of the engine mounting insulator is necessary.
- Torque:
- A : 52 N*m (530 kgf*cm, 38 ft.*lbf)
- B : 87 N*m (887 kgf*cm, 64 ft.*lbf)
Install the 4 hole plugs.
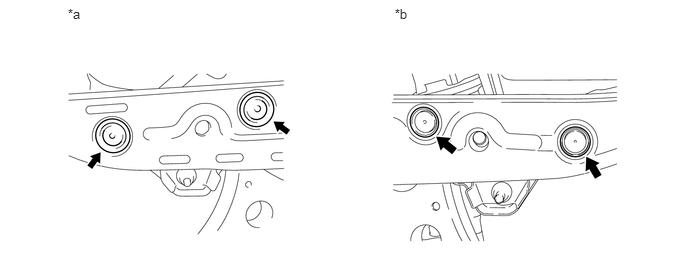
| *a | Engine Mounting Insulator RH | *b | Engine Mounting Insulator LH |
- HINT:
-
Perform this procedure only when replacement of the engine mounting insulator is necessary.
43420G
13.INSTALL FRONT DRIVE SHAFT HOLE SNAP RING LH
43420
14.INSTALL FRONT DRIVE SHAFT ASSEMBLY LH
43410
15.INSTALL FRONT DRIVE SHAFT ASSEMBLY RH
16.INSTALL ENGINE ASSEMBLY WITH TRANSAXLE
Set the engine assembly with transaxle on an engine lifter.
- NOTICE:
- ·
Install a height adjustment attachment and plate lift attachment onto the engine assembly with transaxle.
·Do not position a height adjustment attachment or plate lift attachment onto the front frame assembly.
·To prevent the oil pan from deforming, do not place any attachments onto the oil pan of the engine assembly with transaxle.
·Make sure to support the engine assembly with transaxle securely to prevent it from falling.
·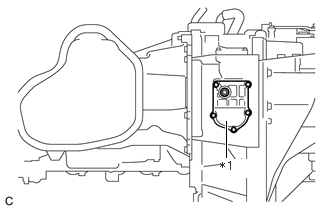 2.354,1.635 2.354,1.26 true 2.292,1.656 2.604,1.854 0.313,0.198 10 true *1
*1 No. 2 Motor Water Jacket Cover Assembly
To prevent coolant leaks, do not position the height adjustment attachments or plate lift attachments under the No. 2 motor water jacket cover assembly.
Remove the engine hangers.
Click hereEngine / Hybrid System>2AR-FXE ENGINE MECHANICAL>ENGINE UNIT>REMOVAL
Install the engine assembly to the vehicle.
- NOTICE:
-
Do not raise the engine more than necessary. If the engine is raised excessively, the vehicle may also be lifted up.
- HINT:
- ·
Make sure that the engine is clear of all wiring and hoses.
·While raising the engine into the vehicle, do not allow it to contact the vehicle.
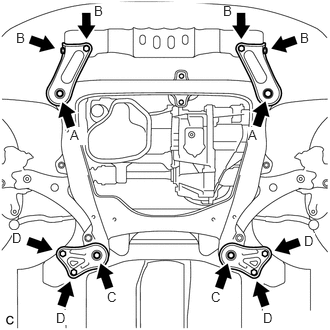
Install the frame side rail plate RH and LH with the 4 bolts and 2 nuts.
- Torque:
- A : 85 N*m (867 kgf*cm, 62 ft.*lbf)
- B : 32 N*m (326 kgf*cm, 24 ft.*lbf)
Install the front suspension member brace rear RH and LH with the 4 bolts and 2 nuts.
- Torque:
- C : 85 N*m (867 kgf*cm, 62 ft.*lbf)
- D : 32 N*m (326 kgf*cm, 24 ft.*lbf)
- HINT:
-
Perform "Inspection After Repair" after replacing the engine assembly.
-
Click hereEngine / Hybrid System>2AR-FXE ENGINE CONTROL>SFI SYSTEM>INITIALIZATION
11361J
17.INSTALL FLYWHEEL HOUSING UNDER COVER
Install the flywheel housing under cover.
48069
18.INSTALL FRONT LOWER NO. 1 SUSPENSION ARM SUB-ASSEMBLY LH
48068
19.INSTALL FRONT LOWER NO. 1 SUSPENSION ARM SUB-ASSEMBLY RH
- HINT:
-
Use the same procedure described for the LH side.
45470
20.INSTALL TIE ROD ASSEMBLY LH
45460
21.INSTALL TIE ROD ASSEMBLY RH
- HINT:
-
Use the same procedure described for the LH side.
89543
22.INSTALL FRONT SPEED SENSOR LH
89542
23.INSTALL FRONT SPEED SENSOR RH
- HINT:
-
Use the same procedure described for the LH side.
48810
24.INSTALL FRONT STABILIZER LINK ASSEMBLY LH
48820B
25.INSTALL FRONT STABILIZER LINK ASSEMBLY RH
- HINT:
-
Use the same procedure described for the LH side.
43502H
26.INSTALL FRONT AXLE SHAFT NUT LH
45220
27.CONNECT STEERING INTERMEDIATE SHAFT ASSEMBLY
43501H
28.INSTALL FRONT AXLE SHAFT NUT RH
- HINT:
-
Use the same procedure described for the LH side.
17410
29.INSTALL FRONT EXHAUST PIPE ASSEMBLY
88711
30.CONNECT NO. 1 COOLER REFRIGERANT DISCHARGE HOSE
88704
31.CONNECT SUCTION HOSE SUB-ASSEMBLY
12309
32.INSTALL ENGINE MOVING CONTROL ROD SUB-ASSEMBLY
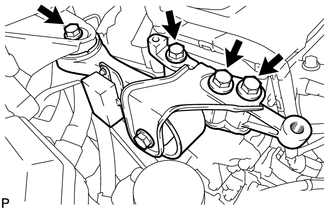
Temporarily install the engine moving control rod sub-assembly with the 4 bolts.
Fully tighten the engine moving control rod sub-assembly with the 4 bolts.
- Torque:
- 38 N*m (387 kgf*cm, 28 ft.*lbf)
82284
33.INSTALL EARTH WIRE
Install the earth wire with the bolt.
- Torque:
- 8.0 N*m (82 kgf*cm, 71 in.*lbf)
12327A
34.INSTALL NO. 2 ENGINE MOUNTING STAY RH
Install the No. 2 engine mounting stay RH with the 2 bolts.
- Torque:
- 38 N*m (387 kgf*cm, 28 ft.*lbf)
77251B
35.CONNECT FUEL MAIN TUBE
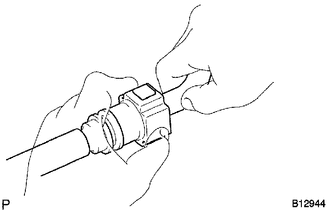
Push in the fuel tube connector to the fuel pipe until the connector makes a "click" sound.
- NOTICE:
- ·
Check for damage or contamination on the connected part of the pipe.
·Check if the pipe and the connector are securely connected by trying to pull them apart.
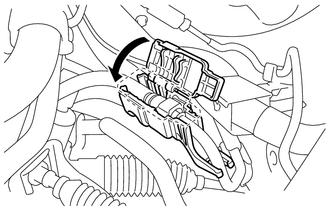
Install the No. 1 fuel pipe clamp.
87245
36.CONNECT INLET HEATER WATER HOSE
Connect the inlet heater water hose.
87246
37.CONNECT OUTLET HEATER WATER HOSE
Connect the outlet heater water hose.
G9229A
38.CONNECT NO. 5 INVERTER COOLING HOSE
Connect the No. 5 inverter cooling hose to the hybrid vehicle transaxle assembly.
16571C
39.CONNECT NO. 1 RADIATOR HOSE
Connect the air fuel ratio sensor wire to the No. 1 radiator hose with the hose clamp.
16572D
40.CONNECT NO. 2 RADIATOR HOSE
Connect the No. 2 radiator hose.
33820B
41.CONNECT TRANSMISSION CONTROL CABLE ASSEMBLY
Connect the transmission control cable assembly to the 2 transmission control cable brackets.
Install a new clip to the No. 1 transmission control cable bracket.
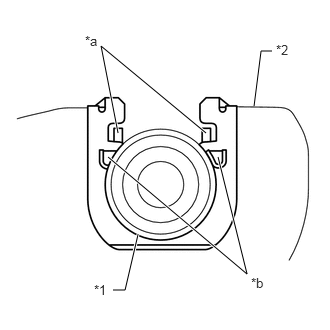
| *1 | No. 1 Transmission Control Cable Assembly |
| *2 | No. 1 Transmission Control Cable Bracket |
| *a | Claw A |
| *b | Claw B |
Install the transmission control cable assembly to the No. 1 transmission control cable bracket
- NOTICE:
- ·
Make sure that the claws A on the clip are securely fit into the bracket holes.
·Make sure that the cable is securely installed inside of the claws B of the clip.
Connect the transmission control cable assembly to the control shaft lever with the nut.
- Torque:
- 15 N*m (153 kgf*cm, 11 ft.*lbf)
82124
42.INSTALL NO. 4 ENGINE WIRE
Install the 2 wire harness clamps and connect the No. 4 engine wire to the fan shroud.
G9200
43.INSTALL INVERTER WITH CONVERTER ASSEMBLY
82121
44.CONNECT ENGINE WIRE
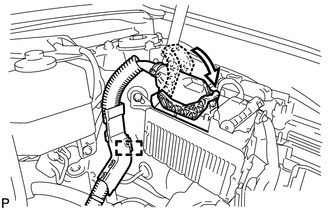
Connect the wire harness clamp.
Connect the connector to the ECM with the lock lever.
Install the earth wire with the bolt.
- Torque:
- 8.0 N*m (82 kgf*cm, 71 in.*lbf)
Connect the 4 connectors and wire harness clamp.
G90A0A
45.CONNECT NO. 1 INVERTER COOLING HOSE ASSEMBLY
G9228A
46.CONNECT NO. 4 INVERTER COOLING HOSE
82113
47.CONNECT NO. 3 ENGINE ROOM WIRE
48.CONNECT LOW VOLTAGE CONNECTOR
49.REMOVE CONNECTOR COVER ASSEMBLY
82164C
50.CONNECT NO. 4 FLOOR WIRE
82124
51.CONNECT NO. 4 ENGINE WIRE
52.INSTALL CONNECTOR COVER ASSEMBLY
G1143C
53.INSTALL NO. 3 MOTOR CABLE BRACKET
G1148
54.CONNECT MOTOR CABLE
G9221B
55.INSTALL UPPER INVERTER COVER
G2148
56.CONNECT GENERATOR CABLE
G9221B
57.INSTALL UPPER INVERTER COVER
G9217
58.INSTALL NO. 4 INVERTER BRACKET
G9257
59.INSTALL NO. 5 INVERTER BRACKET
17701
60.INSTALL AIR CLEANER CASE SUB-ASSEMBLY
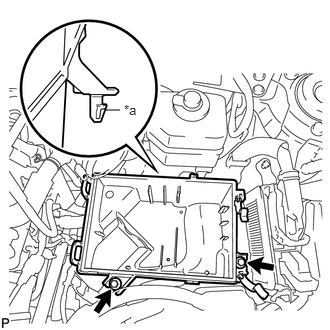
| *a | Projection |
Insert the projection of the air cleaner case sub-assembly to the hole of the No. 2 air cleaner bracket as shown in the illustration.
Tighten the 2 bolts.
- Torque:
- 5.0 N*m (51 kgf*cm, 44 in.*lbf)
17801
61.INSTALL AIR CLEANER FILTER ELEMENT SUB-ASSEMBLY
Install the air cleaner filter element sub-assembly.
- NOTICE:
-
Install the air cleaner filter element with the printed side facing the vehicle front.
17735
62.INSTALL AIR CLEANER CAP SUB-ASSEMBLY
17750A
63.INSTALL INLET AIR CLEANER ASSEMBLY
Install the inlet air cleaner with the 2 bolts.
- Torque:
- 8.0 N*m (82 kgf*cm, 71 in.*lbf)
G3834
64.INSTALL SERVICE PLUG GRIP
G92QA
65.INSTALL NO. 8 HYBRID VEHICLE BATTERY SHIELD PANEL
64717A
66.INSTALL LUGGAGE COMPARTMENT FRONT TRIM COVER
64711
67.INSTALL LUGGAGE COMPARTMENT FLOOR MAT
68.CONNECT CABLE TO AUXILIARY BATTERY NEGATIVE TERMINAL
- NOTICE:
-
When disconnecting the cable, some systems need to be initialized after the cable is reconnected.
-
Click hereGeneral>INTRODUCTION>REPAIR INSTRUCTION>INITIALIZATION
69.INSTALL LUGGAGE TRIM SERVICE HOLE COVER
70.ADD ENGINE OIL
71.ADD COOLANT (for Engine)
72.ADD COOLANT (for Inverter)
73.ADD HYBRID TRANSAXLE FLUID
74. CHARGE AIR CONDITIONING SYSTEM WITH REFRIGERANT
75. WARM UP ENGINE
76.INSPECT FOR FUEL LEAK
77.INSPECT FOR OIL LEAK
78.INSPECT FOR COOLANT LEAK (for Engine)
79.INSPECT FOR COOLANT LEAK (for Inverter)
80.INSPECT FOR EXHAUST GAS LEAK
81.INSPECT FOR REFRIGERANT LEAK
82.INSPECT IGNITION TIMING
83.INSPECT ENGINE IDLE SPEED
84.INSPECT CO/HC
12601B
85.INSTALL NO. 1 ENGINE COVER SUB-ASSEMBLY
Engage the 3 pins and install the No. 1 engine cover sub-assembly.
53295E
86.INSTALL COOL AIR INTAKE DUCT SEAL
87.INSPECT AND ADJUST SHIFT LEVER POSITION
53737B
88.INSTALL FRONT FENDER APRON SEAL LH
53736
89.INSTALL FRONT FENDER APRON SEAL RH
51442C
90.INSTALL ENGINE UNDER COVER LH
53852K
91.INSTALL FRONT WHEEL OPENING EXTENSION PAD LH
51441C
92.INSTALL ENGINE UNDER COVER RH
53851Z
93.INSTALL FRONT WHEEL OPENING EXTENSION PAD RH
94.INSTALL FRONT WHEEL
- Torque:
- 103 N*m (1049 kgf*cm, 76 ft.*lbf)
95.CHECK FOR SPEED SENSOR SIGNAL
96.INSPECT AND ADJUST FRONT WHEEL ALIGNMENT