HEATING / AIR CONDITIONING AIR CONDITIONING SYSTEM P0AA6-611 Hybrid Battery Voltage System Isolation Fault
DESCRIPTION
The DTC is stored if there is insulation trouble with the high-voltage circuit in the air conditioning system. Possible causes are poor insulation in the compressor with motor assembly, or mixing of any oil other than ND-OIL 11 in the refrigerant cycle.
A high-voltage motor is built into the electrical compressor and is cooled directly with refrigerant. Compressor oil (ND-OIL 11) with high insulation performance is used because a leakage of electrical power may occur if regular compressor oil (ND-OIL 8) is used.
- CAUTION:
- ·
Wear insulated gloves and pull out the service plug grip before inspection as procedures may require disconnecting high-voltage connectors.
·Be sure to carry the removed service plug grip because other workers may install it by mistake.
·Do not touch the high-voltage connectors or terminals for 10 minutes after the service plug grip is removed.
| DTC No. | Detection Item | DTC Detection Condition | Trouble Area | Memory |
|---|---|---|---|---|
| P0AA6-611 | Hybrid Battery Voltage System Isolation Fault | High voltage system insulation malfunction | ·
Compressor oil ·
Refrigerant pipe line ·
Compressor with motor assembly ·
CAN communication system |
Memorized |
WIRING DIAGRAM
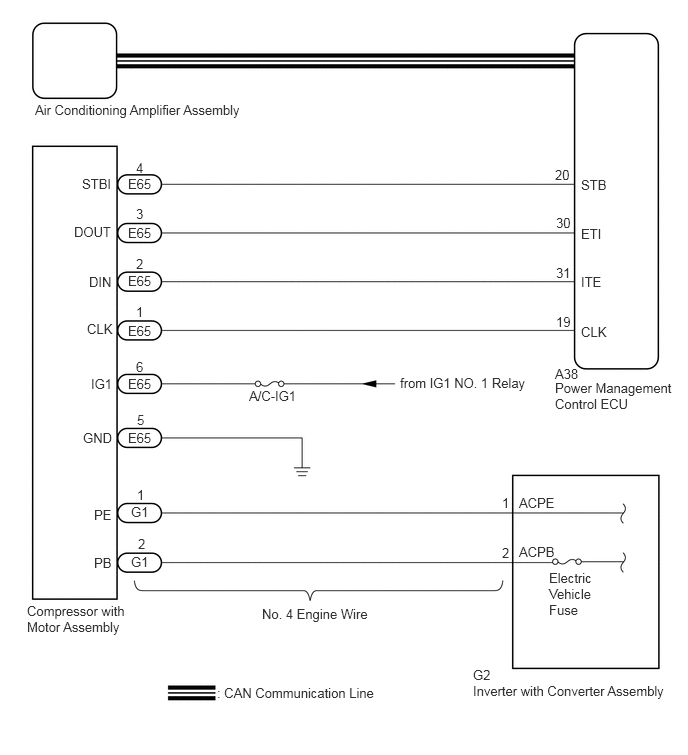
CAUTION / NOTICE / HINT
- CAUTION:
- ·
Wear insulated gloves and pull out the service plug grip before inspection as procedures may require disconnecting high-voltage connectors.
·Be sure to carry the removed service plug grip because other workers may install it by mistake.
·Do not touch the high-voltage connectors or terminals for 10 minutes after the service plug grip is removed.
- NOTICE:
- ·
After turning the power switch off, waiting time may be required before disconnecting the cable from the negative (-) auxiliary battery terminal. Therefore, make sure to read the disconnecting the cable from the negative (-) auxiliary battery terminal notices before proceeding with work.
Click hereGeneral>INTRODUCTION>REPAIR INSTRUCTION>PRECAUTION
·Electrical insulation performance may decrease significantly if even a small amount of oil other than ND-OIL 11 is used (or enters) in the refrigerant cycle, causing the DTC to be output.
·If other oil is accidentally used and a DTC is output, collect the oil in the refrigerant cycle into the compressor and replace it with ND-OIL 11 to increase the ND-OIL 11 ratio amount.
·Replace the main components (evaporator, condenser, and compressor) if a large amount of oil other than ND-OIL 11 enters the system. Failing to do so may cause electrical insulation performance to remain low, causing the DTC to be output.
·The hybrid control system and air conditioning system output DTCs separately. Inspect DTCs following the diagnosis procedure for the hybrid control system first if any DTCs from those systems are output simultaneously.
- HINT:
-
If it can be confirmed that any compressor oil other than ND-OIL 11 has been used in the vehicle, replace the air conditioning cycle.
PROCEDURE
Using the intelligent tester to check if the CAN communication system is functioning normally.
- Result:
Result Proceed to CAN DTC is not output A CAN DTC is output B
A
B
Click herePower Source / Network>NETWORKING>CAN COMMUNICATION SYSTEM>HOW TO PROCEED WITH TROUBLESHOOTING
- CAUTION:
-
Because the compressor has a high-voltage circuit, wear insulated gloves and pull out the service plug grip to cut off the high-voltage circuit before inspection.
Clear the DTCs.
Click hereVehicle Interior>HEATING / AIR CONDITIONING>AIR CONDITIONING SYSTEM>DTC CHECK / CLEAR
- Body Electrical > Air Conditioner > Clear DTCs
- 50002 121
Turn the power switch on (READY).
Prepare the vehicle according to the table below for 3 minutes.
| Item | Condition |
|---|---|
| Blower Speed | HI |
| Temperature Setting | MAX COLD |
| A/C | On |
Turn the power switch off.
Remove the service plug grip.
Click hereEngine / Hybrid System>HYBRID / BATTERY CONTROL>INVERTER WITH CONVERTER>REMOVAL
- CAUTION:
-
Do not touch the high-voltage connectors or terminals for 10 minutes after the service plug grip is removed.
- NOTICE:
-
After removing the service plug grip, turning the power switch on (READY) may cause a malfunction. Do not turn the power switch on (READY) with the service plug grip removed.
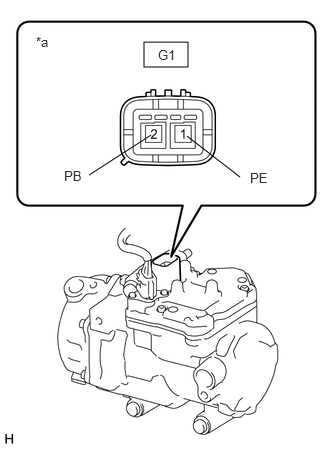
| *a | Component without harness connected
(Compressor with Motor Assembly) |
Disconnect the G1 compressor with motor assembly connector.
Using a megohmmeter, measure the resistance according to the value(s) in the table below.
- Standard Resistance:
Tester Connection Condition Specified Condition G1-1 (PE) - Body ground Always 2 MΩ or higher G1-2 (PB) - Body ground Always 2 MΩ or higher
- Result:
Proceed to OK NG
OK
NG
- CAUTION:
-
Because the compressor has a high-voltage circuit, wear insulated gloves and pull out the service plug grip to cut off the high-voltage circuit before inspection.
Reconnect the connector to the compressor with motor assembly.
Install the service plug grip.
Click hereEngine / Hybrid System>HYBRID / BATTERY CONTROL>INVERTER WITH CONVERTER>INSTALLATION
Turn the power switch on (READY).
Set the A/C temperature to 25°C (77°F) and the blower switch to LO and then operate the compressor for 10 minutes to circulate the refrigerant and collect as much compressor oil as possible in the compressor.
Turn the power switch off.
Using a spot cooler or other tools, cool down the compressor with motor assembly for 30 minutes, or leave the vehicle overnight before inspection.
- NOTICE:
-
Do not operate the compressor before inspection.
Remove the service plug clip.
Click hereEngine / Hybrid System>HYBRID / BATTERY CONTROL>INVERTER WITH CONVERTER>REMOVAL
- CAUTION:
-
Do not touch the high-voltage connectors or terminals for 10 minutes after the service plug grip is removed.
- NOTICE:
-
After removing the service plug grip, turning the power switch on (READY) may cause a malfunction. Do not turn the power switch on (READY) with the service plug grip removed.
| *a | Component without harness connected
(Compressor with Motor Assembly) |
Disconnect the G1 compressor with motor assembly connector.
Using a megohmmeter, measure the resistance according to the value(s) in the table below.
- Standard Resistance:
Tester Connection Condition Specified Condition G1-1 (PE) - Body ground Always 3 MΩ or higher G1-2 (PB) - Body ground Always 3 MΩ or higher
- NOTICE:
-
If the results are out of the specified range, replace the compressor without operating it.
- Result:
Proceed to OK NG
OK
NG