Home › Vehicle Interior › HEATING / AIR CONDITIONING › COMPRESSOR (for 6AR-FSE)

COMPRESSOR (for 6AR-FSE) > INSTALLATION

for Preparation Click here


1. ADJUST COMPRESSOR OIL LEVEL


  1. When replacing the compressor with a new one:


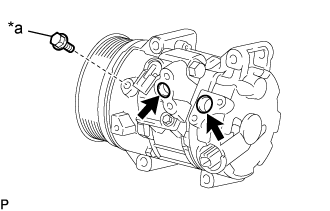
      E305927E01
    1. Gradually discharge the inert gas from the service valves.
      Text in Illustration 
      *a
      Drain bolt (washer)

    2. Remove the drain bolt (washer).


    3. E218352E03
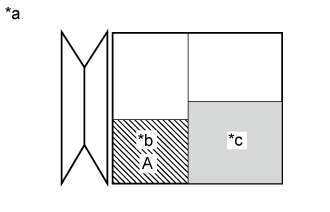
    4. Drain the following amount of oil from the new compressor before installation so that the amount of oil contained in it is the same as that in the compressor to be replaced.

      HINT:
      New compressors are filled with sufficient oil for the whole air conditioning system. Therefore, it is necessary to drain oil from the new compressor to compensate for oil remaining in the condenser and cooling unit.

      Text in Illustration 
      *a
      Removed Compressor
      *b
      Amount of oil drain from removed compressor
      *c
      Amount of oil remaining in the reserve chamber (60 cc (2.03 fl.oz))

      Standard:
      (The amount of compressor oil inside a new compressor assembly with pulley: 100 (+15) cc (3.38 (+0.51) fl.oz)) - (The amount of compressor oil remaining in the removed compressor assembly with pulley) = The amount of compressor oil to be removed when replacing the compressor assembly with pulley

      NOTICE:
      1. When A + 60 cc (2.03 fl.oz) exceeds the standard oil fill volume specified for the compressor by part number, install the compressor without adjusting the oil volume.
        Example:
        If A = 45 cc (1.52 fl.oz), A + 60 cc (2.03 fl.oz) = 105 cc (3.55 fl.oz). If the standard volume is 100 cc (3.38 fl.oz), install the compressor as is.
      2. If the amount of oil remaining in the removed compressor is too low, check for oil leaks.
      3. Use ND-OIL 8 or equivalent for compressor oil.

    5. Install the drain bolt (washer).

      Torque:
      30 N*m{ 306 kgf*cm , 22 ft.*lbf }


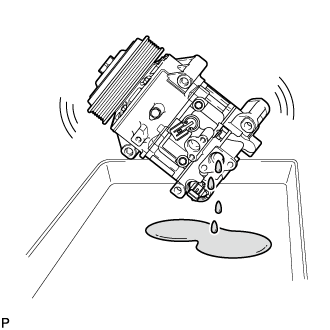
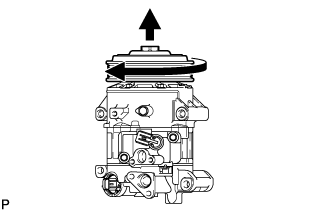
  1. If draining the oil is difficult, drain the oil using the following procedure:

    1. Remove the suction seal cap.


    2. E182028
    3. Lightly shake the compressor with the suction port facing down, and drain the oil (*1).

      NOTICE:
      Do not allow the pulley to come into contact with the compressor oil.


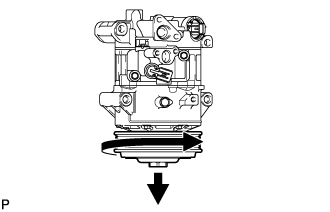
    E182029
  1. With the DL pulley facing down, rotate the pulley in the direction shown by the arrow 10 times at a rate of approximately once every 2 seconds (*2).

    CAUTION:
    If the pulley is rotated, refrigerant or oil might spray out. Thus, keep your face away from the compressor port.


    E182030
  1. Rotate the pulley once in the direction shown by the arrow while quickly turning the compressor so the pulley is up (*3).

  1. Proceed with the above procedure (*1) and drain the oil (*4).

  1. Drain the oil by repeating the procedures above approximately 5 times (from (*2) to (*4)).


2. INSTALL COMPRESSOR ASSEMBLY WITH PULLEY


    E305926E01
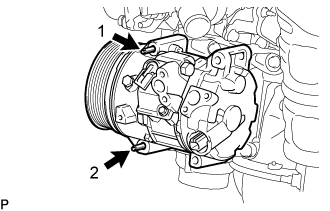
  1. Using an E8 "TORX" socket wrench, temporarily install the compressor assembly with pulley with the 2 stud bolts.

  1. Tighten the 2 stud bolts.

    Torque:
    10 N*m{ 102 kgf*cm , 7 ft.*lbf }

    HINT:
    Tighten the stud bolts in the order shown in the illustration.


    E305925E01
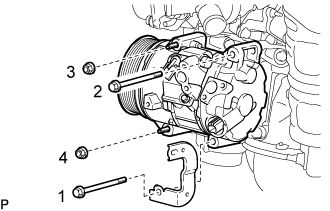
  1. Install the compressor assembly with pulley and bracket with the 2 bolts and 2 nuts.

    Torque:
    25 N*m{ 250 kgf*cm , 18 ft.*lbf }

    HINT:
    Tighten the bolts and nuts in the order shown in the illustration.


3. CONNECT NO. 1 COOLER REFRIGERANT SUCTION HOSE
  1. Remove the vinyl tape from the No. 1 cooler refrigerant suction hose and compressor assembly with pulley.

  1. Sufficiently apply compressor oil to a new O-ring and the fitting surface of the compressor assembly with pulley.

    Compressor Oil:
    ND-OIL 8 or equivalent

  1. Install the O-ring to the No. 1 cooler refrigerant suction hose.

  1. Connect the No. 1 cooler refrigerant suction hose to the compressor assembly with pulley with the bolt.

    Torque:
    9.8 N*m{ 100 kgf*cm , 87 in.*lbf }


4. CONNECT NO. 1 COOLER REFRIGERANT DISCHARGE HOSE
  1. Remove the vinyl tape from the No. 1 cooler refrigerant discharge hose and compressor assembly with pulley.

  1. Sufficiently apply compressor oil to a new O-ring and the fitting surface of the compressor assembly with pulley.

    Compressor Oil:
    ND-OIL 8 or equivalent

  1. Install the O-ring to the No. 1 cooler refrigerant discharge hose.

  1. Connect the No. 1 cooler refrigerant discharge hose to the compressor assembly with pulley with the bolt.

    Torque:
    9.8 N*m{ 100 kgf*cm , 87 in.*lbf }

  1. Engage the clamp.

  1. Connect each connector.

  1. Connect the wire harness with the bolt.

    Torque:
    8.0 N*m{ 82 kgf*cm , 71 in.*lbf }


5. INSTALL V-RIBBED BELT
(Click here)


6. INSTALL RADIATOR ASSEMBLY
(Click here)


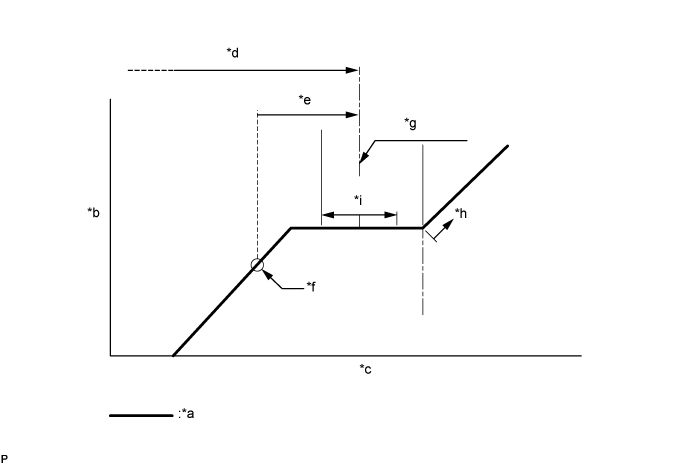
7. CHARGE AIR CONDITIONING SYSTEM WITH REFRIGERANT
  1. Perform vacuum purging using a vacuum pump or appropriate equipment.


  1. Charge the air conditioning system with refrigerant.

    Refrigerant type:
    HFC-134a (R134a)


    E143108E14


    Text in Illustration 
    *a
    Sub-cool System
    *b
    High Pressure
    *c
    Refrigerant Amount
    *d
    Standard charge amount
    *e
    Charge additional 100 g (3.5 oz)
    *f
    Point where bubbles disappear
    *g
    Mean value in proper range
    *h
    Overcharged
    *i
    +/-50 g (+/-1.76 oz)
    -
    -

    Standard charge amount:
    450 to 550 g (15.9 to 19.4 oz)

    SST
    09985-20010   (09985-02010, 09985-02050, 09985-02060, 09985-02070, 09985-02080, 09985-02090, 09985-02110, 09985-02130, 09985-02140, 09985-02150)

    NOTICE:
    1. Do not turn the A/C switch on before charging the air conditioning system with refrigerant. Doing so may cause the compressor to work without refrigerant, resulting in overheating of the compressor.
    2. The refrigerant amount should be checked by quantity (weight).

    HINT:
    Ensure that sufficient refrigerant is available to recharge the system when using a refrigerant recovery unit. Refrigerant recovery units are not always able to recover 100% of the refrigerant from an air conditioning system.


8. WARM UP ENGINE
  1. Keep the A/C switch on for at least 2 minutes to warm up the compressor.

    NOTICE:
    To prevent damage to the compressor, be sure to warm up the compressor when turning the air conditioning on after removing and installing air conditioning system lines (including the compressor).


9. INSPECT FOR REFRIGERANT LEAK
  1. After recharging the air conditioning system with refrigerant, check for refrigerant leaks using a halogen leak detector.

  1. Carry out the test under the following conditions:

    1. Turn the engine switch off.
    2. Measure the pressure to make sure that there is some refrigerant remaining in the air conditioning system.
      Pressure when the compressor is off: approx. 392 to 588 kPa (3.9 to 5.9 kgf/cm2, 57 to 85 psi)
    3. Ensure good ventilation (the halogen leak detector may react to volatile gases which are not refrigerant, such as gasoline vapor and exhaust gas).
    4. Repeat the inspection 2 or 3 times.

  1. Remove the front outer cowl top panel sub-assembly .

  1. Remove the radiator side deflector RH .


    E280082E01
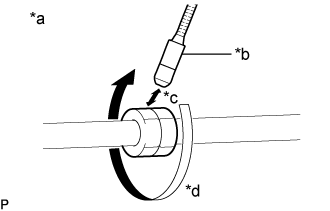
  1. How to check for refrigerant leaks in pipe joints:
    Text in Illustration 
    *a
    Check for leaks
    *b
    Halogen Leak Detector Sensor
    *c
    Distance between Sensor and Joint to be Checked:
    10 mm or less
    *d
    Halogen Leak Detector Sensor Moving Speed:
    25 to 50 mm/sec.

    NOTICE:
    Gas leaking from a joint can be dissipated by even the slightest breeze. Move the halogen leak detector sensor 360° around each joint instead of keeping it in one spot when checking.


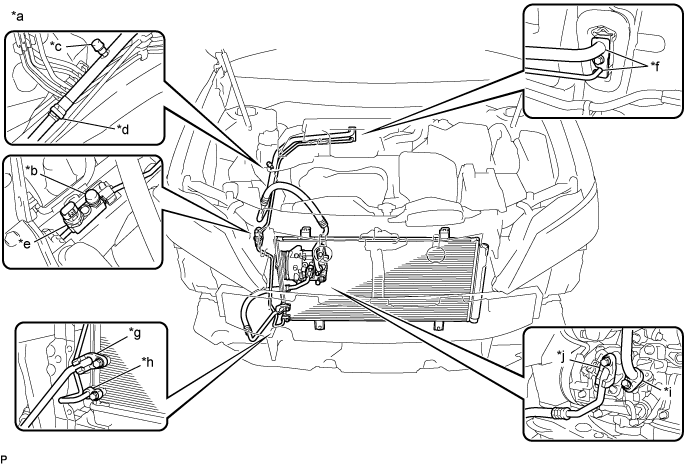
  1. Using a halogen leak detector, check for refrigerant leaks at the pipe joints shown in the illustration.


    E288035E01


    Text in Illustration 
    *a
    Area to be Checked
    *b
    Service Valve (High)
    *c
    Service Valve (Low)
    *d
    Pipe Joint
    *e
    Air Conditioner Pressure Sensor Joint
    *f
    Cooler Expansion Valve Joint
    *g
    Condenser Joint (Inlet)
    *h
    Condenser Joint (Outlet)
    *i
    Compressor Joint (Inlet)
    *j
    Compressor Joint (Outlet)

    HINT:
    1. After the blower motor has stopped, leave the cooling unit for more than 15 minutes.
    2. Disconnect the pressure sensor connector and leave it for approximately 20 minutes.
    3. When checking for leaks, the presence of oily dirt at a joint can indicate a leak.

    Standard:
    There are no refrigerant leaks from the joints.

    If refrigerant is leaking, disconnect the leaking joint and visually check for the cause, such as the presence of foreign matter.


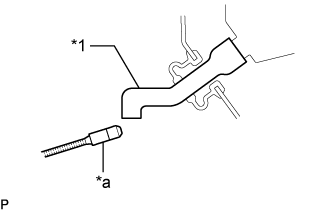
    E280081E01
  1. Bring the halogen leak detector sensor close to the drain cooler hose with the detector turned off, and then turn the detector on.
    Text in Illustration 
    *1
    Drain Cooler Hose
    *a
    Halogen Leak Detector

    NOTICE:
    Keep water away from the halogen leak detector to prevent malfunction.

    HINT:
    1. After the blower motor has stopped, leave the cooling unit for more than 15 minutes.
    2. When bringing the halogen leak detector sensor close to the drain cooler hose, make sure that the halogen leak detector does not react to volatile gases. If it is not possible to avoid interference from volatile gases, the vehicle should be lifted up to allow checking for leaks.

    Standard:
    Refrigerant is not leaking from the drain cooler hose.

    If refrigerant is leaking, check for refrigerant leaks from the No. 1 cooler evaporator sub-assembly.

  1. Remove the blower motor with fan sub-assembly (Click here).


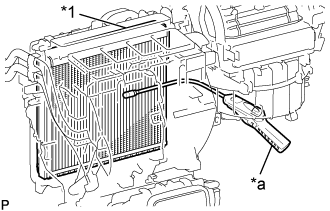
    E288039E01
  1. Insert the halogen leak detector sensor into the air conditioning unit assembly, bring the sensor close to the No. 1 cooler evaporator sub-assembly and check for refrigerant leaks.
    Text in Illustration 
    *1
    No. 1 Cooler Evaporator Sub-assembly
    *a
    Halogen Leak Detector

    HINT:
    After the blower motor has stopped, leave the cooling unit for more than 15 minutes.

    Standard:
    Refrigerant is not leaking from the No. 1 cooler evaporator sub-assembly.

    If refrigerant is leaking, disconnect the leaking joint and visually check for the cause, such as the presence of foreign matter.

  1. Install the blower motor with fan sub-assembly (Click here).

  1. Install the radiator side deflector RH .

  1. Install the front bumper assembly (Click here).

  1. Install the front outer cowl top panel sub-assembly (Click here for LHD or Click here for RHD).