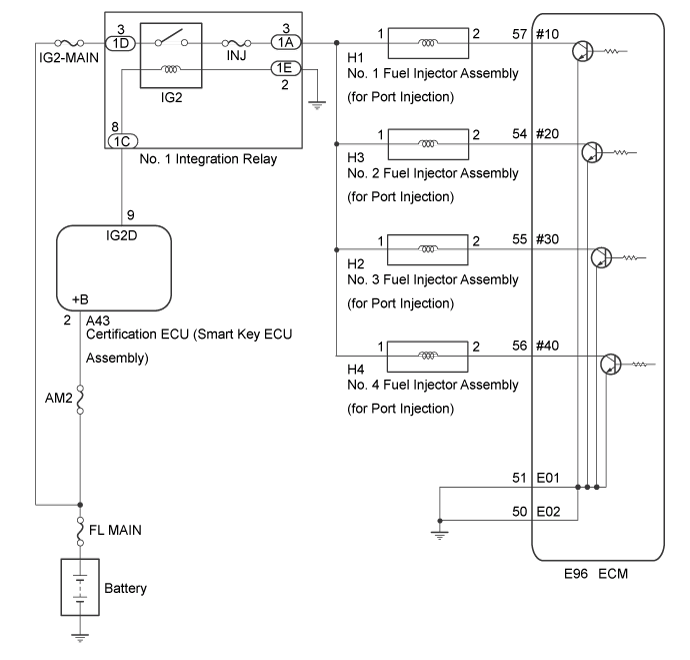
DTC P21CF13 Cylinder 1 Injector "B" Circuit Open |
DTC P21D013 Cylinder 2 Injector "B" Circuit Open |
DTC P21D113 Cylinder 3 Injector "B" Circuit Open |
DTC P21D213 Cylinder 4 Injector "B" Circuit Open |
| DTC No. | DTC Detection Condition | Trouble Area |
| P21CF13 | Current is not applied to the injector 10 times or more (1 trip detection logic). |
|
| P21D013 | Current is not applied to the injector 10 times or more (1 trip detection logic). |
|
| P21D113 | Current is not applied to the injector 10 times or more (1 trip detection logic). |
|
| P21D213 | Current is not applied to the injector 10 times or more (1 trip detection logic). |
|
| Required Sensors/Components | Fuel injector assembly (for port injection) (cylinder 1 to 4) |
| Frequency of Operation | Continuous |
| GTS Display | Description |
| NORMAL |
|
| ABNORMAL |
|
| INCOMPLETE |
|
| N/A |
|
| 1.CHECK DTC OUTPUT (DTC P21CF13, P21D013, P21D113 OR P21D213) |
Connect the GTS to the DLC3.
Turn the engine switch on (IG).
Turn the GTS on.
Enter the following menus: Powertrain / Engine / Trouble Codes.
Read the DTCs.
| Result | Proceed to |
| P21CF13, P21D013, P21D113 or P21D213 is output | A |
| P21CF13, P21D013, P21D113 and P21D213 are output | B |
|
| ||||
| A | |
 |
| 2.CHECK TERMINAL VOLTAGE (POWER SOURCE OF FUEL INJECTOR ASSEMBLY (FOR PORT INJECTION)) |
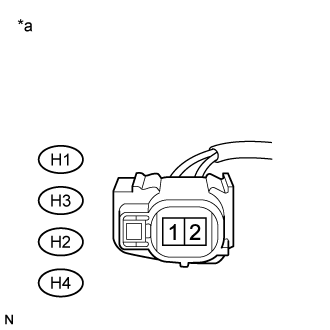 |
Disconnect the fuel injector assembly (for port injection) connector.
| *a | Front view of wire harness connector (to Fuel Injector Assembly (for Port Injection)) |
Turn the engine switch on (IG).
Measure the voltage according to the value(s) in the table below.
| Tester Connection | Condition | Specified Condition |
| H1-1 - Body ground | Engine switch on (IG) | 11 to 14 V |
| H3-1 - Body ground | Engine switch on (IG) | 11 to 14 V |
| H2-1 - Body ground | Engine switch on (IG) | 11 to 14 V |
| H4-1 - Body ground | Engine switch on (IG) | 11 to 14 V |
|
| ||||
| OK | |
|
| 3.CHECK HARNESS AND CONNECTOR (FUEL INJECTOR ASSEMBLY (FOR PORT INJECTION) - ECM) |
Disconnect the ECM connector.
Disconnect the fuel injector assembly (for port injection) connector.
Measure the resistance according to the value(s) in the table below.
| Tester Connection | Condition | Specified Condition |
| H1-2 - E96-57 (#10) | Always | Below 1 Ω |
| H3-2 - E96-54 (#20) | Always | Below 1 Ω |
| H2-2 - E96-55 (#30) | Always | Below 1 Ω |
| H4-2 - E96-56 (#40) | Always | Below 1 Ω |
| H1-2 or E96-57 (#10) - Body ground and other terminals | Always | 10 kΩ or higher |
| H3-2 or E96-54 (#20) - Body ground and other terminals | Always | 10 kΩ or higher |
| H2-2 or E96-55 (#30) - Body ground and other terminals | Always | 10 kΩ or higher |
| H4-2 or E96-56 (#40) - Body ground and other terminals | Always | 10 kΩ or higher |
|
| ||||
| OK | |
|
| 4.INSPECT FUEL INJECTOR ASSEMBLY (FOR PORT INJECTION (RESISTANCE)) |
Inspect the fuel injector assembly (for port injection) (Click here).
|
| ||||
| OK | ||
 | ||
| ||
| 5.CHECK HARNESS AND CONNECTOR (NO. 1 INTEGRATION RELAY - FUEL INJECTOR ASSEMBLY (FOR PORT INJECTION)) |
Disconnect the No. 1 integration relay connector.
Disconnect the fuel injector assembly (for port injection) connector.
Measure the resistance according to the value(s) in the table below.
| Tester Connection | Condition | Specified Condition |
| 1A-3 - H1-1 | Always | Below 1 Ω |
| 1A-3 - H3-1 | Always | Below 1 Ω |
| 1A-3 - H2-1 | Always | Below 1 Ω |
| 1A-3 - H4-1 | Always | Below 1 Ω |
| 1A-3 or H1-1 - Body ground and other terminals | Always | 10 kΩ or higher |
| 1A-3 or H3-1 - Body ground and other terminals | Always | 10 kΩ or higher |
| 1A-3 or H2-1 - Body ground and other terminals | Always | 10 kΩ or higher |
| 1A-3 or H4-1 - Body ground and other terminals | Always | 10 kΩ or higher |
|
| ||||
| OK | ||
| ||
| ||

