2GR-FKS ENGINE CONTROL SFI SYSTEM Active Control Engine Mount System
DESCRIPTION
- LOCATION
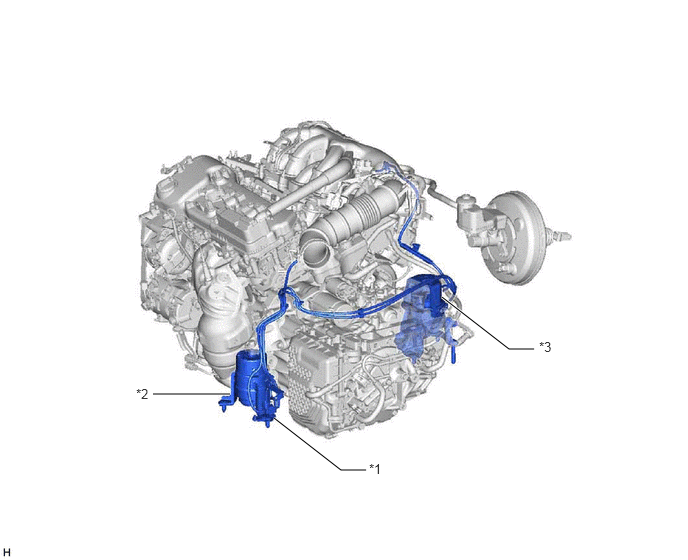 1.594,4.104 2.396,4.104 true 4.604,3.094 5.302,3.635 5.302,3.635 5.563,3.635 true 2.854,4.354 3.552,4.896 3.552,4.896 3.813,4.896 true 3.844,4.802 4.156,5.104 0.313,0.302 10 false *1 1.417,4.021 1.75,4.25 0.333,0.229 10 false *2 5.615,3.531 5.938,3.833 0.323,0.302 10 false *3
*1 Vacuum Switching Valve (for Active Control Engine Mount System) *2 Front Engine Mounting Insulator *3 Rear Engine Mounting Insulator - -
The active control engine mount system decreases engine vibration at a low engine speed using the vacuum switching valve (for active control engine mount system). The vacuum switching valve (for active control engine mount system) is controlled by a pulse signal transmitted to the vacuum switching valve (for active control engine mount system) from the ECM. The frequency of this pulse signal is matched to the engine speed to decrease engine vibration.
WIRING DIAGRAM
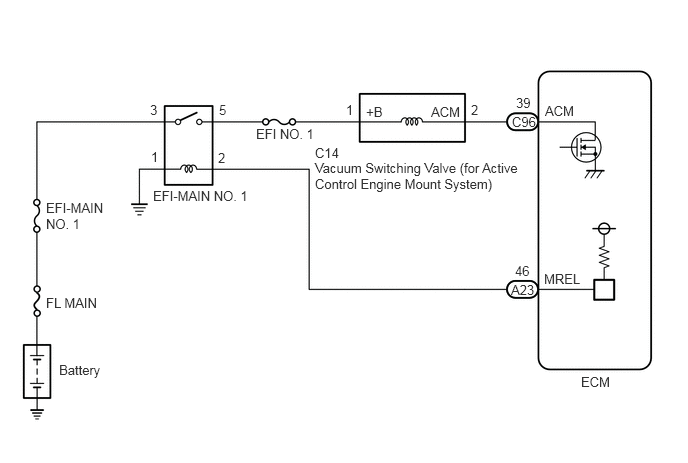
CAUTION / NOTICE / HINT
- NOTICE:
-
Inspect the fuses for circuits related to this system before performing the following procedure.
PROCEDURE
Connect the GTS to the DLC3.
Turn the engine switch on (IG).
Turn the GTS on.
Enter the following menus: Powertrain / Engine / Active Test / Activate the ACM Inhibit.
- Powertrain > Engine > Active Test
-
Tester Display Activate the ACM Inhibit - 50004 372 43
According to the display on the GTS, perform the Active Test to operate the vacuum switching valve (for active control engine mount system) and for check the operating sound of the vacuum switching valve (for active control engine mount system).
- OK:
Operating sounds can be heard.
- Result:
Proceed to OK NG
OK
NG
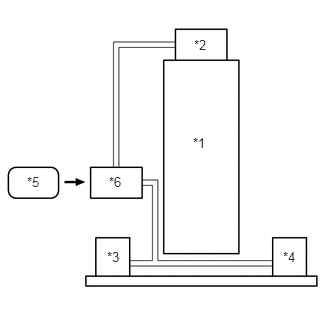
| *1 | Engine |
| *2 | Vacuum Pump Assembly |
| *3 | Front Engine Mounting Insulator |
| *4 | Rear Engine Mounting Insulator |
| *5 | ECM |
| *6 | Vacuum Switching Valve (for Active Control Engine Mount System) |
Check the air and vacuum hoses for looseness, disconnection and blockage.
- OK:
No looseness, disconnection or blockage.
- Result:
Proceed to OK NG
OK
NG
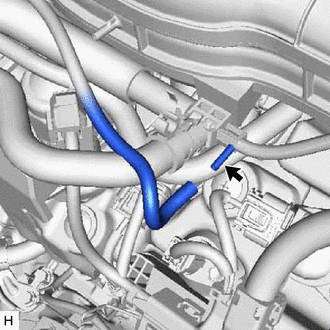
Disconnect the vacuum hose from the vacuum pump assembly.
Start the engine.
Check that the disconnected port located on the vacuum pump assembly applies suction to your finger.
- OK:
Vacuum exists.
- Result:
Proceed to OK NG
OK
NG
Inspect the front engine mounting insulator.
- Result:
Proceed to OK NG
OK
NG
Click hereEngine / Hybrid System>2GR-FKS (ENGINE CONTROL)>ACTIVE CONTROL ENGINE MOUNT (for Front Side)>REMOVAL
Inspect the rear engine mounting insulator.
- Result:
Proceed to OK NG
OK
NG
Click hereEngine / Hybrid System>2GR-FKS (ENGINE CONTROL)>ACTIVE CONTROL ENGINE MOUNT (for Rear Side)>REMOVAL
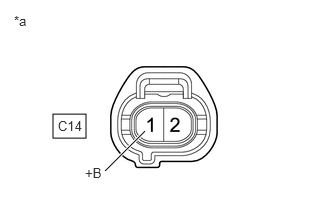
| *a | Front view of wire harness connector
(to Vacuum Switching Valve (for Active Control Engine Mount System)) |
Disconnect the vacuum switching valve (for active control engine mount system) connector.
Turn the engine switch on (IG).
Measure the voltage according to the value(s) in the table below.
- Standard Voltage:
Tester Connection Condition Specified Condition C14-1 (+B) - Body ground Engine switch on (IG) 11 to 14 V
- Result:
Proceed to OK NG
OK
NG
Inspect the vacuum switching valve (for active control engine mount system).
- Result:
Proceed to OK NG
OK
NG
Click hereEngine / Hybrid System>2GR-FKS (ENGINE CONTROL)>VACUUM SWITCHING VALVE (for Engine Mounting)>REMOVAL
Disconnect the vacuum switching valve (for active control engine mount system) connector.
Disconnect the ECM connector.
Measure the resistance according to the value(s) in the table below.
- Standard Resistance:
Tester Connection Condition Specified Condition C14-2 (ACM) - C96-39 (ACM) Always Below 1 Ω C14-2 (ACM) or C96-39 (ACM) - Body ground and other terminals Always 10 kΩ or higher
- Result:
Proceed to OK NG
OK
NG