INTERIOR PANELS / TRIM INSTRUMENT PANEL SAFETY PAD REMOVAL
CAUTION / NOTICE / HINT
The necessary procedures (adjustment, calibration, initialization or registration) that must be performed after parts are removed and installed, or replaced during instrument panel safety pad removal/installation are shown below.
| Replaced Part or Performed Procedure | Necessary Procedure | Effect/Inoperative Function when Necessary Procedure not Performed | Link |
|---|---|---|---|
| Disconnect cable from negative battery terminal | Perform steering sensor zero point calibration | Lane departure alert system (w/ Steering Control) | ( ) |
| Pre-collision system | |||
| Memorize steering angle neutral point | Parking assist monitor system | ()
|
|
| Panoramic View Monitor System | ()
|
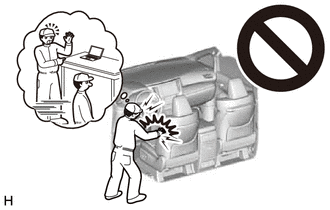
- CAUTION:
-
-
Some of these service operations affect the SRS airbag system. Read the precautionary notices concerning the SRS airbag system before servicing.
-
Click hereVehicle Interior>SUPPLEMENTAL RESTRAINT SYSTEMS>AIRBAG SYSTEM>PRECAUTION
PROCEDURE

 1. PRECAUTION
Click hereVehicle Interior>INTERIOR PANELS / TRIM>INSTRUMENT PANEL SAFETY PAD>PRECAUTION
- NOTICE:
-
After turning the ignition switch off, waiting time may be required before disconnecting the cable from the negative (-) battery terminal. Therefore, make sure to read the disconnecting the cable from the negative (-) battery terminal notices before proceeding with work.
-
Click hereGeneral>INTRODUCTION>REPAIR INSTRUCTION>PRECAUTION
2. CHANGE POWER TILT AND POWER TELESCOPIC STEERING COLUMN SYSTEM SETTINGS (for Power Tilt and Power Telescopic Steering Column)
3.ALIGN FRONT WHEELS FACING STRAIGHT AHEAD
45130
4.REMOVE HORN BUTTON ASSEMBLY
5.REMOVE STEERING WHEEL ASSEMBLY
45024
6.REMOVE LOWER STEERING COLUMN COVER SUB-ASSEMBLY (for Manual Tilt and Manual Telescopic Steering Column)
45024
7.REMOVE LOWER STEERING COLUMN COVER SUB-ASSEMBLY (for Power Tilt and Power Telescopic Steering Column)
45286B
8.REMOVE UPPER STEERING COLUMN COVER (for Manual Tilt and Manual Telescopic Steering Column)
45286B
9.REMOVE UPPER STEERING COLUMN COVER (for Power Tilt and Power Telescopic Steering Column)
84650
10.REMOVE WINDSHIELD WIPER SWITCH ASSEMBLY
84329
11.REMOVE TURN SIGNAL SWITCH
58810J
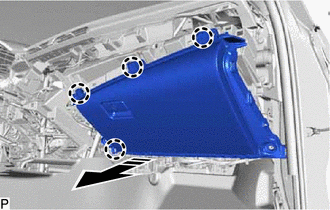
12.REMOVE CONSOLE BOX ASSEMBLY
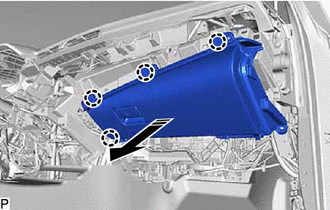
67914
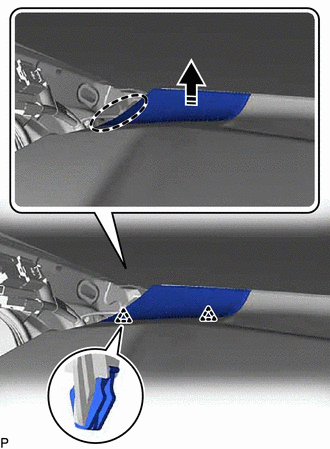
13.REMOVE FRONT DOOR SCUFF PLATE LH
62112A
14.REMOVE COWL SIDE TRIM SUB-ASSEMBLY LH
62312B
15.DISCONNECT FRONT DOOR OPENING TRIM WEATHERSTRIP LH
Disconnect the front door opening trim weatherstrip LH.
62212
16.REMOVE FRONT PILLAR GARNISH LH (w/o Curtain Shield Airbag)
62212
17.REMOVE FRONT PILLAR GARNISH LH (w/ Curtain Shield Airbag)
55318C
18.REMOVE INSTRUMENT SIDE PANEL LH
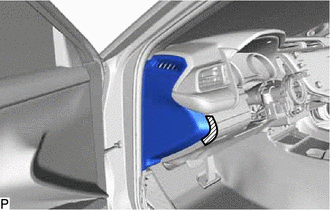

|
Protective Tape |
Apply protective tape to the area shown in the illustration.
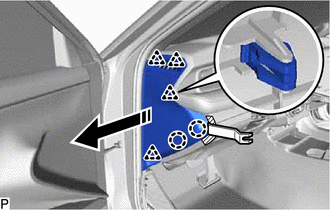

|
Remove in this Direction |
Using a moulding remover, disengage the 2 claws and 4 clips as shown in the illustration.
- NOTICE:
-
To prevent damage to the instrument side panel LH, do not insert the moulding remover in a position other than shown in the illustration.
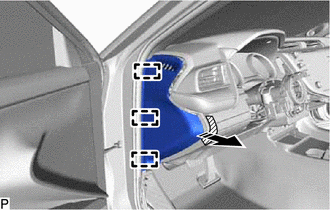
|
|
Remove in this Direction |
Disengage the 3 guides to remove the instrument side panel LH as shown in the illustration.
55606
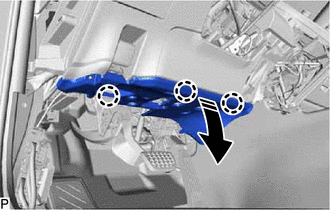
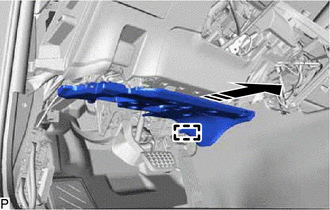
19.REMOVE NO. 1 INSTRUMENT PANEL UNDER COVER SUB-ASSEMBLY (for LHD)
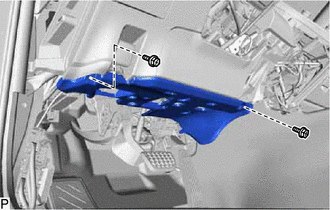
Remove the 2 screws <C>.
|
|
Remove in this Direction |
Disengage the 3 claws as shown in the illustration.
|
|
Remove in this Direction |
Disengage the guide as shown in the illustration.
Disconnect the connector.
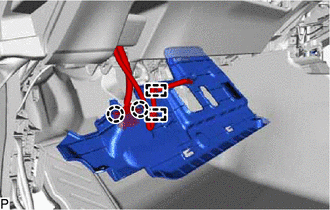
Disengage the 2 claws to disconnect the DLC3 connector.
Disengage the 2 clamps to remove the No. 1 instrument panel under cover sub-assembly.
55606
20.REMOVE NO. 1 INSTRUMENT PANEL UNDER COVER SUB-ASSEMBLY (for RHD)
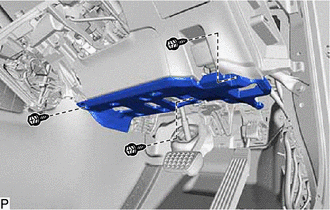
Remove the 3 screws <C>.
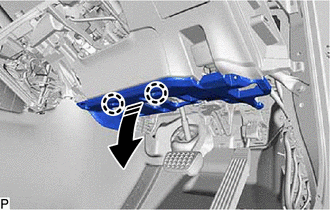
|
|
Remove in this Direction |
Disengage the 2 claws as shown in the illustration.
Disconnect the connector.
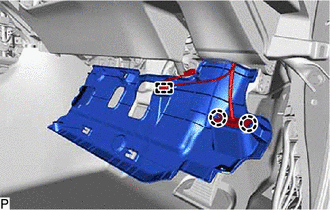
Disengage the 2 claws to disconnect the DLC3 connector.
Disengage the clamp to remove the No. 1 instrument panel under cover sub-assembly.
55436B
21.REMOVE NO. 2 METER HOOD CLUSTER
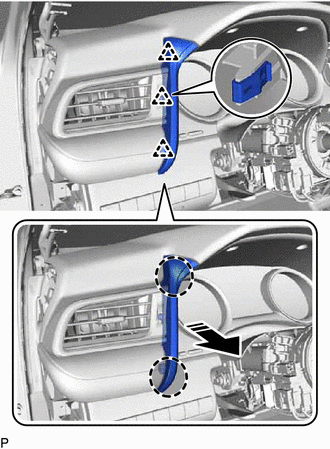

|
Place Hand Here |
|
|
Remove in this Direction |
Disengage the 3 clips to remove the No. 2 meter hood cluster as shown in the illustration.
53601
22.DISCONNECT HOOD LOCK CONTROL LEVER SUB-ASSEMBLY
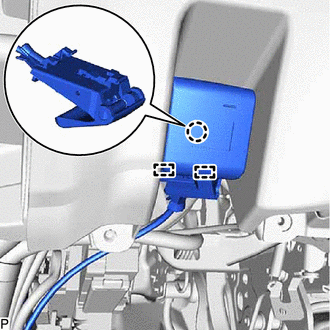
Disengage the claw and 2 guides to disconnect the hood lock control lever sub-assembly.
55302D
23.REMOVE NO. 1 INSTRUMENT PANEL SUB-ASSEMBLY (w/o Driver Side Knee Airbag)
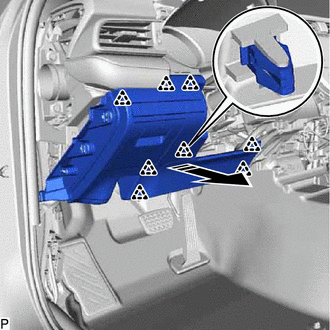
|
|
Remove in this Direction |
Disengage the 8 clips as shown in the illustration.
Disengage the clamp.
Disconnect each connector to remove the No. 1 instrument panel sub-assembly.
55302D
24.REMOVE NO. 1 INSTRUMENT PANEL SUB-ASSEMBLY (w/ Driver Side Knee Airbag)
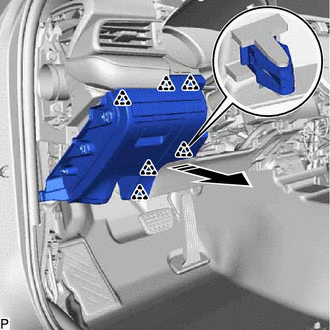
|
|
Remove in this Direction |
Disengage the 6 clips as shown in the illustration.
Disengage the clamp.
Disconnect each connector to remove the No. 1 instrument panel sub-assembly.
73900
25.REMOVE LOWER NO. 1 INSTRUMENT PANEL AIRBAG ASSEMBLY (w/ Driver Side Knee Airbag)
55410C
26.REMOVE INSTRUMENT CLUSTER FINISH PANEL ASSEMBLY
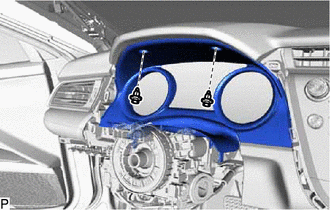
Remove the 2 clips.
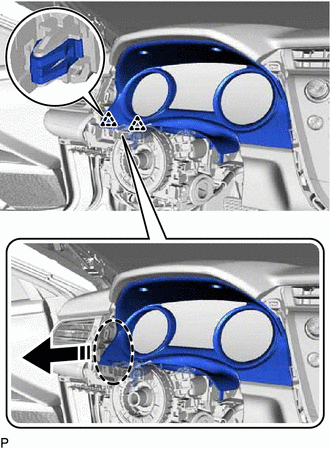
|
|
Place Hand Here |
|
|
Remove in this Direction |
Disengage the 2 clips as shown in the illustration.
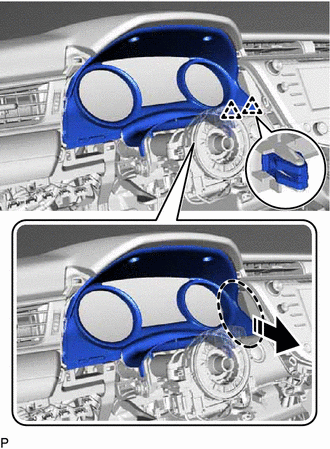
|
|
Place Hand Here |
|
|
Remove in this Direction |
Disengage the 2 clips as shown in the illustration.
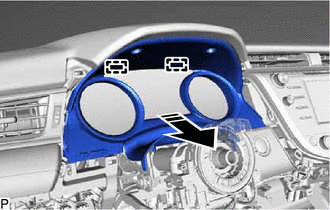
|
|
Remove in this Direction |
Disengage the 2 guides as shown in the illustration.
Disconnect the connector to remove the instrument cluster finish panel assembly.
83100
27.REMOVE COMBINATION METER ASSEMBLY
55480D
28.REMOVE LOWER INSTRUMENT PANEL FINISH PANEL ASSEMBLY
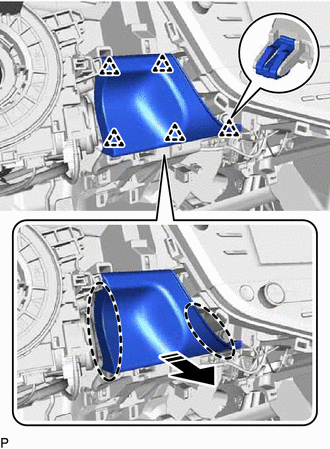
|
|
Place Hand Here |
|
|
Remove in this Direction |
Disengage the 5 clips to remove the lower instrument panel finish panel assembly as shown in the illustration.
w/ Switch:
Disconnect the connector.
55670
29.REMOVE NO. 3 INSTRUMENT PANEL REGISTER ASSEMBLY
Disengage the 8 clips in the order shown in the illustration.
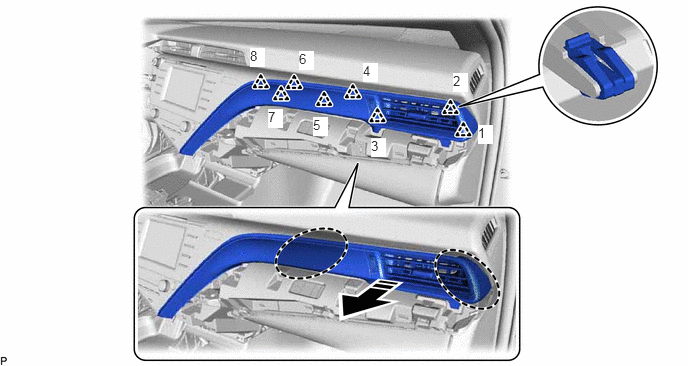
|
|
Place Hand Here |
|
Remove in this Direction |
Disengage the 3 clips in the order shown in the illustration.
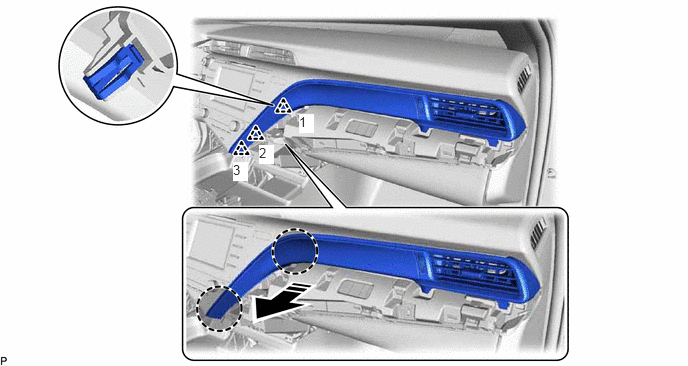
|
|
Place Hand Here |
|
Remove in this Direction |
Disconnect the connector to remove the No. 3 instrument panel register assembly.
55900
30.REMOVE AIR CONDITIONING CONTROL ASSEMBLY (except 8 Inch Display)
55423B
31.REMOVE INSTRUMENT CLUSTER FINISH PANEL COVER (w/o Radio Receiver)
for RHD:
Disengage the 4 clips to remove the instrument cluster finish panel cover as shown in the illustration.
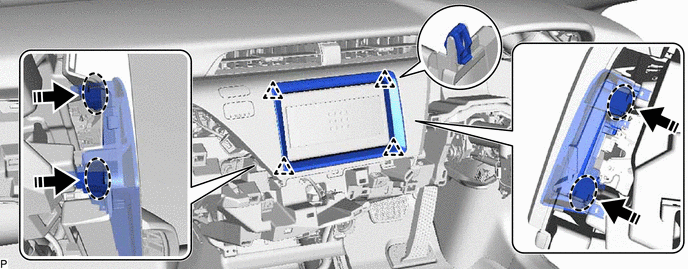
|
|
Place Hand Here |
|
Remove in this Direction |
55420A
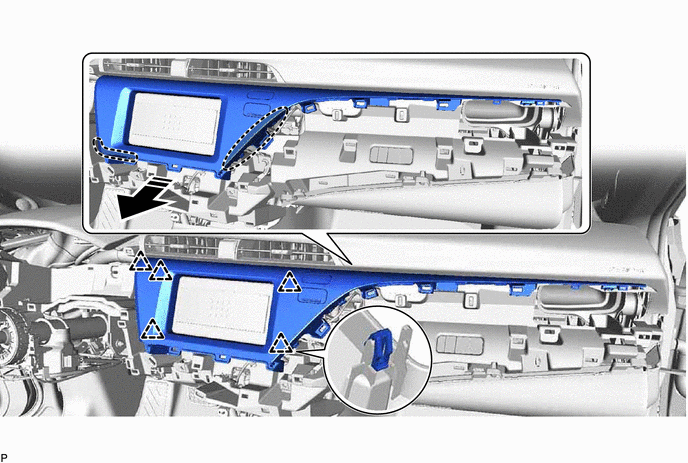
32.REMOVE CENTER INSTRUMENT CLUSTER FINISH PANEL ASSEMBLY (w/o Radio Receiver)
Disengage the 4 clips in the order shown in the illustration.
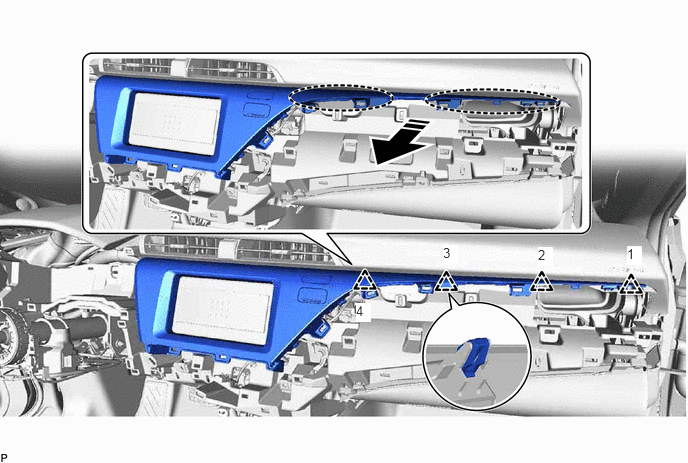
|
|
Place Hand Here |
|
Remove in this Direction |
Disengage the 5 clips as shown in the illustration.
|
|
Place Hand Here |
|
Remove in this Direction |
Disconnect the connector to remove the center instrument cluster finish panel assembly.
33.REMOVE RADIO TUNER OPENING COVER WITH BRACKET (w/o Radio Receiver)
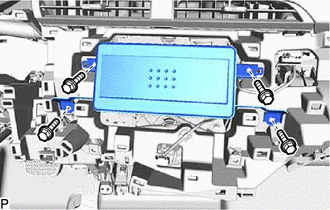
Remove the 4 bolts <B>.
Disconnect the connector to remove the radio tuner opening cover with bracket.
34.REMOVE RADIO RECEIVER ASSEMBLY WITH BRACKET (for Radio Receiver Type)
35.REMOVE RADIO AND DISPLAY RECEIVER ASSEMBLY WITH BRACKET (for Radio and Display Type)
for 7 Inch Display:
Click hereAudio / Visual / Telematics>AUDIO / VIDEO>RADIO RECEIVER>REMOVAL
36.REMOVE RADIO AND DISPLAY RECEIVER ASSEMBLY WITH BRACKET (for Radio and Display Type)
for 8 Inch Display:
Click hereAudio / Visual / Telematics>AUDIO / VIDEO>RADIO RECEIVER>REMOVAL
67913
37.REMOVE FRONT DOOR SCUFF PLATE RH
- HINT:
-
Use the same procedure as for the LH side.
62111A
38.REMOVE COWL SIDE TRIM SUB-ASSEMBLY RH
- HINT:
-
Use the same procedure as for the LH side.
62311B
39.DISCONNECT FRONT DOOR OPENING TRIM WEATHERSTRIP RH
- HINT:
-
Use the same procedure as for the LH side.
62211
40.REMOVE FRONT PILLAR GARNISH RH
- HINT:
-
Use the same procedure as for the LH side.
55317A
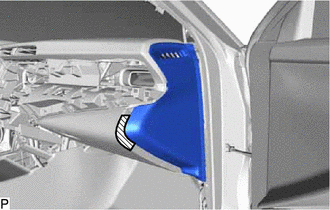
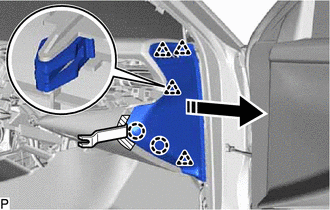
41.REMOVE INSTRUMENT SIDE PANEL RH
|
|
Protective Tape |
Apply protective tape to the area shown in the illustration.
|
|
Remove in this Direction |
Using a moulding remover, disengage the 2 claws and 4 clips as shown in the illustration.
- NOTICE:
-
To prevent damage to the instrument side panel RH, do not insert the moulding remover in a position other than shown in the illustration.
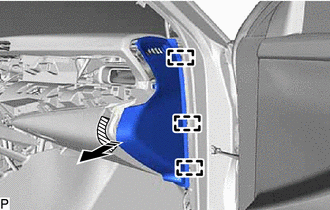
|
|
Remove in this Direction |
Disengage the 3 guides to remove the instrument side panel RH as shown in the illustration.
55607
42.REMOVE NO. 2 INSTRUMENT PANEL UNDER COVER SUB-ASSEMBLY
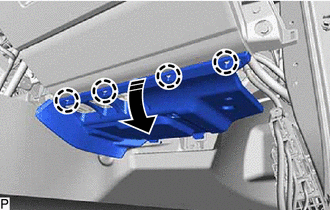
|
|
Remove in this Direction |
Disengage the 4 claws as shown in the illustration.
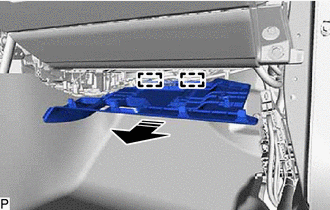
|
|
Remove in this Direction |
Disengage the 2 guides as shown in the illustration.
Disengage the clamp.
Disconnect the connector to remove the No. 2 instrument panel under cover sub-assembly.
73990
43.REMOVE LOWER NO. 2 INSTRUMENT PANEL AIRBAG ASSEMBLY (w/ Passenger Side Knee Airbag)
55303B
44.REMOVE LOWER INSTRUMENT PANEL SUB-ASSEMBLY (w/o Passenger Side Knee Airbag)
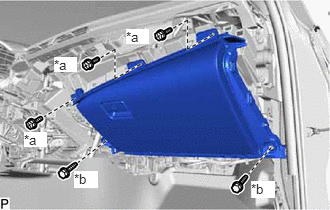
| *a | Screws <C> |
| *b | Bolts <D> |
Remove the 3 screws <C>.
Remove the 2 bolts <D>.
|
|
Remove in this Direction |
Disengage the 4 claws as shown in the illustration.
Disconnect the connector to remove the lower instrument panel sub-assembly.
55303B
45.REMOVE LOWER INSTRUMENT PANEL SUB-ASSEMBLY (w/ Passenger Side Knee Airbag)
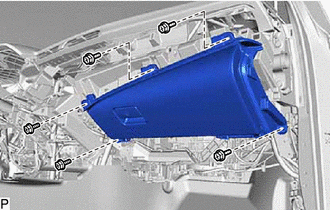
Remove the 5 screws <C>.
|
|
Remove in this Direction |
Disengage the 4 claws as shown in the illustration.
Disconnect the connector to remove the lower instrument panel sub-assembly.
55472C
46.REMOVE NO. 1 INSTRUMENT PANEL SPEAKER PANEL
|
|
Place Hand Here |
|
|
Remove in this Direction |
Disengage the 2 clips as shown in the illustration.
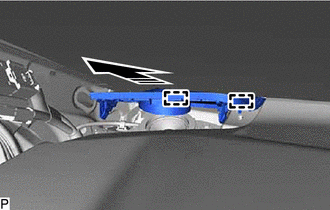
|
|
Remove in this Direction |
Disengage the 2 guides to remove the No. 1 instrument panel speaker panel as shown in the illustration.
86160P
47.REMOVE FRONT NO. 2 SPEAKER ASSEMBLY (for LH Side)
55473B
48.REMOVE NO. 2 INSTRUMENT PANEL SPEAKER PANEL
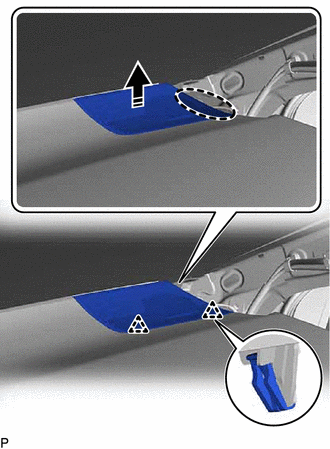
|
|
Place Hand Here |
|
|
Remove in this Direction |
Disengage the 2 clips as shown in the illustration.
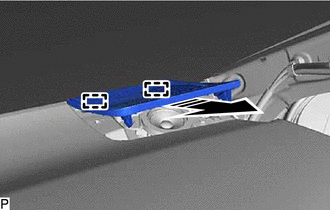
|
|
Remove in this Direction |
Disengage the 2 guides to remove the No. 2 instrument panel speaker panel as shown in the illustration.
86160P
49.REMOVE FRONT NO. 2 SPEAKER ASSEMBLY (for RH Side)
- HINT:
-
Use the same procedure as for the LH side.
55011A
50.REMOVE NO. 1 INSTRUMENT PANEL GARNISH SUB-ASSEMBLY
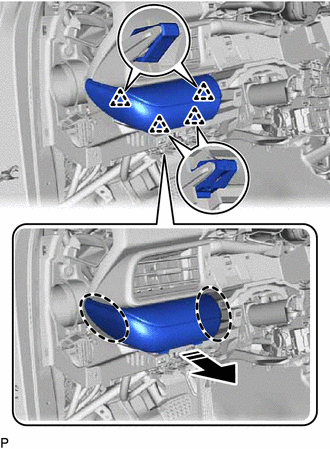
|
|
Place Hand Here |
|
|
Remove in this Direction |
Disengage the 4 clips to remove the No. 1 instrument panel garnish sub-assembly as shown in the illustration.
55650
51.REMOVE NO. 1 INSTRUMENT PANEL REGISTER ASSEMBLY
|
|
Place Hand Here |
|
|
Remove in this Direction |
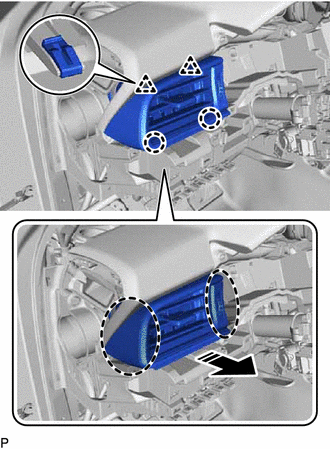
Disengage the 2 clips and 2 claws to remove the No. 1 instrument panel register assembly as shown in the illustration.
82149A
52.DISCONNECT NO. 5 INSTRUMENT PANEL WIRE (w/o Occupant Classification System)
82149A
53.DISCONNECT NO. 5 INSTRUMENT PANEL WIRE (w/ Occupant Classification System)
54.REMOVE INSTRUMENT PANEL SAFETY PAD SUB-ASSEMBLY
for Automatic Air Conditioning System:
|
|
Remove in this Direction |
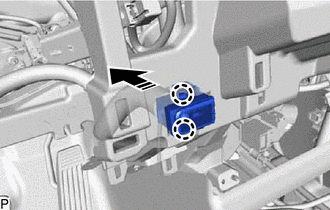
Disengage the 2 claws to disconnect the cooler (room temp. sensor) thermistor as shown in the illustration.
Disconnect each connector.
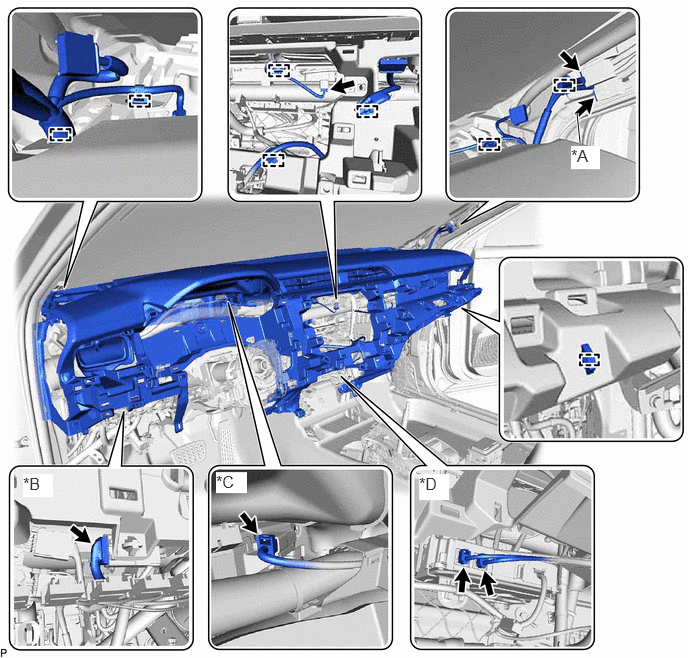
| *A | w/ Digital Audio Broadcasting Antenna, Television Antenna or Telematics Transceiver | *B | w/ Ion Generator |
| *C | w/ Headup Display | *D | w/ Telematics Transceiver |
Disengage each clamp.
Remove the 2 clips.
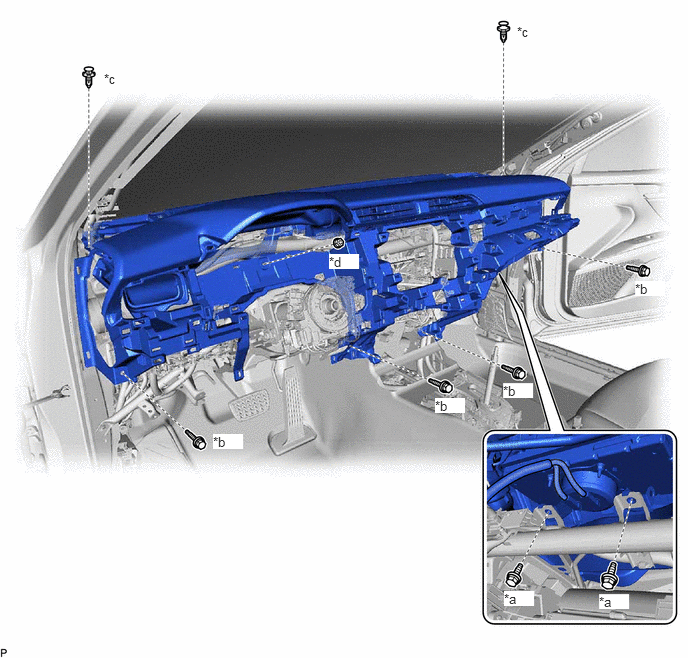
| *a | Bolt <A> | *b | Bolt <B> |
| *c | Clip | *d | Nut <F> |
Remove the 4 bolts <B>, 2 bolts <A> and nut <F>.
Disengage the 4 guides and remove the instrument panel safety pad sub-assembly as shown in the illustration.
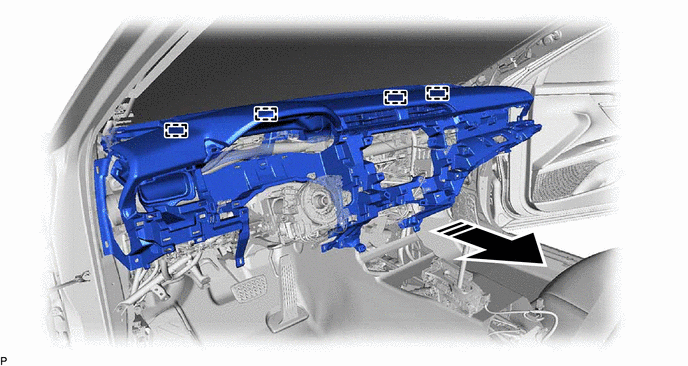
|
|
Remove in this Direction | - | - |
- NOTICE:
- ·
Do not damage the instrument panel safety pad sub-assembly.
·Do not allow the wire harnesses to interfere with the surrounding parts.