2AR-FE ENGINE MECHANICAL CAMSHAFT REMOVAL
CAUTION / NOTICE / HINT
The necessary procedures (adjustment, calibration, initialization, or registration) that must be performed after parts are removed and installed, or replaced during camshaft removal/installation are shown below.
| Replaced Part or Performed Procedure | Necessary Procedure | Effect/Inoperative Function when Necessary Procedure not Performed | Link |
|---|---|---|---|
| Battery terminal is disconnected/reconnected | Perform steering sensor zero point calibration | Lane departure alert system (w/ Steering Control) | ( ) |
| Pre-collision system | |||
| Memorize steering angle neutral point | Parking assist monitor system | ()
|
|
| Panoramic view monitor system | ()
|
||
·
Replacement of camshaft (for intake or exhaust camshaft) ·
Replacement of camshaft timing gear assembly ·
Replacement of camshaft timing exhaust gear assembly ·
Replacement of ignition coil assembly |
Inspection after repair | ·
Poor idle, etc. ·
Engine start function, etc. |
()
|
PROCEDURE

 1. PRECAUTION
- NOTICE:
-
After turning the ignition switch off, waiting time may be required before disconnecting the cable from the negative (-) battery terminal. Therefore, make sure to read the disconnecting the cable from the negative (-) battery terminal notices before proceeding with work.
-
Click hereGeneral>INTRODUCTION>REPAIR INSTRUCTION>PRECAUTION
2.DISCONNECT CABLE FROM NEGATIVE BATTERY TERMINAL
- NOTICE:
-
When disconnecting the cable, some systems need to be initialized after the cable is reconnected.
-
Click hereGeneral>INTRODUCTION>REPAIR INSTRUCTION>INITIALIZATION
3.REMOVE FRONT WHEEL RH
53736
4.REMOVE FRONT FENDER APRON SEAL RH
53295E
5.REMOVE COOL AIR INTAKE DUCT SEAL
12601B
6.REMOVE NO. 1 ENGINE COVER SUB-ASSEMBLY
17750A
7.REMOVE INLET AIR CLEANER ASSEMBLY
8.REMOVE AIR CLEANER ASSEMBLY WITH AIR CLEANER HOSE
9.DISCONNECT HOSES
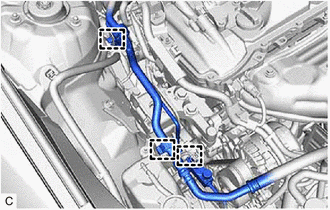
Disengage the 3 clamps.
82121
10.DISCONNECT ENGINE WIRE
Disconnect the connectors and disengage the clamps.
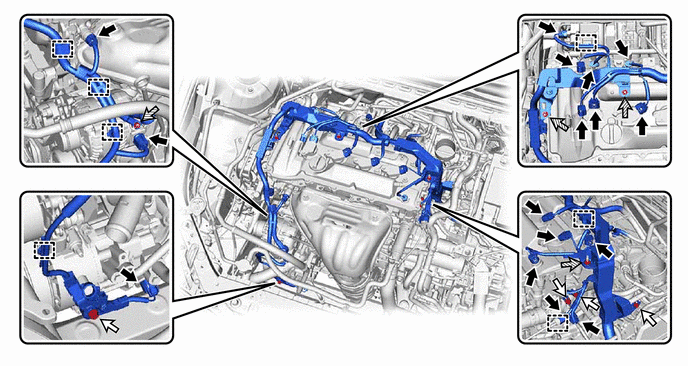

|
Bolt | 
|
Nut |
Remove the bolts and nuts and disconnect the engine wire from the engine.
19500
11.REMOVE IGNITION COIL ASSEMBLY
11201
12.REMOVE CYLINDER HEAD COVER SUB-ASSEMBLY
13.SET NO. 1 CYLINDER TO TDC/COMPRESSION
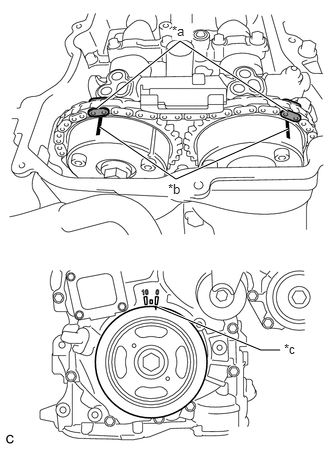
| *a | Paint Mark |
| *b | Timing Mark |
| *c | Timing Notch (Groove) |
Turn the crankshaft pulley until its timing notch (groove) and the timing mark "0" of the timing chain cover sub-assembly are aligned.
Check that each timing mark of the camshaft timing gear assembly and camshaft timing exhaust gear assembly are aligned with each timing mark located as shown in the illustration. If not, turn the crankshaft 1 revolution (360°) to align the timing marks as shown in the illustration.
Place paint marks on the chain sub-assembly in alignment with the timing marks on the camshaft timing gear assembly and camshaft timing exhaust gear assembly.
11324
14.REMOVE TIMING CHAIN COVER PLATE
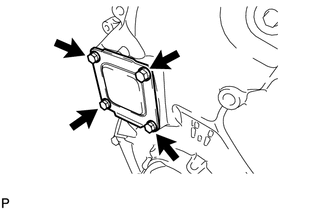
Remove the 4 bolts, timing chain cover plate and gasket.
13540
15.REMOVE NO. 1 CHAIN TENSIONER ASSEMBLY
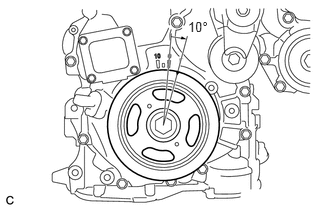
Turn the crankshaft approximately 10° clockwise.
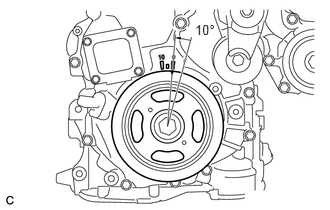
Turn the crankshaft approximately 10° counterclockwise.
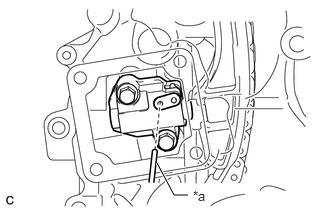
| *a | Pin |
Align the holes of the stopper plate and tensioner, and insert a pin into the stopper plate hole to lock the tensioner.
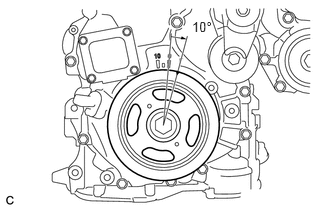
Turn the crankshaft approximately 10° clockwise.
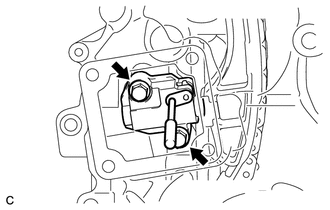
Remove the 2 bolts, No. 1 chain tensioner assembly and gasket.
- NOTICE:
-
Make sure not to drop the gasket inside the timing chain cover sub-assembly.
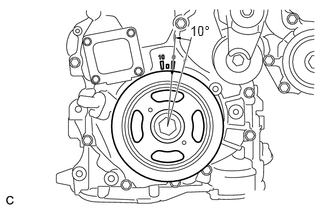
Turn the crankshaft approximately 10° counterclockwise.
13566B
16.REMOVE TIMING CHAIN GUIDE
17.REMOVE TIMING CHAIN COVER TIGHT PLUG
13050
18.REMOVE CAMSHAFT TIMING GEAR ASSEMBLY
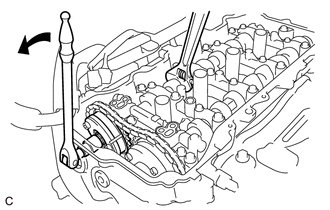
Hold the hexagonal portion of the camshaft with a wrench and remove the bolt from the camshaft.
- NOTICE:
-
Be careful not to damage the cylinder head or spark plug tube with the wrench.
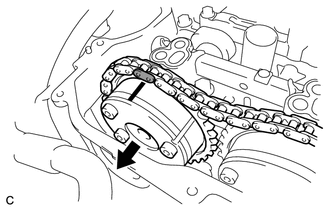
Separate the camshaft timing gear assembly from the camshaft.
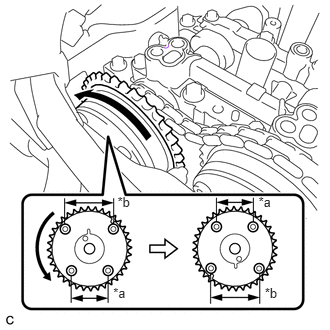
| *a | Narrow |
| *b | Wide |
Remove the timing chain sub-assembly from the camshaft timing gear assembly, and turn the camshaft timing gear assembly approximately 180°.
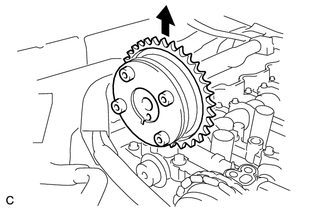
Remove the camshaft timing gear assembly.
- NOTICE:
-
Do not disassemble the camshaft timing gear assembly.
19.REMOVE CAMSHAFT BEARING CAP
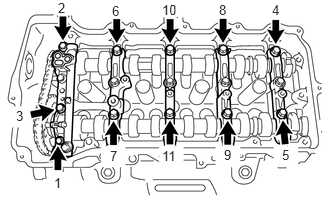
Remove the 11 bolts in several steps in the order shown in the illustration.
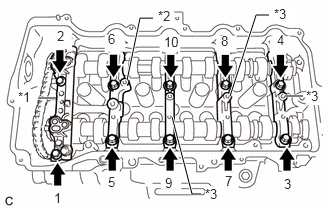
| *1 | No. 1 Camshaft Bearing Cap |
| *2 | No. 2 Camshaft Bearing Cap |
| *3 | No. 3 Camshaft Bearing Cap |
Remove the 10 bolts in several steps in the order shown in the illustration.
Remove the No. 1 camshaft bearing cap, No. 2 camshaft bearing cap and 3 No. 3 camshaft bearing caps.
- HINT:
-
Arrange the removed parts in such a way that they can be reinstalled to their original locations.
13511
20.REMOVE CAMSHAFT
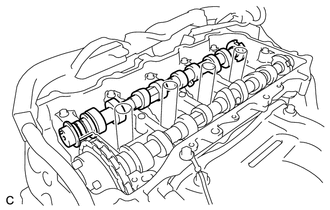
Remove the camshaft from the camshaft housing sub-assembly.
13512
21.REMOVE NO. 2 CAMSHAFT
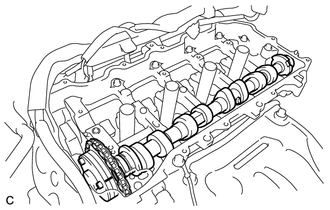
Hold up the chain sub-assembly and remove the No. 2 camshaft from the camshaft housing sub-assembly.
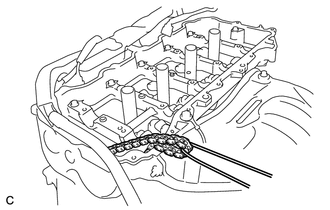
Suspend the chain sub-assembly with a string or equivalent as shown in the illustration.
- NOTICE:
-
Be careful not to drop the chain sub-assembly inside the timing chain cover sub-assembly.
13070A
22.REMOVE CAMSHAFT TIMING EXHAUST GEAR ASSEMBLY
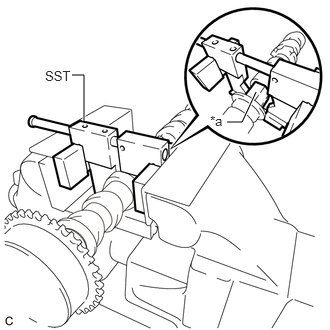
| *a | Hexagonal Portion |
Using SST, grip the hexagonal portion, and then secure the SST and No. 2 camshaft in a vise as shown in the illustration.
- SST
- 09212-31010
- NOTICE:
- ·
Do not damage the No. 2 camshaft.
·Never grip areas other than the hexagonal portion, as this may cause damage.
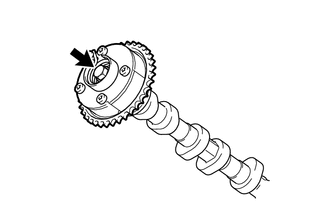
Remove the bolt and camshaft timing exhaust gear assembly.
- NOTICE:
-
Do not disassemble the camshaft timing exhaust gear assembly.
15678A
23.REMOVE OIL CONTROL VALVE FILTER
11811
24.REMOVE NO. 1 CAMSHAFT BEARING
11821
25.REMOVE NO. 2 CAMSHAFT BEARING