2AR-FE LUBRICATION OIL PUMP REMOVAL
CAUTION / NOTICE / HINT
The necessary procedures (adjustment, calibration, initialization, or registration) that must be performed after parts are removed and installed, or replaced during timing chain cover sub-assembly removal/installation are shown below.
| Replaced Part or Performed Procedure | Necessary Procedure | Effect/Inoperative Function when Necessary Procedure not Performed | Link | |
|---|---|---|---|---|
|
*1: w/ Smart Entry and Start System *2: w/o Smart Entry and Start System *3: The vehicle height changes because of suspension or tire replacement. |
||||
| Battery terminal is disconnected/reconnected | Perform steering sensor zero point calibration | Lane departure alert system (w/ Steering Control) | ( ) |
|
| Pre-collision system | ||||
| Memorize steering angle neutral point | Parking assist monitor system | ()
|
||
| Panoramic view monitor system | ()
|
|||
| Replacement of ECM | Perform Vehicle Identification Number (VIN) or frame number registration | MIL comes on | ()
|
|
| Perform code registration (Immobiliser system) | ·
Wireless door lock control system ·
Smart Entry and Start System (for Entry Function) ·
Smart Entry and Start System (for Start Function) ·
Steering lock function |
See Service Bulletin for the registration method. | ||
·
Replacement of engine assembly ·
Gas leak from exhaust system is repaired |
Inspection after repair | ·
Poor idle, etc. ·
Engine start function, etc. |
()
|
|
| Replacement of ECM
(If possible, read the transaxle compensation code from the previous ECM) |
Possible | Perform the following procedures in the order shown:
1.
Reset Memory 2.
Transfer transaxle compensation code 3.
Perform road test to allow ECM to learn |
·
Large shift shock ·
The deterioration of fuel efficiency |
()for U760E Initialization
( )for U760E Registration
|
| Impossible | Perform the following procedures in the order shown:
1.
Reset Memory 2.
Reset transaxle compensation code 3.
Perform road test to allow ECM to learn |
|||
| Replacement of ECM*1 | Perform code registration (Immobiliser function) | ·
Wireless door lock control system ·
Smart Entry and Start System (for Entry Function) ·
Smart Entry and Start System (for Start Function) ·
Steering lock function |
See Service Bulletin for the registration method. | |
| Replacement of ECM*2 | Perform code registration (Immobiliser system) | ·
Wireless door lock control system ·
Engine start |
See Service Bulletin for the registration method. | |
| Replacement of automatic transaxle fluid | ATF thermal degradation estimate reset | The value of the Data List item "ATF Thermal Degradation Estimate" is not estimated correctly. | ()
|
|
| Suspension, tires*3 | Rear television camera assembly optical axis (Back camera position setting) | Parking assist monitor system | ()for Initialization
( )for Calibration
|
|
| Perform headlight ECU sub-assembly LH initialization | Lighting system (EXT) | ()
|
||
·
Television camera controller initialization ·
Adjust steering angle ·
Rear television camera assembly optical axis (Back camera position setting) |
Panoramic view monitor system | ()for Initialization
( )for Calibration
|
||
| Replacement of front bumper assembly | Front television camera view adjustment | |||
| Front wheel alignment adjustment | Perform system variant learning and acceleration sensor zero point calibration. | ·
VSC disabled or malfunctioning ·
DTCs are output ·
Slip indicator light illuminated ·
ABS warning light illuminated |
()
|
|
- NOTICE:
-
Do not remove the oil pump or oil pump relief valve from the timing chain cover sub-assembly.
PROCEDURE

 1.REMOVE ENGINE ASSEMBLY WITH TRANSAXLE
82121
2.REMOVE ENGINE WIRE
19500
3.REMOVE IGNITION COIL ASSEMBLY
11201
4.REMOVE CYLINDER HEAD COVER SUB-ASSEMBLY
11301K
5.REMOVE CRANKSHAFT POSITION SENSOR
13471
6.REMOVE CRANKSHAFT PULLEY
12315A
7.REMOVE ENGINE MOUNTING BRACKET RH
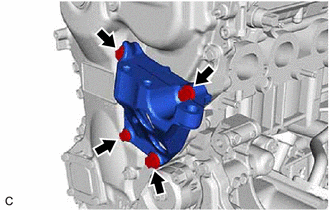
Remove the 4 bolts and engine mounting bracket RH.
16620
8.REMOVE V-RIBBED BELT TENSIONER ASSEMBLY
11310
9.REMOVE TIMING CHAIN COVER SUB-ASSEMBLY
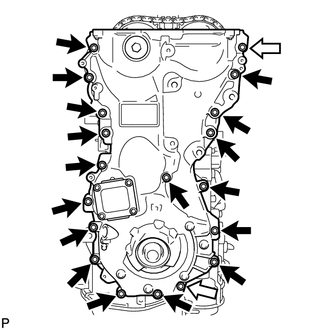

|
Bolt |

|
Nut |
Remove the 17 bolts and 2 nuts.
Remove the timing chain cover sub-assembly by prying between the timing chain cover sub-assembly and cylinder head sub-assembly, camshaft housing sub-assembly, cylinder block sub-assembly and stiffening crankcase assembly with a screwdriver as shown in the illustration.
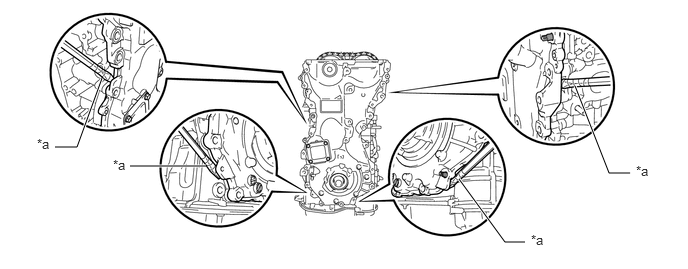
| *a | Protective Tape | - | - |
- NOTICE:
-
Be careful not to damage the contact surfaces of the cylinder head sub-assembly, camshaft housing sub-assembly, cylinder block sub-assembly, stiffening crankcase assembly or timing chain cover sub-assembly.
- HINT:
-
Tape the screwdriver tip before use.
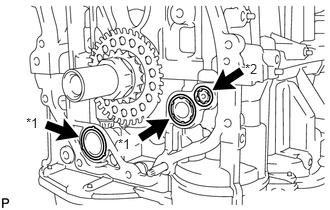
| *1 | Oil Pump Gasket |
| *2 | Oil Hole Cover Gasket |
Remove the 2 oil pump gaskets and oil hole cover gasket from the stiffening crankcase assembly.
11301C
10.REMOVE TIMING CHAIN COVER OIL SEAL
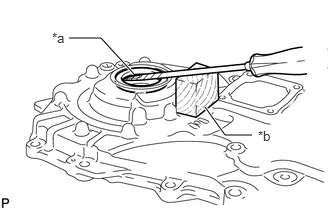
| *a | Protective Tape |
| *b | Wooden Block |
Using a screwdriver and wooden block, pry out the timing chain cover oil seal.
- NOTICE:
-
Do not damage the surface of the timing chain cover oil seal press fit hole or the crankshaft.
- HINT:
-
Tape the screwdriver tip before use.