A25A-FKS ENGINE MECHANICAL ENGINE UNIT INSTALLATION
CAUTION / NOTICE / HINT
- NOTICE:
-
This procedure includes the installation of small-head bolts. Refer to Small-Head Bolts of Basic Repair Hint to identify the small-head bolts.
-
Click hereGeneral>INTRODUCTION>REPAIR INSTRUCTION>PRECAUTION
PROCEDURE

 25861A
1.INSTALL NO. 2 VACUUM SWITCHING VALVE BRACKET
Using an 8 mm socket wrench, install the No. 2 vacuum switching valve bracket to the cylinder head sub-assembly with the 2 bolts.
- Torque:
- 10 N*m (102 kgf*cm, 7 ft.*lbf)
2.INSTALL PURGE VALVE (PURGE VSV)
w/ Canister Pump Module:
Click hereEngine / Hybrid System>A25A-FKS (EMISSION CONTROL)>PURGE VALVE(w/ Canister Pump Module)>INSTALLATION
w/o Canister Pump Module:
17169A
3.INSTALL NO. 3 EXHAUST MANIFOLD HEAT INSULATOR
Type A:
Install the No. 3 exhaust manifold heat insulator to the cylinder block sub-assembly with the bolt.
- Torque:
- 16 N*m (163 kgf*cm, 12 ft.*lbf)
Type B:
Install the No. 3 exhaust manifold heat insulator to the cylinder block sub-assembly with the 2 bolts.
- Torque:
- 16 N*m (163 kgf*cm, 12 ft.*lbf)
16323
4.INSTALL ENGINE WATER PUMP ASSEMBLY (WATER INLET HOUSING)
Install the engine water pump assembly (water inlet housing) and a new gasket to the cylinder block sub-assembly with the 4 bolts.
- Torque:
- 43 N*m (438 kgf*cm, 32 ft.*lbf)
16031
5.INSTALL WATER INLET WITH THERMOSTAT SUB-ASSEMBLY
11452
6.INSTALL ENGINE OIL LEVEL DIPSTICK GUIDE
Apply a light coat of engine oil to a new O-ring.
Install the O-ring to the engine oil level dipstick guide.
Using an 8 mm socket wrench, install the engine oil level dipstick guide to the camshaft housing sub-assembly with the bolt.
- Torque:
- 10 N*m (102 kgf*cm, 7 ft.*lbf)
Install the engine oil level dipstick.
19500
7.INSTALL IGNITION COIL ASSEMBLY
23255A
8.INSTALL FUEL INJECTOR SEAL
23250E
9.INSTALL DIRECT FUEL INJECTOR ASSEMBLY
23814B
10.INSTALL FUEL DELIVERY PIPE
23250F
11.INSTALL PORT FUEL INJECTOR ASSEMBLY
82125N
12.INSTALL NO. 5 ENGINE WIRE
23291
13.INSTALL INJECTOR VIBRATION INSULATOR
23807V
14.INSTALL NO. 1 DELIVERY PIPE SPACER
23800
15.INSTALL FUEL DELIVERY PIPE WITH SENSOR ASSEMBLY
16.INSTALL WIRE HARNESS CLAMP BRACKET
Using an 8 mm socket wrench, install the wire harness clamp bracket to the No. 1 ventilation case with the 2 bolts.
- Torque:
- 10 N*m (102 kgf*cm, 7 ft.*lbf)
82126A
17.INSTALL NO. 6 ENGINE WIRE
Install the No. 6 engine wire to the wire harness clamp bracket with the 2 nuts.
- Torque:
- 10 N*m (102 kgf*cm, 7 ft.*lbf)
Engage the 2 clamps.
Connect the 4 connectors.
82219A
18.INSTALL SENSOR WIRE
Using an 8 mm socket wrench, install the sensor wire to the water inlet with thermostat sub-assembly with the bolt.
- Torque:
- 10 N*m (102 kgf*cm, 7 ft.*lbf)
Engage the 3 clamps.
Connect the 4 connectors.
16295
19.INSTALL NO. 7 WATER BY-PASS HOSE
Install the No. 7 water by-pass hose and slide the 2 clips to secure it.
23100X
20.TEMPORARILY INSTALL FUEL (ENGINE ROOM SIDE) PUMP ASSEMBLY (for High Pressure)
23801P
21.TEMPORARILY INSTALL NO. 1 FUEL PIPE SUB-ASSEMBLY
23100X
22.INSTALL FUEL (ENGINE ROOM SIDE) PUMP ASSEMBLY (for High Pressure)
23801P
23.INSTALL NO. 1 FUEL PIPE SUB-ASSEMBLY
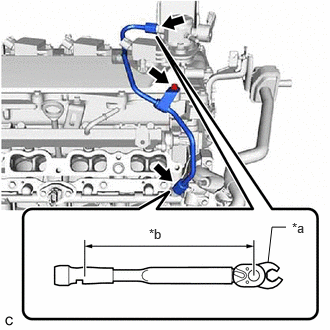
| *a | 17 mm Union Nut Wrench |
| *b | Torque Wrench Fulcrum Length |
Using a 17 mm union nut wrench, tighten the union nut on the fuel delivery pipe side of the No. 1 fuel pipe sub-assembly.
- Torque:
- Specified tightening torque : 35 N*m (357 kgf*cm, 26 ft.*lbf)
- NOTICE:
-
Do not adjust the torque in the loosening direction.
- HINT:
- ·
Calculate the torque wrench reading when changing the fulcrum length of the torque wrench.
Click hereGeneral>INTRODUCTION>REPAIR INSTRUCTION>PRECAUTION
·When using a 17 mm union nut wrench (fulcrum length of 30 mm (1.18 in.)) + torque wrench (fulcrum length of 180 mm (7.09 in.)): 30 N*m (306 kgf*cm, 22 ft.*lbf)
Using a 17 mm union nut wrench, tighten the union nut on the fuel pump assembly side of the No. 1 fuel pipe sub-assembly.
- Torque:
- Specified tightening torque : 35 N*m (357 kgf*cm, 26 ft.*lbf)
- NOTICE:
-
Do not adjust the torque in the loosening direction.
- HINT:
- ·
Calculate the torque wrench reading when changing the fulcrum length of the torque wrench.
Click hereGeneral>INTRODUCTION>REPAIR INSTRUCTION>PRECAUTION
·When using a 17 mm union nut wrench (fulcrum length of 30 mm (1.18 in.)) + torque wrench (fulcrum length of 180 mm (7.09 in.)): 30 N*m (306 kgf*cm, 22 ft.*lbf)
Using an 8 mm socket wrench, install the bolt.
- Torque:
- 10 N*m (102 kgf*cm, 7 ft.*lbf)
23910A
24.CONNECT FUEL TUBE SUB-ASSEMBLY
17177
25.INSTALL NO. 1 INTAKE MANIFOLD TO HEAD GASKET
17111
26.INSTALL INTAKE MANIFOLD
16278
27.INSTALL NO. 2 WATER BY-PASS PIPE
Install the bolt (A).
- Torque:
- 21 N*m (214 kgf*cm, 15 ft.*lbf)
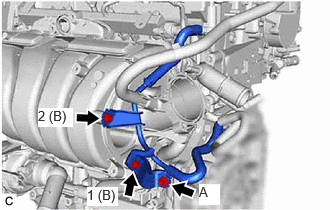
Using an 8 mm socket wrench, install the No. 2 water by-pass pipe with the 2 bolts (B) in the order shown in the illustration.
- Torque:
- 10 N*m (102 kgf*cm, 7 ft.*lbf)
16279
28.INSTALL NO. 3 WATER BY-PASS PIPE
Connect the No. 3 water by-pass pipe to the water outlet and slide the clip to secure it.
Using an 8 mm socket wrench, install the No. 3 water by-pass pipe to the intake manifold with the bolt.
- Torque:
- 10 N*m (102 kgf*cm, 7 ft.*lbf)
25620
29.INSTALL EGR VALVE ASSEMBLY
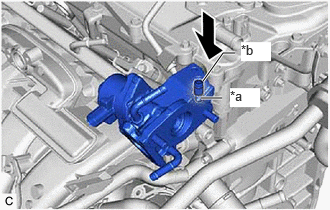
| *a | Pin |
| *b | Hole |
Align and fit the hole of the EGR valve assembly to the pin of the camshaft housing sub-assembly.
Using an 8 mm socket wrench, install the EGR valve assembly with the 2 bolts.
- Torque:
- 10 N*m (102 kgf*cm, 7 ft.*lbf)
Connect the No. 8 water by-pass hose to the EGR valve assembly and slide the clip to secure it.
30.INSTALL WATER HOSE
Connect the water hose to the EGR valve assembly and slide the clip to secure it.
25601
31.INSTALL NO. 1 EGR PIPE SUB-ASSEMBLY
Using an 8 mm socket wrench, install the No. 1 EGR pipe sub-assembly, a new EGR inlet gasket and a new EGR valve adapter gasket with the 4 bolts.
- Torque:
- 10 N*m (102 kgf*cm, 7 ft.*lbf)
25680
32.INSTALL EGR COOLER ASSEMBLY
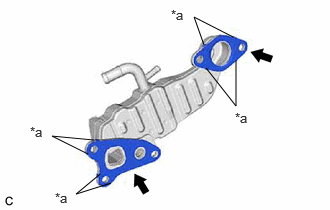
| *a | Claw |
Install a new EGR cooler gasket to the EGR cooler assembly.
- NOTICE:
-
Make sure that the claws of the EGR cooler gasket are toward the EGR cooler assembly side.
Install a new EGR valve gasket to the EGR cooler assembly.
- NOTICE:
-
Make sure that the claws of the EGR valve gasket are toward the EGR cooler assembly side.
Type A:
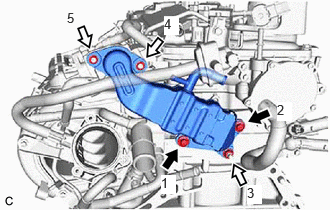

|
Bolt |

|
Nut |
Temporarily install the EGR cooler assembly to the cylinder head sub-assembly and EGR valve assembly with the 2 bolts and 3 nuts.
Tighten the 2 bolts and 3 nuts in the order shown in the illustration.
- Torque:
- 24 N*m (245 kgf*cm, 18 ft.*lbf)
Type B:
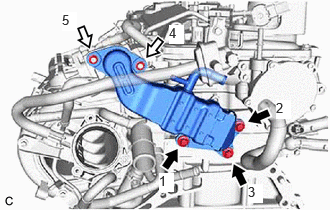
|
|
Bolt |
|
|
Nut |
Temporarily install the EGR cooler assembly to the cylinder head sub-assembly and EGR valve assembly with the 3 bolts and 2 nuts.
Tighten the 3 bolts and 2 nuts in the order shown in the illustration.
- Torque:
- 24 N*m (245 kgf*cm, 18 ft.*lbf)
Connect the No. 3 water by-pass hose to the EGR cooler assembly.
Connect the water hose to the EGR cooler assembly.
22271
33.INSTALL THROTTLE BODY GASKET
22030
34.INSTALL THROTTLE BODY WITH MOTOR ASSEMBLY
17141
35.INSTALL EXHAUST MANIFOLD (TWC: Front Catalyst)
17118
36.INSTALL MANIFOLD STAY
17167
37.INSTALL NO. 1 EXHAUST MANIFOLD HEAT INSULATOR
Type A:
Install the No. 1 exhaust manifold heat insulator to the exhaust manifold (TWC: Front Catalyst) with the 5 bolts.
- Torque:
- 10 N*m (102 kgf*cm, 7 ft.*lbf)
Type B:
Install the No. 1 exhaust manifold heat insulator to the exhaust manifold (TWC: Front Catalyst) with the 3 bolts.
- Torque:
- 10 N*m (102 kgf*cm, 7 ft.*lbf)
16260
38.INSTALL FLOW SHUTTING VALVE (WATER BY-PASS HOSE ASSEMBLY)
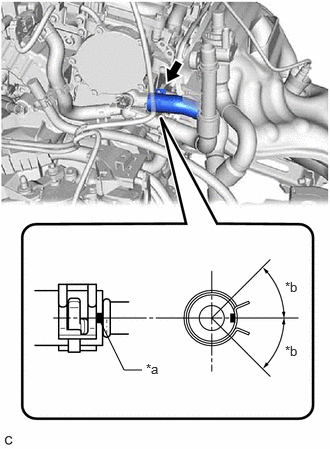
| *a | Paint Mark |
| *b | 45° (Claw of Clip Location) |
Connect the flow shutting valve (water by-pass hose assembly) to the outlet water by-pass sub-assembly and slide the clip to secure it.
- NOTICE:
- ·
Make sure to slide the flow shutting valve (water by-pass hose assembly) until it contacts the hose stopper of the outlet water by-pass sub-assembly.
·Make sure that the claws of the clip are within the location shown in the illustration.
Install the water hose clamp bracket with the 2 bolts.
- Torque:
- 13 N*m (133 kgf*cm, 10 ft.*lbf)
Connect the flow shutting valve (water by-pass hose assembly) with the bolt.
- Torque:
- 19 N*m (194 kgf*cm, 14 ft.*lbf)
16207
39.INSTALL NO. 2 WATER BY-PASS PIPE SUB-ASSEMBLY
Connect the No. 2 water by-pass pipe sub-assembly with the bolt.
- Torque:
- 19 N*m (194 kgf*cm, 14 ft.*lbf)
Connect the No. 2 water by-pass pipe sub-assembly to the outlet water by-pass sub-assembly and slide the clip to secure it.
11323C
40.INSTALL NO. 3 TIMING CHAIN COVER (w/ Cover)
Using an 8 mm socket wrench, install the No. 3 timing chain cover and plate washer to the No. 2 timing gear cover assembly with the bolt.
- Torque:
- 10 N*m (102 kgf*cm, 7 ft.*lbf)
11336A
41.INSTALL TIMING GEAR COVER INSULATOR
Using an 8 mm socket wrench, install the timing gear cover insulator and plate washer to the No. 2 timing gear cover assembly with the bolt.
- Torque:
- 10 N*m (102 kgf*cm, 7 ft.*lbf)
11336A
42.INSTALL NO. 2 TIMING CHAIN COVER INSULATOR
Install the No. 2 timing chain cover insulator to the V-ribbed belt tensioner assembly.
16620D
43.INSTALL V-RIBBED BELT TENSIONER ASSEMBLY
- NOTICE:
-
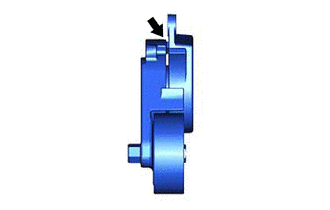
- ·
Do not apply or add any oil or grease to the belt tensioner to prevent abnormal noises from the belt tensioner pulley, belt squealing, etc.
·Do not allow oil or grease to adhere to the moving parts of the belt tensioner, as this may cause malfunctions.
If oil or grease is on the location indicated by the arrow, replace the belt tensioner.
Install the V-ribbed belt tensioner assembly to the No. 2 timing gear cover assembly with the 2 bolts.
- Torque:
- 21 N*m (214 kgf*cm, 15 ft.*lbf)
12602C
44.INSTALL NO. 2 ENGINE COVER
Install the No. 2 engine cover to the No. 2 timing gear cover assembly with the 2 bolts.
- Torque:
- 10 N*m (102 kgf*cm, 7 ft.*lbf)
88310
45.INSTALL COMPRESSOR ASSEMBLY WITH PULLEY
for Type A:
Using an E8 "TORX" socket wrench, temporarily install the compressor assembly with pulley with the 2 stud bolts.
- Torque:
- 5.0 N*m (51 kgf*cm, 44 in.*lbf)
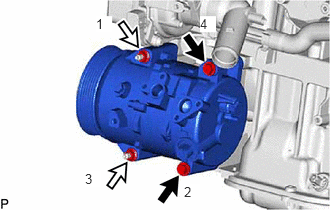
|
|
Bolt |
|
|
Nut |
Install the compressor assembly with pulley with the 2 bolts and 2 nuts.
- Torque:
- 24.5 N*m (250 kgf*cm, 18 ft.*lbf)
- HINT:
-
Tighten the bolts and nuts in the order shown in the illustration.
for Type B:
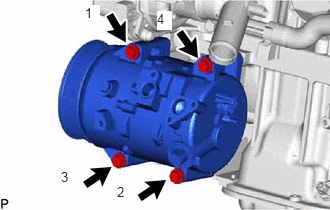
Install the compressor assembly with pulley with the 4 bolts.
- Torque:
- 24.5 N*m (250 kgf*cm, 18 ft.*lbf)
- HINT:
-
Tighten the bolts in the order shown in the illustration.
27020
46.INSTALL GENERATOR ASSEMBLY
16361A
47.INSTALL V-RIBBED BELT
43457
48.INSTALL DRIVE SHAFT BEARING BRACKET
Install the drive shaft bearing bracket with the 3 bolts.
- Torque:
- 63.7 N*m (650 kgf*cm, 47 ft.*lbf)
- NOTICE:
-
Make sure that the bolts and bolt holes are free of oil. Clean them if necessary.