HEATING / AIR CONDITIONING CONDENSER REMOVAL
CAUTION / NOTICE / HINT
The necessary procedures (adjustment, calibration, initialization, or registration) that must be performed after parts are removed and installed, or replaced during cooler condenser assembly removal/installation are shown below.
| Replaced Part or Performed Procedure | Necessary Procedure | Effect/Inoperative Function When Necessary Procedures are not Performed | Link |
|---|---|---|---|
|
*: Applies only for when removing and installing or replacing the rear television camera assembly. |
|||
| Front bumper assembly (w/ Parking Support Brake System) | ·
Measure ultrasonic sensor detection angle ·
Ultrasonic sensor detection angle registration |
Parking Support Brake System | ( ) |
| Front bumper assembly (w/ Panoramic View Monitor System) | Front television camera view adjustment | Panoramic View Monitor System | ()for Initialization
( )for Calibration
|
Replacement or removal and installation of 2 or more parts:
·
Front television camera assembly, front bumper assembly or radiator grille ·
Rear television camera assembly ·
Side television camera assembly LH or outer rear view mirror assembly LH ·
Side television camera assembly RH or outer rear view mirror assembly RH |
·
Television camera view adjustment ·
Rear television camera assembly optical axis (Back camera position setting)* |
Panoramic View Monitor System | ()for Initialization
( )for Calibration
|
PROCEDURE

 1.RECOVER REFRIGERANT FROM REFRIGERATION SYSTEM
for HFC-134a (R134a):
Click hereVehicle Interior>HEATING / AIR CONDITIONING>REFRIGERANT>REPLACEMENT
for HFO-1234yf (R1234yf):
Click hereVehicle Interior>HEATING / AIR CONDITIONING>REFRIGERANT (for HFO-1234yf(R1234yf))>REPLACEMENT
53019F
2.REMOVE RADIATOR SHUTTER SUB-ASSEMBLY (w/ Grille Shutter)
3.REMOVE HEADLIGHT ASSEMBLY LH (for LED Type Turn Signal Light)
4.REMOVE HEADLIGHT ASSEMBLY RH (for LED Type Turn Signal Light)
- HINT:
-
Use the same procedure as for the LH side.
5.REMOVE HEADLIGHT ASSEMBLY LH (for Bulb Type Turn Signal Light)
6.REMOVE HEADLIGHT ASSEMBLY RH (for Bulb Type Turn Signal Light)
- HINT:
-
Use the same procedure as for the LH side.
16691A
7.REMOVE FRONT RADIATOR SIDE AIR GUIDE PLATE RH (w/o Grille Shutter)
52611
8.REMOVE FRONT BUMPER ENERGY ABSORBER
52131A
9.REMOVE FRONT BUMPER REINFORCEMENT
53253B
10.REMOVE UPPER RADIATOR MOUNTING BRACKET
17750A
11.REMOVE INLET AIR CLEANER ASSEMBLY
53510
12.REMOVE HOOD LOCK ASSEMBLY
16595B
13.REMOVE NO. 1 RADIATOR AIR GUIDE LH (w/o Grille Shutter)
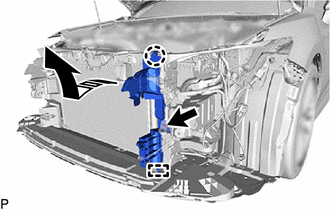

|
Remove in this Direction |
Remove the clip.
Disengage the claw and guide, and remove the No. 1 radiator air guide LH as shown in the illustration.
16593B
14.REMOVE NO. 1 RADIATOR AIR GUIDE RH (w/o Grille Shutter)
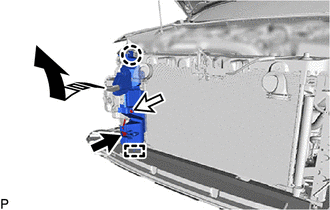
|
|
Remove in this Direction |
Disconnect the connector.
Remove the clip.
Disengage the claw and guide, and remove the No. 1 radiator air guide RH as shown in the illustration.
16595B
15.REMOVE NO. 1 RADIATOR AIR GUIDE LH (w/ Grille Shutter)
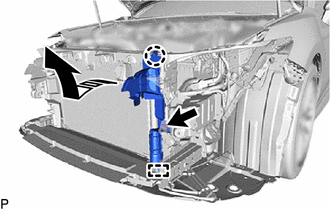
|
|
Remove in this Direction |
Remove the clip.
Disengage the claw and guide, and remove the No. 1 radiator air guide LH as shown in the illustration.
16593B
16.REMOVE NO. 1 RADIATOR AIR GUIDE RH (w/ Grille Shutter)
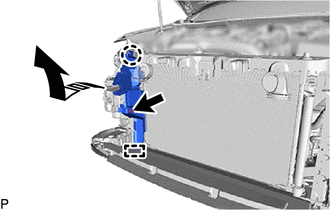
|
|
Remove in this Direction |
Remove the clip.
Disengage the claw and guide, and remove the No. 1 radiator air guide RH as shown in the illustration.
88711
17.DISCONNECT NO. 1 COOLER REFRIGERANT DISCHARGE HOSE SUB-ASSEMBLY
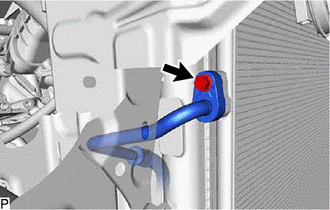
Remove the bolt and disconnect the No. 1 cooler refrigerant discharge hose sub-assembly from the cooler condenser assembly.
Remove the O-ring from the No. 1 cooler refrigerant discharge hose sub-assembly.
- NOTICE:
-
Seal the openings of the disconnected parts using vinyl tape to prevent entry of moisture and foreign matter.
88710E
18.DISCONNECT AIR CONDITIONING TUBE AND ACCESSORY ASSEMBLY
While pressing the end of the air conditioning tube and accessory assembly into the end of the cooler condenser assembly, use pliers to squeeze together both sides of the piping clamp until it breaks apart.
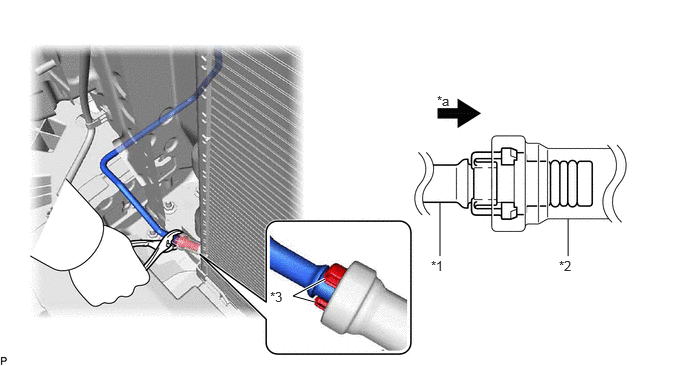
| *1 | Air Conditioning Tube and Accessory Assembly | *2 | Cooler Condenser Assembly |
| *3 | Piping Clamp | - | - |
| *a | Press In | - | - |
- NOTICE:
- ·
If any foreign matter is adhered to the connecting part, brush it off or use compressed air to remove it.
·Make sure that fragments of the piping clamp do not enter the piping.
Disconnect the air conditioning tube and accessory assembly.
- NOTICE:
-
Remove any foreign matter from the connecting parts of the air conditioning tube and accessory assembly and cooler condenser assembly.
Remove the 2 O-rings from the air conditioning tube and accessory assembly.
- NOTICE:
-
Wrap the open ends of the separated cooler condenser assembly and air conditioning tube and accessory assembly with vinyl tape to prevent entry of moisture and foreign matter.
Remove the piping clamp.
53205
19.REMOVE UPPER RADIATOR SUPPORT SUB-ASSEMBLY
88460
20.REMOVE COOLER CONDENSER ASSEMBLY
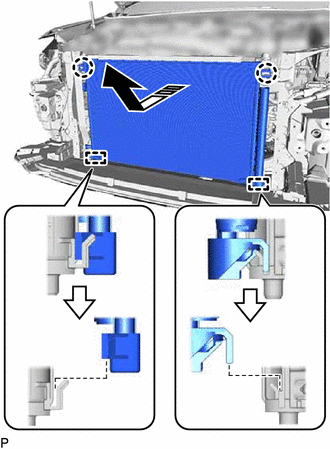
|
|
Remove in this Direction |
Disengage the 2 claws and 2 guides, and remove the cooler condenser assembly as shown in the illustration.
- NOTICE:
-
Do not damage the cooler condenser assembly or radiator assembly when removing the cooler condenser assembly.