N04C-VL ENGINE MECHANICAL ENGINE ASSEMBLY INSTALLATION
PROCEDURE

 22100
1.INSTALL INJECTION OR SUPPLY PUMP ASSEMBLY
2.INSTALL COMMON RAIL ASSEMBLY FUEL PIPE SUPPORT
Install the common rail assembly fuel support with the 2 bolts.
- Torque:
55 N*m (561 kgf*cm, 41 ft.*lbf)
82702E
3.INSTALL WIRING HARNESS BRACKET SUB-ASSEMBLY
Install the wiring harness bracket sub-assembly with the 2 bolts.
- Torque:
29 N*m (291 kgf*cm, 21 ft.*lbf)
23849G
4.INSTALL FUEL PIPE SUPPORT
Install the fuel support with the 2 bolts.
- Torque:
29 N*m (291 kgf*cm, 21 ft.*lbf)
23810A
5.INSTALL COMMON RAIL ASSEMBLY
6.INSTALL NO. 3 NOZZLE LEAKAGE PIPE SUB-ASSEMBLY
Install the No. 3 nozzle leakage pipe sub-assembly with 2 new gaskets and the 2 union bolts.
- Torque:
13 N*m (133 kgf*cm, 10 ft.*lbf)
Install the fuel pipe clamp with the nut. Tighten the nut until the clamp edges make contact.
29300
7.INSTALL VACUUM PUMP ASSEMBLY
29601B
8.INSTALL VACUUM PUMP OIL PIPE SUB-ASSEMBLY
19971E
9.INSTALL VACUUM PIPE
Install the vacuum pipe with 2 new gaskets and the union bolt.
- Torque:
25 N*m (250 kgf*cm, 18 ft.*lbf)
Install the 2 pipe clamps with the 2 nuts. Tighten the 2 nuts until the clamp edges make contact with the engine side clamp edges.
23803H
10.INSTALL FUEL RETURN PIPE SUB-ASSEMBLY
23811
11.INSTALL FUEL FILTER TO INJECTION PUMP FUEL PIPE
16100
12.INSTALL ENGINE WATER PUMP ASSEMBLY
16206
13.INSTALL WATER BY-PASS PIPE SUB-ASSEMBLY
Install the water by-pass pipe sub-assembly with 6 new O-rings and the 6 bolts.
- Torque:
29 N*m (291 kgf*cm, 21 ft.*lbf)
16206B
14.INSTALL NO. 3 WATER BY-PASS PIPE SUB-ASSEMBLY
Connect the water hose.
Install the No. 3 water by-pass pipe sub-assembly with the 6 new O-rings and 6 bolts.
- Torque:
29 N*m (291 kgf*cm, 21 ft.*lbf)
87208L
15.INSTALL WATER PIPE SUB-ASSEMBLY
Install the water pipe sub-assembly with a new O-ring and the 3 bolts.
- Torque:
29 N*m (291 kgf*cm, 21 ft.*lbf)
16333
16.INSTALL WATER OUTLET HOUSING
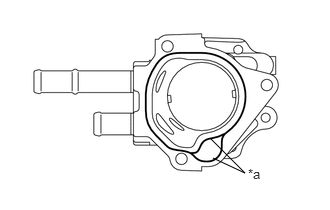
Apply a continuous bead of seal packing (width: 2.2 to 2.7 mm (0.0866 to 0.1063 in.)) as shown in the illustration.
- Seal packing:
Toyota Genuine Seal Packing Black, ThreeBond 1207B or equivalent
| *a | Seal Packing |
- NOTICE:
- ·
Remove any oil from the contact surface.
·Install the water outlet housing within 3 minutes, and tighten the bolts within 15 minutes of applying the seal packing.
Install the water outlet housing with the 3 bolts.
- Torque:
29 N*m (291 kgf*cm, 21 ft.*lbf)
16331A
17.INSTALL THERMOSTAT
16331
18.INSTALL WATER OUTLET
Install the water outlet with the 3 bolts.
- Torque:
29 N*m (291 kgf*cm, 21 ft.*lbf)
88431
19.INSTALL NO. 1 COMPRESSOR MOUNTING BRACKET (w/ Air Conditioning System)
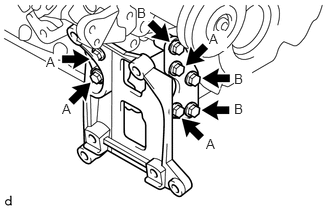
Install the No. 1 compressor mounting bracket and compressor mounting bracket set with the 7 bolts.
- Torque:
- Bolt A:
55 N*m (561 kgf*cm, 41 ft.*lbf)
- Bolt B:
29 N*m (291 kgf*cm, 21 ft.*lbf)
- HINT:
-
First, temporarily tighten the bolts and check that the No. 1 compressor mounting bracket is seated properly. then, tighten the bolts to the specified torque.
88444
20.INSTALL IDLE PULLEY ASSEMBLY WITH BRACKET (w/ Air Conditioning System)
Install the idle pulley assembly with bracket with the 3 bolts.
- Torque:
55 N*m (561 kgf*cm, 41 ft.*lbf)
16630G
21.INSTALL IDLER PULLEY ASSEMBLY
Install the idler pulley assembly with the 2 bolts.
- Torque:
55 N*m (561 kgf*cm, 41 ft.*lbf)
22.INSTALL CAMSHAFT POSITION SENSOR
23.INSTALL CRANKSHAFT POSITION SENSOR
89422
24.INSTALL ENGINE COOLANT TEMPERATURE SENSOR
15710C
25.INSTALL OIL COOLER GASKET
15710
26.INSTALL OIL COOLER ASSEMBLY
83530
27.INSTALL ENGINE OIL PRESSURE SWITCH ASSEMBLY
17141
28.INSTALL EXHAUST MANIFOLD
17111
29.INSTALL INTAKE MANIFOLD
23670
30.INSTALL INJECTOR ASSEMBLY
23741B
31.INSTALL INJECTION PIPE CLAMP
17138A
32.INSTALL INTAKE PIPE STAY
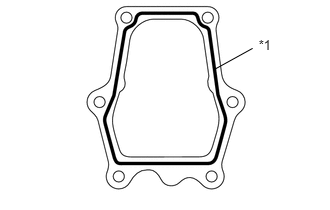
Apply a continuous bead of seal packing (width: 1.5 to 2.5 mm (0.0591 to 0.0984 in.)) as shown in the illustration.
- Seal packing:
Toyota Genuine Seal Packing Black, ThreeBond 1207B or equivalent
| *1 | Seal Packing |
- NOTICE:
- ·
Remove any oil from the contact surface.
·Install the intake pipe within 3 minutes, and tighten the bolts within 15 minutes of applying the seal packing.
Install the intake pipe with the 4 bolts.
- Torque:
29 N*m (291 kgf*cm, 21 ft.*lbf)
33.INSTALL INTAKE PIPE WITH VENTURI ASSEMBLY
15301
34.INSTALL OIL DIPSTICK GUIDE
Install the oil dipstick guide with a new O-ring with the bolt.
- Torque:
29 N*m (291 kgf*cm, 21 ft.*lbf)
25625
35.INSTALL EGR VALVE BRACKET
Install the EGR valve bracket with the 4 bolts.
- Torque:
29 N*m (291 kgf*cm, 21 ft.*lbf)
11201
36.INSTALL CYLINDER HEAD COVER SUB-ASSEMBLY
Install 4 new No. 2 cylinder head cover gaskets onto the 4 injectors.
Install a new cylinder head cover gasket onto the cylinder head cover sub-assembly.
Install the 2 cushions and 2 spacers and tighten the 2 bolts.
- Torque:
29 N*m (291 kgf*cm, 21 ft.*lbf)
11202D
37.INSTALL NO. 2 CYLINDER HEAD COVER SUB-ASSEMBLY
Install the wire harness.
Install the cylinder head cover cushion rubber.
Install the No. 2 cylinder head cover sub-assembly with the 2 bolts.
- Torque:
29 N*m (291 kgf*cm, 21 ft.*lbf)
12180E
38.INSTALL OIL FILLER CAP SUB-ASSEMBLY
Install the oil filler cap sub-assembly.
39.INSTALL ENGINE ASSEMBLY
Support the engine with an engine lifter.
Install the engine assembly.
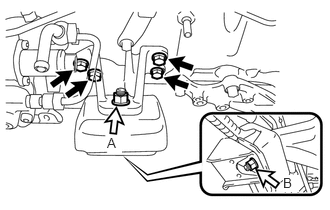
Install the front No. 1 engine mounting bracket LH with the 4 bolts.
- Torque:
69 N*m (704 kgf*cm, 51 ft.*lbf)

|
Bolt |

|
Nut |
Install the engine mounting stabilizer and engine mounting insulator with the 2 nuts.
- Torque:
- Nut A:
87 N*m (887 kgf*cm, 64 ft.*lbf)
- Nut B:
90 N*m (918 kgf*cm, 66 ft.*lbf)
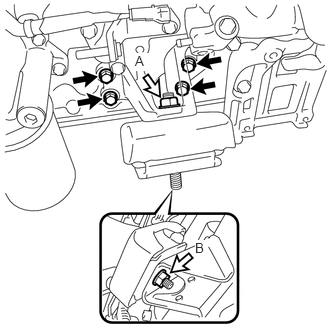
Install the front No. 1 engine mounting bracket RH with the 4 bolts.
- Torque:
69 N*m (704 kgf*cm, 51 ft.*lbf)
|
|
Bolt |
|
|
Nut |
Install the engine mounting stabilizer and engine mounting insulator with the 2 nuts.
- Torque:
- Nut A:
87 N*m (887 kgf*cm, 64 ft.*lbf)
- Nut B:
74 N*m (755 kgf*cm, 55 ft.*lbf)
82121
40.INSTALL ENGINE WIRE
Install the engine wire.
51202D
41.INSTALL FRONT LOWER SUSPENSION CROSSMEMBER SUB-ASSEMBLY
Install the front lower suspension crossmember sub-assembly with the 6 bolts, 4 washers and 4 nuts.
- Torque:
160 N*m (1631 kgf*cm, 118 ft.*lbf)
45450
42.INSTALL STEERING RELAY ROD ASSEMBLY
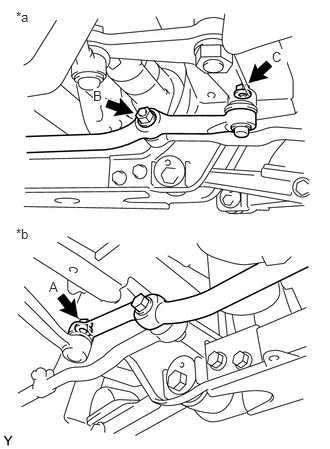
Install the steering relay rod assembly with the 3 nuts.
- Torque:
- Nut A:
150 N*m (1530 kgf*cm, 111 ft.*lbf)
- Nut B:
155 N*m (1581 kgf*cm, 114 ft.*lbf)
- Nut C:
91 N*m (928 kgf*cm, 67 ft.*lbf)
| *a | for LH Side |
| *b | for RH Side |
Install 3 new cotter pins.
28100
43.INSTALL STARTER ASSEMBLY
44.CONNECT NO. 1 FUEL HOSE RETURN TUBE
22100A
45.CONNECT INJECTION PUMP TO FUEL FILTER FUEL HOSE OR PIPE
44774
46.CONNECT UNION TO CONNECTOR TUBE HOSE
Connect the union to connector tube hose.
17342P
47.INSTALL NO. 2 AIR HOSE
44310
48.INSTALL VANE PUMP ASSEMBLY
Coat a new O-ring with power steering fluid and install it onto the vane pump assembly.
Install the vane pump assembly with the 2 bolts.
- Torque:
20 N*m (204 kgf*cm, 15 ft.*lbf)
53712C
49.INSTALL FRONT FENDER APRON LH
Install the front fender apron LH with the 6 bolts.
- Torque:
7.0 N*m (71 kgf*cm, 62 in.*lbf)
44360
50.INSTALL VANE PUMP OIL RESERVOIR ASSEMBLY
Install the vane pump oil reservoir assembly with the 3 bolts.
- Torque:
18 N*m (184 kgf*cm, 13 ft.*lbf)
27020
51.INSTALL GENERATOR ASSEMBLY
88320
52.INSTALL COOLER COMPRESSOR ASSEMBLY (w/ Air Conditioning System)
Install the cooler compressor assembly with the 6 bolts.
- Torque:
47 N*m (475 kgf*cm, 34 ft.*lbf)
Connect the connector.
16577C
53.INSTALL RADIATOR PIPE
Install a new O-ring onto the radiator pipe.
Install the radiator pipe with the 2 bolts.
- Torque:
18 N*m (184 kgf*cm, 13 ft.*lbf)
17201
54.INSTALL TURBOCHARGER SUB-ASSEMBLY
31250
55.INSTALL CLUTCH DISC ASSEMBLY
33110
56.INSTALL MANUAL TRANSMISSION ASSEMBLY
16400
57.INSTALL RADIATOR ASSEMBLY