14B LUBRICATION OIL PUMP OIL PUMP INSTALLATION
PROCEDURE

 11301
1.INSTALL OIL PUMP (TIMING GEAR CASE)
Place a new gasket and the timing gear case in position.
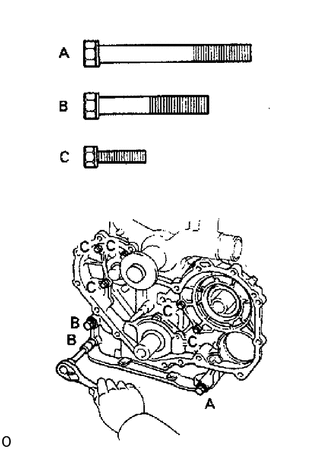
Install and uniformly tighten the 8 bolts in several passes.
- Torque:
- 14 mm head:
44 N*m (449 kgf*cm, 32 ft.*lbf)
- 12 mm head:
21 N*m (214 kgf*cm, 15 ft.*lbf)
- HINT:
-
Each bolt length is indicated in the illustration.
- Bolt length:
A 85 mm (3.35 in.) for 14 mm head
B 60 mm (2.36 in.) for 14 mm head
C 25 mm (0.98 in.) for 12 mm head
Align the matchmarks on the injection pump and timing gear case.
Install the 2 nuts holding the injection pump flange to the timing gear case.
- Torque:
18.5 N*m (189 kgf*cm, 14 ft.*lbf)
2.INSTALL VACUUM PIPE (15B-F, 15B-FT)
Install the vacuum pipe with the bolt (15B-F) or 2 bolts (15B-FT).
Connect these vacuum hoses.
Vacuum hose to 3-way connector
Vacuum hose to vacuum pump
3.INSTALL OIL STRAINER AND OIL PIPE
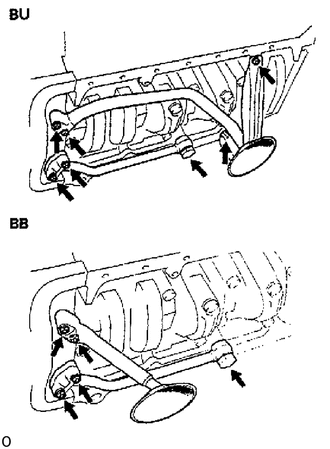
Install a new gasket and the oil strainer with the 2 bolts (BU) and 2 nuts.
- Torque:
18.5 N*m (189 kgf*cm, 14 ft.*lbf)
Install new 3 gaskets and oil pipe with the union bolt and 2 nuts.
- Torque:
- Union bolt:
50 N*m (510 kgf*cm, 37 ft.*lbf)
- Nut:
18.5 N*m (189 kgf*cm, 14 ft.*lbf)
12101
4.INSTALL OIL PAN
Remove any old packing (FIPG) material and be careful not to drop any oil on the contact surfaces of the oil pan and cylinder block.
Using a razor blade and gasket scraper, remove all the old packing (FIPG) material from the gasket surfaces and sealing groove.
Thoroughly clean all components to remove all the loose material.
Using a non-residue solvent, clean both sealing surfaces.
- NOTICE:
-
Do not use a solvent which will affect the painted surfaces.
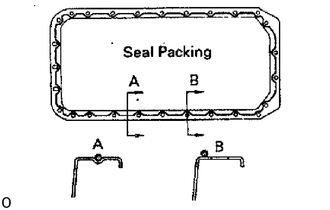
Apply seal packing to the oil pan as shown in the illustration.
- Seal packing:
Toyota Genuine Seal Packing Black, Three Bond 1207B or equivalent
Install a nozzle that has been cut to a 4 - 5 mm (0.16 - 0.20 in.) opening.
Parts must be assembled within 5 minutes of application. Otherwise the material must be removed and reapplied.
Immediately remove nozzle from the tube and reinstall cap.
Install the oil pan with the 17 bolts and 7 nuts. Uniformly tighten the bolts and nuts in several passes.
- Torque:
18.5 N*m (189 kgf*cm, 14 ft.*lbf)
89491
5.INSTALL OIL LEVEL SENSOR
Install a new gasket to the oil pan.
Install the level sensor with the 4 bolts.
13523
6.INSTALL CAMSHAFT TIMING GEAR
Align the timing gear set key with the key groove of the timing gear.
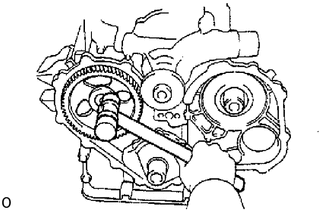
Using a plastic-faced hammer, lightly tap in the timing gear.
- NOTICE:
-
Avoid any impact to the camshaft.
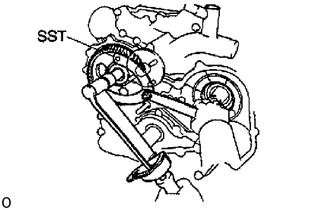
Using SST, install the plate washer and mount bolt.
- SST
- 09960-10010 (09962-01000, 09963-01000)
- Torque:
37.5 N*m (382 kgf*cm, 28 ft.*lbf)
7.INSTALL CRANKSHAFT TIMING GEAR, IDLE GEAR, INJECTION PUMP DRIVE GEAR AND VACUUM PUMP
8.INSTALL TIMING GEAR COVER AND CRANKSHAFT PULLEY
13901
9.INSTALL VALVE ROCKER SHAFT ASSEMBLY
10.INSTALL GLOW PLUGS (3B)
23600
11.INSTALL INJECTION NOZZLES (14B, 15B-F, 15B-FT)
12.INSTALL WATER PUMP PULLEY, FAN, FLUID COU PLING ASSEMBLY (FAN SPACER AND FAN) AND DRIVE BELT(S)
w/ Fluid Coupling:
Click hereEngine / Hybrid System>14B (COOLING)>WATER PUMP>WATER PUMP INSTALLATION
w/o Fluid Coupling:
Click hereEngine / Hybrid System>14B (COOLING)>WATER PUMP>WATER PUMP INSTALLATION
13.INSTALL OIL DIPSTICK GUIDE AND OIL DIPSTICK (BB)
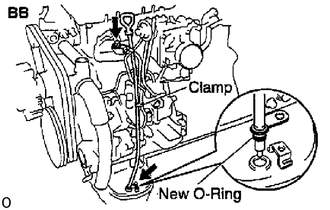
Install a new O-ring to the dipstick guide.
Apply soapy water to the O-ring.
Push in the dipstick guide end into the guide hole of the oil pan.
Install the oil dipstick guide with the 2 bolts.
Install the dipstick.
14. FILL WITH ENGINE OIL
15. START ENGINE AND CHECK FOR OIL LEAKS
16.RECHECK ENGINE OIL LEVEL
17.RECHECK VALVE CLEARANCE