WINDOW / GLASS FRONT SIDE FIX WINDOW ASSEMBLY LH(for Lower Side) REMOVAL
CAUTION / NOTICE / HINT
- HINT:
- ·
Use the same procedure for RHD and LHD vehicles.
·The procedure listed below is for RHD vehicles.
PROCEDURE

 87945
1.REMOVE OUTER MIRROR COVER LH
w/ Power Retract Mirror:
Click hereVehicle Interior>MIRROR>OUTER REAR VIEW MIRROR (for Front Passenger Side)>REMOVAL
w/o Power Retract Mirror:
87940
2.REMOVE OUTER REAR VIEW MIRROR ASSEMBLY LH
w/ Power Retract Mirror:
Click hereVehicle Interior>MIRROR>OUTER REAR VIEW MIRROR (for Front Passenger Side)>REMOVAL
w/o Power Retract Mirror:
53182A
3.REMOVE HEADLIGHT COVER LH
for Single Beam Headlight:
Click hereVehicle Interior>LIGHTING>HEADLIGHT ASSEMBLY(for Single Beam Headlight)>REMOVAL
for Dual Beam Headlight:
Click hereVehicle Interior>LIGHTING>HEADLIGHT ASSEMBLY(for Dual Beam Headlight)>REMOVAL
4.REMOVE FRONT PILLAR END COVER LH
62212
5.REMOVE FRONT PILLAR GARNISH LH
- HINT:
-
Use the same procedure described for the RH side.
62425
6.REMOVE CENTER PILLAR GARNISH COVER (w/ Hand Grip Frame)
74730
7.REMOVE HAND GRIP FRAME ASSEMBLY (w/ Hand Grip Frame)
73220
8.DISCONNECT FRONT SEAT OUTER BELT ASSEMBLY LH (w/ Rear No. 1 Seat)
62547B
9.REMOVE NO. 3 PILLAR GARNISH LH
62989
10.REMOVE CENTER DOOR LOCK COVER (for Folding Type)
62638A
11.REMOVE QUARTER PILLAR GARNISH RH
73224
12.REMOVE FRONT SEAT BELT RETRACTOR COVER LH (w/ Rear No. 1 Seat)
67676
13.REMOVE FRONT SIDE TRIM BOARD COVER LH
62540A
14.REMOVE NO. 2 SIDE TRIM ASSEMBLY LH
62520G
15.REMOVE NO. 1 SIDE TRIM ASSEMBLY LH
62109A
16.REMOVE LOWER SIDE WINDOW GLASS SUB-ASSEMBLY LH
- NOTICE:
-
The lower side window glass sub-assembly LH may fall while performing this procedure. Therefore, use suction cups to hold the lower side window glass sub-assembly LH from the outside of the vehicle.
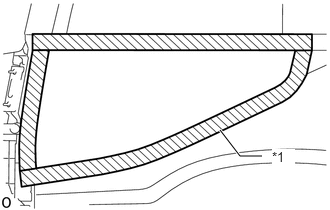
Apply protective tape to the outer surface of the vehicle body to prevent scratches.
| *1 | Protective Tape |
Install the suction cups to the lower side window glass sub-assembly LH.
From the interior, insert a piano wire between the vehicle body and glass.
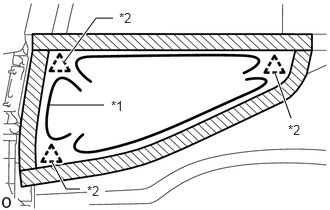
Tie objects that can serve as handles (for example, wooden blocks) to both wire ends.
- NOTICE:
- ·
When separating the glass from the vehicle, Do not damage the vehicle paint or interior/exterior ornaments.
·To prevent the instrument panel from being scratched when removing the glass, place a plastic sheet between the piano wire and instrument panel.
| *1 | Piano Wire |
| *2 | No. 1 Side Window Pin |
Cut through the adhesive by pulling the piano wire around the glass.
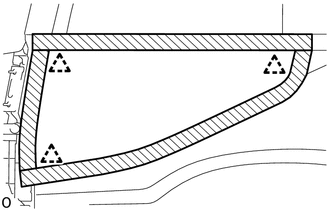
Using suction cups, disconnect the 3 pins and remove the lower side window glass sub-assembly LH.
- NOTICE:
-
Be careful not to drop the lower side window glass sub-assembly LH.
68217A
17.REMOVE NO. 1 SIDE WINDOW PIN
When reusing the lower side window glass sub-assembly LH:
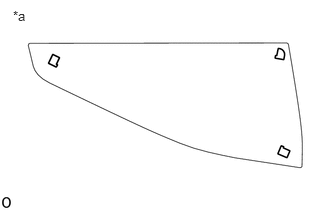
Using a scraper, remove the No. 1 Side Window Pin.
- NOTICE:
- ·
Do not damage the lower side window glass sub-assembly LH.
·Be sure to replace the No. 1 Side Window Pin with a new one.
| *a | Back Side |
62179
18.REMOVE LOWER SIDE WINDOW DAM
When reusing the lower side window glass sub-assembly LH:
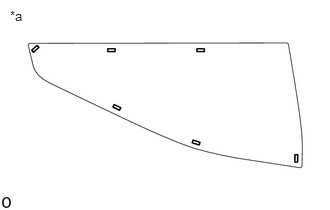
Using a scraper, remove the lower side window dam.
- NOTICE:
- ·
Do not damage the lower side window glass sub-assembly LH.
·Be sure to replace the lower side window dam with a new one.
| *a | Back Side |