Home › Brake › BRAKE CONTROL / DYNAMIC CONTROL SYSTEMS › ANTI-LOCK BRAKE SYSTEM (w/o Brake pedal Load Sensing Switch) › 2017.01–2021.01
RM2850E _54 Brake _073264 BRAKE CONTROL / DYNAMIC CONTROL SYSTEMS _0356879 ANTI-LOCK BRAKE SYSTEM(w/o Brake pedal Load Sensing Switch) J

BRAKE CONTROL / DYNAMIC CONTROL SYSTEMS  ANTI-LOCK BRAKE SYSTEM(w/o Brake pedal Load Sensing Switch)  Brake Warning Light Remains ON  


DESCRIPTION

If any of the following is detected, the brake warning light remains on:

·

The skid control ECU connector is disconnected from the skid control ECU.

·

The brake fluid level is insufficient.

·

The parking brake is applied.

·

BRAKE PRESSURE INCREASE FUNCTION is not possible.

·

The vacuum created by the vacuum pump is below the standard level.


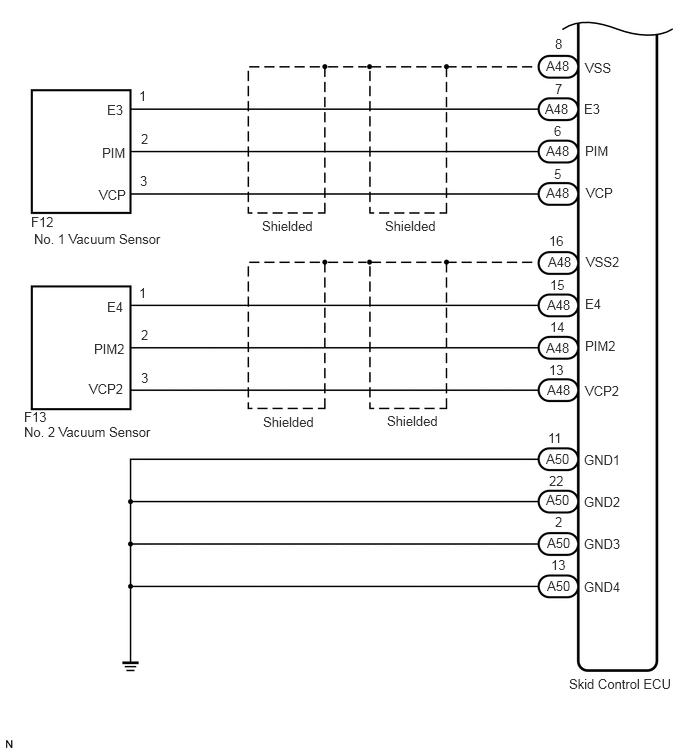
WIRING DIAGRAM
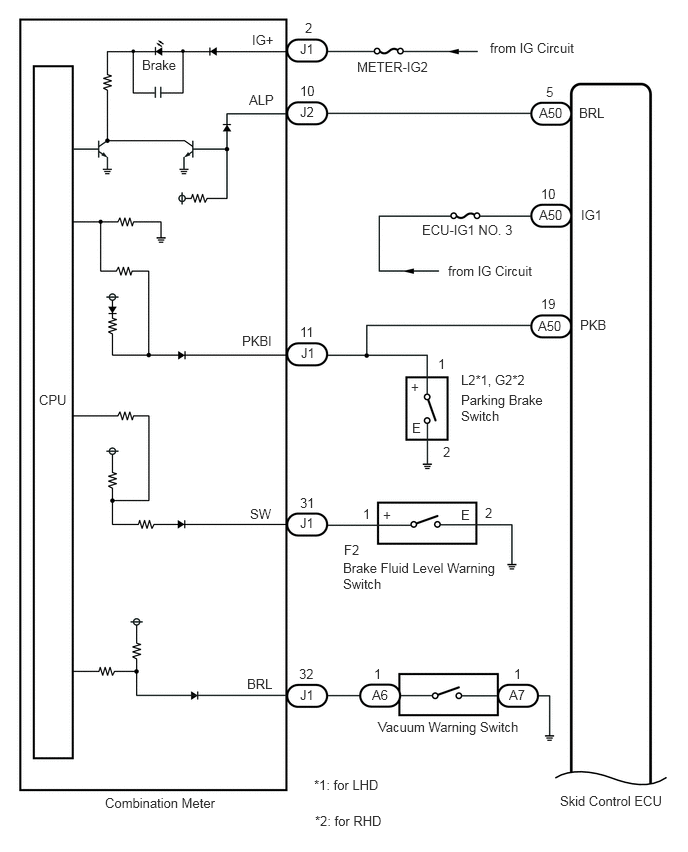
C395234E01
1.479,0.594 1.948,0.823 0.469,0.229 10 false Brake 2.625,0.333 2.927,0.542 0.302,0.208 10 false IG+ 3.177,0.208 3.406,0.406 0.229,0.198 10 false 2 3.125,0.427 3.375,0.646 0.25,0.219 10 false J1 3.125,0.865 3.396,1.063 0.271,0.198 10 false 10 3.125,1.083 3.417,1.313 0.292,0.229 10 false J2 2.594,0.958 2.917,1.146 0.323,0.188 10 false ALP 3.719,0.615 4.604,0.854 0.885,0.24 10 false METER-IG2 5.104,0.417 6.24,0.656 1.135,0.24 10 false from IG Circuit 0.406,4.083 0.75,4.281 0.344,0.198 10 false CPU 2.521,3.469 2.99,3.698 0.469,0.229 10 false PKBI 3.125,3.375 3.406,3.573 0.281,0.198 10 false 11 3.135,3.594 3.448,3.844 0.313,0.25 10 false J1 3.125,5.156 3.375,5.365 0.25,0.208 10 false 31 3.125,5.365 3.396,5.594 0.271,0.229 10 false J1 2.604,5.271 2.938,5.521 0.333,0.25 10 false SW 1.094,8.281 2.323,8.531 1.229,0.25 10 false Combination Meter 3.271,8.094 4.365,8.333 1.094,0.24 10 false *1: for LHD 3.281,8.469 4.219,8.698 0.938,0.229 10 false *2: for RHD 3.125,7.156 3.406,7.385 0.281,0.229 10 false J1 3.115,6.938 3.385,7.167 0.271,0.229 10 false 32 2.573,7.042 2.906,7.281 0.333,0.24 10 false BRL 3.896,6.938 4.115,7.156 0.219,0.219 10 false 1 3.875,7.156 4.208,7.385 0.333,0.229 10 false A6 3.938,7.49 5.5,7.771 1.563,0.281 10 false Vacuum Warning Switch 5.302,7.156 5.563,7.396 0.26,0.24 10 false A7 5.354,6.938 5.563,7.167 0.208,0.229 10 false 1 4.802,5.281 5.031,5.5 0.229,0.219 10 false E 5.052,5.26 5.292,5.458 0.24,0.198 10 false 2 3.99,5.281 4.219,5.469 0.229,0.188 10 false + 3.781,5.271 4.01,5.5 0.229,0.229 10 false 1 3.583,5.646 3.938,5.854 0.354,0.208 10 false F2 3.573,5.833 5.208,6.188 1.635,0.354 10 false Brake Fluid Level Warning Switch 4.292,4.375 4.5,4.604 0.208,0.229 10 false E 4.615,4.625 4.875,4.854 0.26,0.229 10 false 2 4.281,3.948 4.5,4.167 0.219,0.219 10 false + 4.563,3.708 4.781,3.896 0.219,0.188 10 false 1 4.802,3.875 5.635,4.073 0.833,0.198 10 false L2*1, G2*2 5.833,8.26 7.021,8.49 1.188,0.229 10 false Skid Control ECU 6.042,3.302 6.51,3.531 0.469,0.229 10 false PKB 5.604,3.313 6.073,3.542 0.469,0.229 10 false A50 5.635,3.083 5.948,3.302 0.313,0.219 10 false 19 4.667,2.74 5.74,2.979 1.073,0.24 10 false from IG Circuit 4.396,2.313 5.531,2.552 1.135,0.24 10 false ECU-IG1 NO. 3 5.635,1.938 5.927,2.177 0.292,0.24 10 false 10 5.615,2.156 5.969,2.406 0.354,0.25 10 false A50 6.052,2.156 6.521,2.385 0.469,0.229 10 false IG1 6.031,1.094 6.458,1.313 0.427,0.219 10 false BRL 5.688,0.875 5.906,1.094 0.219,0.219 10 false 5 5.615,1.094 6.01,1.281 0.396,0.188 10 false A50 4.802,4.083 5.74,4.438 0.938,0.354 10 false Parking Brake Switch

C375246E01
1.115,1.063 1.427,1.26 0.313,0.198 10 false E3 1.063,1.51 1.406,1.729 0.344,0.219 10 false PIM 1.031,1.948 1.417,2.177 0.385,0.229 10 false VCP 1.448,0.917 1.76,1.115 0.313,0.198 10 false 1 1.469,1.365 1.781,1.563 0.313,0.198 10 false 2 1.458,1.802 1.771,2 0.313,0.198 10 false 3 0.323,2.229 0.708,2.427 0.385,0.198 10 false F12 0.354,2.406 1.833,2.677 1.479,0.271 10 false No. 1 Vacuum Sensor 2.729,2.271 3.406,2.458 0.677,0.188 10 false Shielded 1.115,3.115 1.427,3.313 0.313,0.198 10 false E4 5.781,0.375 6.094,0.573 0.313,0.198 10 false 8 5.688,0.604 6,0.802 0.313,0.198 10 false A48 5.781,0.844 6.094,1.042 0.313,0.198 10 false 7 6.094,0.625 6.406,0.823 0.313,0.198 10 false VSS 6.083,1.052 6.396,1.25 0.313,0.198 10 false E3 5.771,1.281 6.083,1.479 0.313,0.198 10 false 6 6.094,1.49 6.406,1.688 0.313,0.198 10 false PIM 5.771,1.729 6.083,1.927 0.313,0.198 10 false 5 6.104,1.927 6.417,2.125 0.313,0.198 10 false VCP 5.719,2.427 6.031,2.625 0.313,0.198 10 false 16 6.104,2.646 6.604,2.885 0.5,0.24 10 false VSS2 5.729,2.885 6.042,3.083 0.313,0.198 10 false 15 6.094,3.083 6.406,3.281 0.313,0.198 10 false E4 5.729,3.323 6.042,3.521 0.313,0.198 10 false 14 6.094,3.521 6.594,3.708 0.5,0.188 10 false PIM2 5.719,3.771 6.031,3.969 0.313,0.198 10 false 13 6.094,3.99 6.667,4.281 0.573,0.292 10 false VCP2 5.708,4.479 6.021,4.677 0.313,0.198 10 false 11 6.083,4.708 6.635,4.969 0.552,0.26 10 false GND1 5.719,4.927 6.031,5.125 0.313,0.198 10 false 22 6.083,5.146 6.656,5.396 0.573,0.25 10 false GND2 5.781,5.354 6.094,5.552 0.313,0.198 10 false 2 6.083,5.583 6.698,5.917 0.615,0.333 10 false GND3 6.083,6.031 6.708,6.229 0.625,0.198 10 false GND4 5.927,7.042 7.083,7.25 1.156,0.208 10 false Skid Control ECU 5.74,5.802 6.052,6 0.313,0.198 10 false 13 0.979,3.552 1.406,3.76 0.427,0.208 10 false PIM2 0.927,3.969 1.406,4.177 0.479,0.208 10 false VCP2 1.448,2.969 1.76,3.167 0.313,0.198 10 false 1 1.469,3.406 1.781,3.604 0.313,0.198 10 false 2 1.469,3.854 1.781,4.052 0.313,0.198 10 false 3 0.25,4.26 0.667,4.448 0.417,0.188 10 false F13 0.25,4.417 1.729,4.646 1.479,0.229 10 false No. 2 Vacuum Sensor 4.01,2.271 4.688,2.458 0.677,0.188 10 false Shielded 4.031,4.302 4.708,4.49 0.677,0.188 10 false Shielded 2.74,4.313 3.417,4.5 0.677,0.188 10 false Shielded 5.677,1.052 5.99,1.25 0.313,0.198 10 false A48 5.688,1.49 6,1.688 0.313,0.198 10 false A48 5.688,1.927 6,2.125 0.313,0.198 10 false A48 5.708,2.646 6.021,2.844 0.313,0.198 10 false A48 5.698,3.094 6.01,3.292 0.313,0.198 10 false A48 5.688,3.542 6,3.74 0.313,0.198 10 false A48 5.698,3.979 6.01,4.177 0.313,0.198 10 false A48 5.688,4.698 6,4.896 0.313,0.198 10 false A50 5.688,5.125 6,5.323 0.313,0.198 10 false A50 5.698,5.573 6.01,5.771 0.313,0.198 10 false A50 5.698,6.021 6.01,6.219 0.313,0.198 10 false A50

PROCEDURE

1.CHECK DTC

Result:
Result Proceed to
DTC is not output A
DTC is output B


A

2.CHECK IF SKID CONTROL ECU CONNECTOR IS SECURELY CONNECTED

B

2.CHECK IF SKID CONTROL ECU CONNECTOR IS SECURELY CONNECTED
a.

Check if the skid control ECU connector is securely connected.

OK:

The connector should be securely connected.


Result:
Proceed to
OK
NG


OK

3.CHECK BATTERY

NG

CONNECT CONNECTOR TO ECU CORRECTLY

3.CHECK BATTERY
a.

Check the battery voltage.

Standard Voltage:

11 to 14 V


Result:
Proceed to
OK
NG


OK

4.INSPECT SKID CONTROL ECU (IG1 TERMINAL)

NG

CHECK OR REPLACE CHARGING SYSTEM OR BATTERY

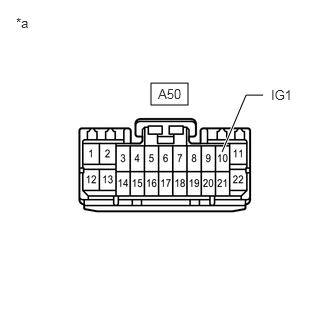
4.INSPECT SKID CONTROL ECU (IG1 TERMINAL)
a.
C215683E05
1.573,0.865 1.958,1.094 0.385,0.229 2.313,1.583 2.563,0.99 2.563,0.99 2.74,0.99 true 0.167,0.156 0.479,0.354 0.313,0.198 10 false *a 1.646,0.896 1.958,1.094 0.313,0.198 10 false A50 2.823,0.906 3.135,1.104 0.313,0.198 10 false IG1

Disconnect the skid control ECU connector.


b.

Turn the ignition switch to ON.


c.

Measure the voltage according to the value(s) in the table below.

Standard Voltage:
Tester Connection Switch Condition Specified Condition
A50-10 (IG1) - Body ground Ignition switch ON 11 to 14 V

Text in Illustration
*a Front view of wire harness connector
(to Skid Control ECU)


Result:
Proceed to
OK
NG


OK

5.INSPECT SKID CONTROL ECU (GND TERMINAL)

NG

REPAIR OR REPLACE HARNESS OR CONNECTOR (IG1 CIRCUIT)

5.INSPECT SKID CONTROL ECU (GND TERMINAL)
a.

Turn the ignition switch off.


b.

Measure the resistance according to the value(s) in the table below.

Standard Resistance:
Tester Connection Condition Specified Condition
A50-11 (GND1) - Body ground Always Below 1 Ω
A50-22 (GND2) - Body ground Always Below 1 Ω
A50-2 (GND3) - Body ground Always Below 1 Ω
A50-13 (GND4) - Body ground Always Below 1 Ω


Result:
Proceed to
OK
NG


OK

6.READ VALUE USING GTS (PARKING BRAKE SWITCH)

NG

REPAIR OR REPLACE HARNESS OR CONNECTOR (GND CIRCUIT)

6.READ VALUE USING GTS (PARKING BRAKE SWITCH)
a.

Reconnect the skid control ECU connector.


b.

Connect the GTS to the DLC3.


c.

Start the engine.


d.

Select the Data List mode on the GTS (Click hereBrake>BRAKE CONTROL / DYNAMIC CONTROL SYSTEMS>ANTI-LOCK BRAKE SYSTEM (w/o Brake pedal Load Sensing Switch)>DATA LIST / ACTIVE TEST).

ABS / VSC / TRC:
Tester Display Measurement Item/Range Normal Condition Diagnostic Note
Parking Brake SW Parking brake switch / ON or OFF ON: Parking brake applied
OFF: Parking brake released
-


e.

Using the GTS, check the input of switch operation when the parking brake is operated.

OK:

When the parking brake is operated, the display changes as shown above.


Result:
Proceed to
OK
NG


OK

7.INSPECT VACUUM WARNING SWITCH

NG

12.INSPECT PARKING BRAKE SWITCH
7.INSPECT VACUUM WARNING SWITCH
a.

Start the engine.


b.

Idle the engine.


c.

Disconnect the vacuum warning switch connector and check the brake warning light.

Result:
Result Proceed to
Brake warning light does not turn off A
Brake warning light turns off B


HINT:

If the brake warning light turns off, the vacuum warning switch has an internal short circuit.


A

8.INSPECT BRAKE FLUID LEVEL WARNING SWITCH

B

REPLACE VACUUM WARNING SWITCH

8.INSPECT BRAKE FLUID LEVEL WARNING SWITCH
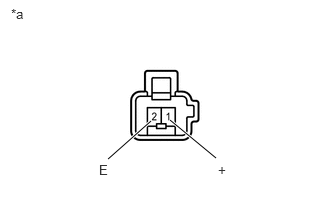
a.
C215685E03
1.125,1.656 1.573,1.26 true 2.25,1.646 1.771,1.25 true 0.115,0.063 0.333,0.271 0.219,0.208 10 false *a 1.031,1.688 1.25,1.896 0.219,0.208 10 false E 2.271,1.688 2.49,1.896 0.219,0.208 10 false +

Turn the ignition switch off.


b.

Remove the reservoir filler cap and strainer.


c.

Disconnect the brake fluid level warning switch connector.


d.

Measure the resistance according to the value(s) in the table below.

HINT:

A float is located inside the reservoir. Its position can be changed by increasing or decreasing the level of brake fluid.


Standard Resistance:
Tester Connection Switch Condition Specified Condition
1 (+) - 2 (E) Switch OFF (Float up) 10 kΩ or higher
1 (+) - 2 (E) Switch ON (Float down) Below 1 Ω

Text in Illustration
*a Component without harness connected
(Brake Fluid Level Warning Switch)


HINT:

If there is no problem after finishing the above check, adjust the brake fluid level to the MAX level.


Result:
Proceed to
OK
NG


OK

9.CHECK HARNESS AND CONNECTOR (COMBINATION METER - BRAKE FLUID LEVEL WARNING SWITCH AND VACUUM WARNING SWITCH)

NG

REPLACE BRAKE MASTER CYLINDER RESERVOIR SUB-ASSEMBLY (BRAKE FLUID LEVEL WARNING SWITCH)

9.CHECK HARNESS AND CONNECTOR (COMBINATION METER - BRAKE FLUID LEVEL WARNING SWITCH AND VACUUM WARNING SWITCH)
a.

Disconnect the combination meter connector.


b.

Measure the resistance according to the value(s) in the table below.

Standard Resistance:
Tester Connection Condition Specified Condition
J1-31 (SW) - F2-1 (+) Always Below 1 Ω
J1-31 (SW) or F2-1 (+) - Body ground Always 10 kΩ or higher
F2-2 (E) - Body ground Always Below 1 Ω
J1-32 (BRL) - A6-1 Always Below 1 Ω
J1-32 (BRL) or A6-1 - Body ground Always 10 kΩ or higher
A7-1 - Body ground Always Below 1 Ω


Result:
Proceed to
OK
NG


OK

10.CHECK HARNESS AND CONNECTOR (SKID CONTROL ECU - COMBINATION METER)

NG

REPAIR OR REPLACE HARNESS OR CONNECTOR

10.CHECK HARNESS AND CONNECTOR (SKID CONTROL ECU - COMBINATION METER)
a.

Disconnect the skid control ECU connector.


b.

Disconnect the combination meter connector.


c.

Measure the resistance according to the value(s) in the table below.

Standard Resistance:
Tester Connection Condition Specified Condition
A50-5 (BRL) - J2-10 (ALP) Always Below 1 Ω
A50-5 (BRL) or J2-10 (ALP) - Body ground Always 10 kΩ or higher


Result:
Proceed to
OK
NG


OK

11.INSPECT COMBINATION METER ASSEMBLY

NG

REPAIR OR REPLACE HARNESS OR CONNECTOR

11.INSPECT COMBINATION METER ASSEMBLY
a.

Reconnect the vacuum warning switch connector.


b.

Reconnect the brake fluid warning switch connector.


c.

Reconnect the combination meter connectors.


d.

Reconnect the skid control ECU connector.


e.

Check the combination meter (Click hereVehicle Interior>METER / GAUGE / DISPLAY>METER / GAUGE SYSTEM>HOW TO PROCEED WITH TROUBLESHOOTING).

OK:

The combination meter is normal.


HINT:
·

Reinstall the connectors and restore the vehicle to its prior condition before checking the combination meter.

·

If troubleshooting has been carried out according to the Problem Symptoms Table, refer back to the table and proceed to the next step before replacing the part (Click hereBrake>BRAKE CONTROL / DYNAMIC CONTROL SYSTEMS>ANTI-LOCK BRAKE SYSTEM (w/o Brake pedal Load Sensing Switch)>PROBLEM SYMPTOMS TABLE).


Result:
Proceed to
OK
NG


OK

INSPECT PARKING BRAKE SWITCH

NG

REPLACE COMBINATION METER ASSEMBLY

12.INSPECT PARKING BRAKE SWITCH
a.

Turn the ignition switch off.


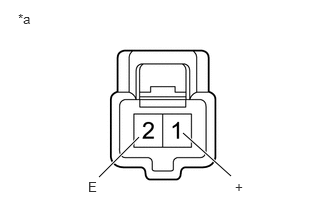
C375209E01
1.031,1.844 1.448,1.427 true 2.406,1.833 1.906,1.385 true 0.188,0.115 0.5,0.313 0.313,0.198 10 false *a 0.917,1.865 1.229,2.063 0.313,0.198 10 false E 2.448,1.865 2.76,2.063 0.313,0.198 10 false +

b.

Disconnect the parking brake switch connector.


c.

Measure the resistance according to the value(s) in the table below.

Standard Resistance:
Tester Connection Switch Condition Specified Condition
1 (+) - 2 (E) Parking brake switch ON
(Switch pin free)
Below 1 Ω
1 (+) - 2 (E) Parking brake switch OFF
(Switch pin pushed in)
10 kΩ or higher

Text in Illustration
*a Component without harness connected
(Parking Brake Switch)


Result:
Proceed to
OK
NG


OK

13.CHECK HARNESS AND CONNECTOR (SKID CONTROL ECU - PARKING BRAKE SWITCH AND COMBINATION METER)

NG

REPLACE PARKING BRAKE SWITCH

13.CHECK HARNESS AND CONNECTOR (SKID CONTROL ECU - PARKING BRAKE SWITCH AND COMBINATION METER)
a.

Disconnect the skid control ECU connector.


b.

Disconnect the combination meter connector.


c.

Measure the resistance according to the value(s) in the table below.

Standard Resistance:
Tester Connection Condition Specified Condition
A50-19 (PKB) - L2-1 (+)*1
A50-19 (PKB) - G2-1 (+)*2
Always Below 1 Ω
A50-19 (PKB) or L2-1 (+) - Body ground*1
A50-19 (PKB) or G2-1 (+) - Body ground*2
Always 10 kΩ or higher
J1-11 (PKBI) - L2-1 (+)*1
J1-11 (PKBI) - G2-1 (+)*2
Always Below 1 Ω
J1-11 (PKBI) or L2-1 (+) - Body ground*1
J1-11 (PKBI) or G2-1 (+) - Body ground*2
Always 10 kΩ or higher
A50-19 (PKB) - J1-11 (PKBI) Always Below 1 Ω
A50-19 (PKB) or J1-11 (PKBI) - Body ground Always 10 kΩ or higher
L2-2 (E) - Body ground*1
G2-2 (E) - Body ground*2
Always Below 1 Ω


*1: for LHD

*2: for RHD


HINT:

If troubleshooting has been carried out according to the Problem Symptoms Table, refer back to the table and proceed to the next step (Click hereBrake>BRAKE CONTROL / DYNAMIC CONTROL SYSTEMS>ANTI-LOCK BRAKE SYSTEM (w/o Brake pedal Load Sensing Switch)>PROBLEM SYMPTOMS TABLE).


Result:
Proceed to
OK
NG


OK

14.INSPECT COMBINATION METER ASSEMBLY

NG

REPAIR OR REPLACE HARNESS OR CONNECTOR

14.INSPECT COMBINATION METER ASSEMBLY
a.

Reconnect the parking brake switch connector.


b.

Reconnect the skid control ECU connector.


c.

Reconnect the combination meter connector.


d.

Check the combination meter (Click hereVehicle Interior>METER / GAUGE / DISPLAY>METER / GAUGE SYSTEM>HOW TO PROCEED WITH TROUBLESHOOTING).

OK:

The combination meter is normal.


HINT:
·

Reinstall the connectors and restore the vehicle to its prior condition before checking the combination meter.

·

If troubleshooting has been carried out according to the Problem Symptoms Table, refer back to the table and proceed to the next step before replacing the part (Click hereBrake>BRAKE CONTROL / DYNAMIC CONTROL SYSTEMS>ANTI-LOCK BRAKE SYSTEM (w/o Brake pedal Load Sensing Switch)>PROBLEM SYMPTOMS TABLE).


Result:
Proceed to
OK
NG


OK

REPLACE SKID CONTROL ECU

NG

REPLACE COMBINATION METER ASSEMBLY