INTERIOR PANEL UPPER INSTRUMENT PANEL REMOVAL
PROCEDURE

 1. TABLE OF BOLT, SCREW AND NUT
- HINT:
-
All bolts, screws and nuts relevant to installing and removing the instrument panel are shown along with their alphabet codes in the table below.
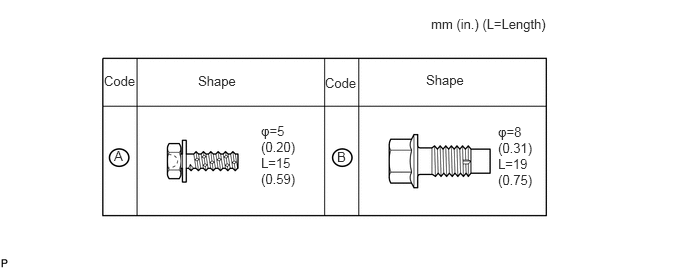 1.083,0.76 1.792,1.052 0.708,0.292 10 false Code 2.063,0.76 2.771,1.052 0.708,0.292 10 false Shape 1.188,1.542 1.896,1.833 0.708,0.292 10 false A 3.51,1.552 4.219,1.844 0.708,0.292 10 false B 2.719,1.281 3.094,2.031 0.375,0.75 10 false φ=5 (0.20) L=15 (0.59) 5.188,1.292 5.573,2.01 0.385,0.719 10 false φ=8 (0.31) L=19 (0.75) 4.49,0.167 5.938,0.427 1.448,0.26 10 false mm (in.) (L=Length) 3.385,0.781 4.094,1.073 0.708,0.292 10 false Code 4.438,0.75 5.146,1.042 0.708,0.292 10 false Shape
2.DISCONNECT CABLE FROM NEGATIVE BATTERY TERMINAL
- CAUTION:
-
Wait at least 90 seconds after disconnecting the cable from the negative (-) battery terminal to prevent airbag and seat belt pretensioner activation.
55404C
3.REMOVE INSTRUMENT CLUSTER FINISH PANEL SUB-ASSEMBLY
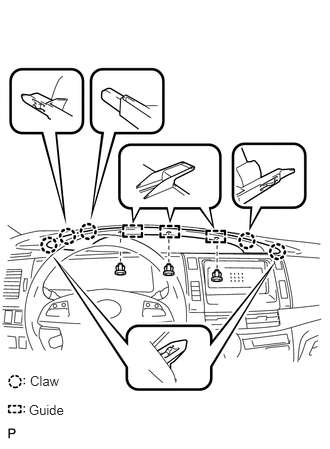
Remove the 3 clips.
Disengage the 5 claws and 3 guides, and remove the instrument cluster finish panel.
45186
4.REMOVE NO. 2 STEERING WHEEL LOWER COVER
45187
5.REMOVE NO. 3 STEERING WHEEL LOWER COVER
45130
6.REMOVE STEERING PAD ASSEMBLY
45100
7.REMOVE STEERING WHEEL ASSEMBLY
45286
8.REMOVE STEERING COLUMN COVER
9.REMOVE TURN SIGNAL SWITCH ASSEMBLY WITH SPIRAL CABLE
55420A
10.REMOVE INSTRUMENT CLUSTER FINISH PANEL CENTER ASSEMBLY
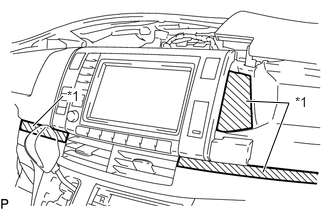
Apply protective tape on the positions shown in the illustration.
| *1 | Protective Tape |
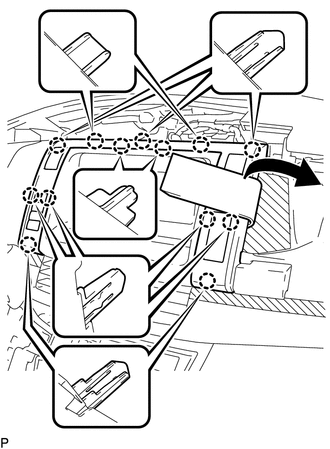
Using a molding remover, disengage the 13 claws.
Remove the instrument cluster finish panel center and then disconnect the connectors.
55414A
11.REMOVE INSTRUMENT CLUSTER FINISH PANEL END (w/o Navigation System)
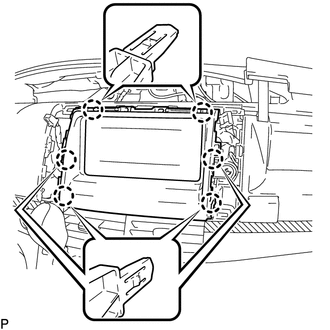
Disengage the 5 claws, and remove the instrument cluster finish panel end.
55522B
12.REMOVE RADIO TUNER OPENING COVER (w/o Radio Receiver)
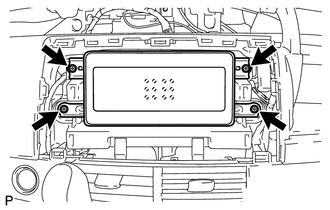
Remove the 4 screws and opening cover.
13.REMOVE RADIO RECEIVER ASSEMBLY WITH BRACKET (for Radio Receiver Type)
14.REMOVE NAVIGATION RECEIVER ASSEMBLY WITH BRACKET (for Navigation Receiver Type)
55650
15.REMOVE NO. 1 INSTRUMENT PANEL REGISTER ASSEMBLY
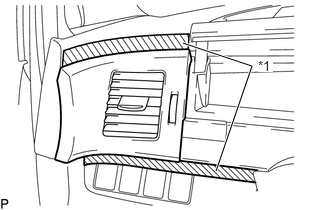
Apply protective tape on the positions shown in the illustration.
| *1 | Protective Tape |
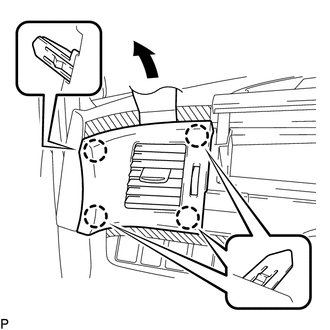
Using a tape remover, disengage the 4 claws, and remove the register.
55041B
16.REMOVE NO. 1 INSTRUMENT PANEL BOX DOOR SUB-ASSEMBLY
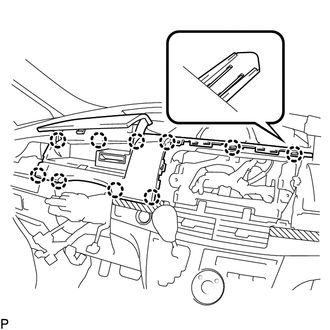
Disengage the 10 claws and remove the box door.
55660
17.REMOVE NO. 2 INSTRUMENT PANEL REGISTER ASSEMBLY
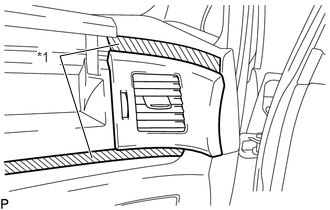
Apply protective tape on the positions shown in the illustration.
| *1 | Protective Tape |
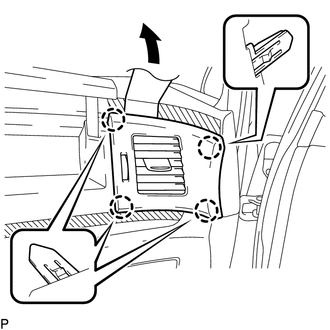
Using a tape remover, disengage the 4 claws and remove the register.
55042B
18.REMOVE NO. 2 INSTRUMENT PANEL BOX DOOR SUB-ASSEMBLY
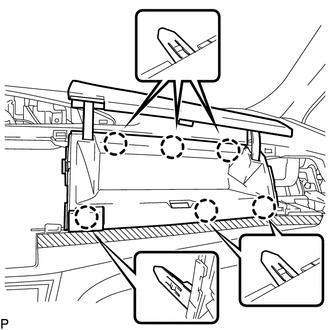
Disengage the 6 claws and remove the box door.
62226
19.REMOVE FRONT PILLAR GARNISH LOWER LH
62212
20.REMOVE FRONT PILLAR GARNISH LH (w/ Curtain Shield Airbag)
62212
21.REMOVE FRONT PILLAR GARNISH LH (w/o Curtain Shield Airbag)
62225A
22.REMOVE FRONT PILLAR GARNISH LOWER RH
62211
23.REMOVE FRONT PILLAR GARNISH RH (w/ Curtain Shield Airbag)
- HINT:
-
Perform the same procedure as for the LH side.
62211
24.REMOVE FRONT PILLAR GARNISH RH (w/o Curtain Shield Airbag)
- HINT:
-
Perform the same procedure as for the LH side.
25.DISCONNECT FRONT PASSENGER AIRBAG CONNECTOR
55302A
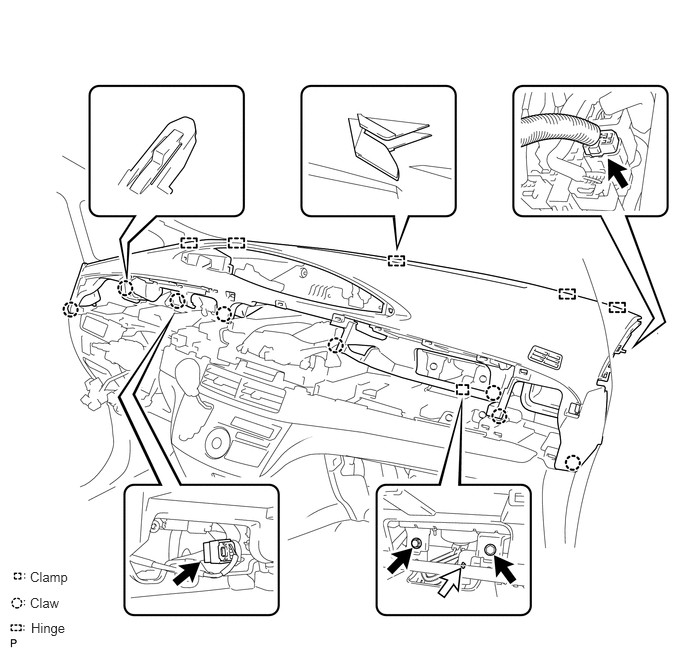
26.REMOVE UPPER INSTRUMENT PANEL
Remove the 2 bolts, and remove the passenger airbag.
Disconnect the connectors and clamps.
Disengage the 9 claws and 5 guides, and remove the upper instrument panel.