P0756 Shift Solenoid "B" Performance (Shift Solenoid Valve S2)
Diagnostic trouble codes · Vehicles built from Aug 2009
Versions by build date: Jul 2007 – Nov 2007 Dec 2007 – Jul 2009 from Aug 2009
DESCRIPTION
The ECM uses signals from the output shaft speed sensor and input speed sensor to detect the actual gear position (1st, 2nd, 3rd, 4th or 5th gear).Then the ECM compares the actual gear with the shift schedule in the ECM memory to detect mechanical problems of the shift solenoid valves, valve body or automatic transmission (clutch, brake or gear, etc.).
| DTC No. |
DTC Detection Condition |
Trouble Area |
| P0756 |
Gear required by ECM does not match actual gear when driving. (2-trip detection logic*1, 1-trip detection logic*2) |
|
- HINT:
- *1: w/ OBD
- *2: w/o OBD
- *1: w/ OBD
MONITOR DESCRIPTION
This DTC indicates stuck ON malfunction or stuck OFF malfunction of the shift solenoid valve S2. The ECM controls the gearshifts by turning the shift solenoid valves ON/OFF. When the gear position directed by the ECM and the actual gear position do not match, the ECM stores the DTC.INSPECTION PROCEDURE
- HINT:
- Using the intelligent tester to perform Active Tests allows relays, VSVs, actuators and other items to be operated without removing any parts. This non-intrusive functional inspection can be very useful because intermittent operation may be discovered before parts or wiring is disturbed. Performing Active Tests early in troubleshooting is one way to save diagnostic time. Data List information can be displayed while performing Active Tests.
- Warm up the engine.
- Turn the ignition switch off.
- Connect the intelligent tester to the DLC3.
- Turn the ignition switch to ON.
- Turn the tester on.
- Enter the following menus: Powertrain / Engine and ECT / Active Test.
- According to the display on the tester, perform the Active Test.
- HINT:
- While driving, the shift position can be changed with the intelligent tester.
- Comparing the shift position directed by the Active Test with the actual shift position enables the problem to be confirmed (Click here).
Engine and ECT Tester Display
Test Part
Control Range
Diagnostic Note
Control the Shift Position
Operate shift solenoid valve and set each shift position by yourself
- Press "→" button: Shift up
- Press "←" button: Shift down
Possible to check operation of shift solenoid valves
[Vehicle Condition]
50 km/h (30 mph) or less
- Press "→" button: Shift up
- HINT:
- This test can be conducted when the vehicle speed is 50 km/h (30 mph) or less.
- The 4th to 5th up-shifting must be performed with the accelerator pedal released.
- The 5th to 4th down-shifting must be performed with the accelerator pedal released.
- Do not operate the accelerator pedal for at least 2 seconds after shifting and do not shift successively.
- The shift position directed by the ECM is shown in the Data List/Shift Status display on the intelligent tester.
- The shift solenoid valve S2 is turned on/off normally when the shift lever is in D:
Gearshift controlled by ECM
1st
2nd
3rd
4th
5th
Shift solenoid valve S2
OFF
ON
ON
OFF
OFF
- This test can be conducted when the vehicle speed is 50 km/h (30 mph) or less.
| 1. CHECK ANY OTHER DTCS OUTPUT (IN ADDITION TO DTC P0756) |

Connect the intelligent tester to the DLC3.
Turn the ignition switch to ON.
Turn the tester on.
Enter the following menus: Powertrain / Engine and ECT / Trouble Codes.
Read the DTCs using the intelligent tester.
Result Result
Proceed to
Only P0756 is output
A
P0756 and other DTCs are output
B
- HINT:
- If any codes besides P0756 are output, perform troubleshooting for those DTCs first.
|
|
||||

| A | |
 |
| 2. PERFORM ACTIVE TEST USING INTELLIGENT TESTER (ACTIVE THE SOLENOID (SLT)) |
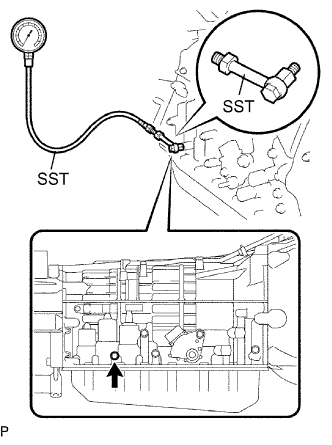  |
- NOTICE:
- Perform the test at the normal operating ATF (Automatic Transmission Fluid) temperature: 50 to 80°C (122 to 176°F).
- Be careful to prevent SST hose from interfering with the exhaust pipe.
- Perform the test with the A/C off.
- Perform the test at the normal operating ATF (Automatic Transmission Fluid) temperature: 50 to 80°C (122 to 176°F).
- HINT:
- Using the intelligent tester to perform Active Tests allows relays, VSVs, actuators and other items to be operated without removing any parts. This non-intrusive functional inspection can be very useful because intermittent operation may be discovered before parts or wiring is disturbed. Performing Active Tests early in troubleshooting is one way to save diagnostic time. Data List information can be displayed while performing Active Tests.
Remove the test plug on the transmission case center right side and connect SST.
- SST
- 09992-00095
(09992-00231, 09992-00271)
Connect the intelligent tester to the DLC3.
Start the engine and warm it up.
Measure the line pressure with SST.
Turn the tester on.
Enter the following menus: Powertrain / Engine and ECT / Active Test.
According to the display on the tester, perform the Active Test.
Measure the line pressure with SST.
*: Active the Solenoid (SLT) in the Active Test is performed to check the line pressure changes by connecting SST to the automatic transmission, which is used in the Hydraulic Test (Click here) as well. Please note that the pressure values in the Active Test and Hydraulic Test are different.Engine and ECT Tester Display
Test Part
Control Range
Diagnostic Note
Active the Solenoid (SLT)*
Operate the shift solenoid SLT and raise line pressure
ON or OFF - HINT:
- OFF: Line pressure up (when Active Test "Active the Solenoid (SLT)" is performed, ECM commands SLT solenoid to turn OFF)
- ON: No action (normal operation)
- OFF: Line pressure up (when Active Test "Active the Solenoid (SLT)" is performed, ECM commands SLT solenoid to turn OFF)
[Vehicle Condition] - Vehicle stopped
- Engine idling
- OK:
- The line pressure changes as specified when performing the Active Test.
|
|
||||
| OK | |
|
| 3. INSPECT SHIFT SOLENOID VALVE S2 |
Remove the shift solenoid valve S2.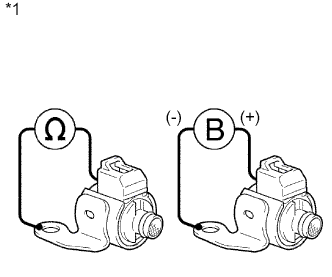
Measure the resistance according to the value(s) in the table below.
- Standard Resistance:
Tester Connection
Condition
Specified Condition
1 - Solenoid body
20°C (68°F)
11 to 15 Ω
Text in Illustration *1
Component without harness connected:
(Shift Solenoid Valve S2)
Connect the positive (+) lead to the terminal of the solenoid connector, and the negative (-) lead to the solenoid body.
- OK:
- The solenoid makes operating sounds.
|
|
||||
| OK | |
|
| 4. INSPECT TRANSMISSION VALVE BODY ASSEMBLY |
Check the transmission valve body assembly.
- HINT:
- Refer to Problem Symptoms Table Chapter 2 (Click here).
- OK:
- There are no foreign objects on any valves and they operate smoothly.
|
|
||||
| OK | ||
 |
||
| ||