C0210/33 Rear Speed Sensor RH Circuit
Diagnostic trouble codes · Vehicles built Jul 2007 – Oct 2010
Also covers:
- C0215/34 Rear Speed Sensor LH Circuit
- C1238/38 Foreign Object is Attached on Tip of Rear Speed Sensor RH
- C1239/39 Foreign Object is Attached on Tip of Rear Speed Sensor LH
- C1273/73 Low Output Signal of Rear Speed Sensor RH (Test Mode DTC)
- C1274/74 Low Output Signal of Rear Speed Sensor LH (Test Mode DTC)
- C1277/77 Abnormal Change in Output Signal of Rear Speed Sensor RH (Test Mode DTC)
- C1278/78 Abnormal Change in Output Signal of Rear Speed Sensor LH (Test Mode DTC)
DESCRIPTION
Refer to DTC C0200/31 (Click here).| DTC No. |
DTC Detecting Conditions |
Trouble Areas |
| C0210/33 C0215/34 |
When any of following conditions detected:
|
|
| C1238/38 C1239/39 |
When either of following conditions (1 or 2) detected:
|
|
| C1273/73 C1274/74 |
Detected only during test mode. |
|
| C1277/77 C1278/78 |
Detected only during test mode. |
|
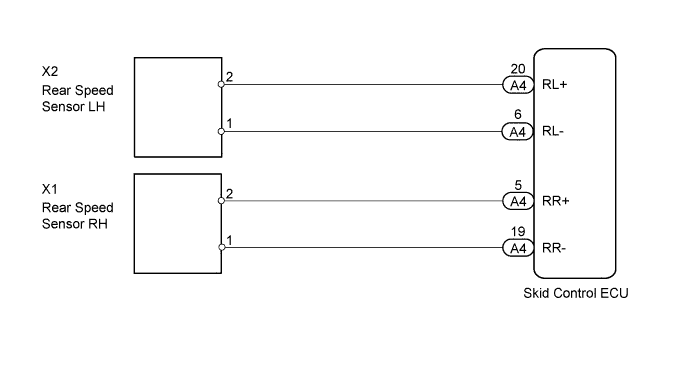
WIRING DIAGRAM

INSPECTION PROCEDURE
- NOTICE:
- When replacing the master cylinder solenoid, perform zero point calibration (Click here).
- Check the speed sensor signal in test mode after clearing or replacement (Click here).
- When replacing the master cylinder solenoid, perform zero point calibration (Click here).
| 1. CHECK HARNESS AND CONNECTOR (MOMENTARY INTERRUPTION) |

Connect the intelligent tester to the DLC3.
Turn the ignition switch to ON.
Turn the tester on.
Using the intelligent tester, check for any momentary interruption in the wire harness and connector of the speed sensor.Select the following menu items: Chassis / ABS/VSC/TRC/ Data List
DATA LIST: ABS/VSC/TRC Tester Display
Measurement Item / Range
Normal Condition
Diagnostic Note
RR Speed Open
RR speed sensor open detection: OPN_DET or NORMAL
OPN_DET: Momentary interruption
NORMAL: Normal
-
RL Speed Open
RL speed sensor open detection: OPN_DET or NORMAL
OPN_DET: Momentary interruption
NORMAL: Normal
-
- OK:
- There are no momentary interruptions.
- HINT:
- Perform the above inspection before removing the sensor and connector.
|
|
||||

| OK | |
 |
| 2. READ VALUE USING DATA LIST |
Connect the intelligent tester to the DLC3.
Start the engine and drive the vehicle.
Turn the tester on.
Select the following menu items: Chassis / ABS/VSC/TRC/ Data List
DATA LIST: ABS/VSC/TRC Tester Display
Measurement Item / Range
Normal Condition
Diagnostic Note
RR Wheel Speed
Wheel speed sensor (RR) reading : min.: 0 km/h (0 MPH), max.: 326 km/h (202 MPH)
Actual wheel speed
Similar to speed indicated on speedometer
RR Wheel Speed
Wheel speed sensor (RL) reading : min.: 0 km/h (0 MPH), max.: 326 km/h (202 MPH)
Actual wheel speed
Similar to speed indicated on speedometer
Check that there is no significant difference between the speed value displayed on the intelligent tester and the speed value displayed on the speedometer when driving the vehicle.
- OK:
- There is no significant difference in the displayed speed values.
- HINT:
- There is a tolerance of +- 10% in the speedometer indication.
|
|
||||

| OK | |
|
| 3. PERFORM TEST MODE INSPECTION |
Perform a TEST MODE inspection and check for DTCs (Click here).
|
|
||||
| OK | |
|
| 4. RECONFIRM DTC |
Clear the DTC(s) (Click here).
Start the engine.
Drive the vehicle at a speed of 20 km/h (12 mph) or more for at least 60 seconds.
Check if the same DTC(s) is output (Click here).
- Result:
Result
Proceed to
DTC not output
A
DTC output
B
|
|
||||
| A | ||
 |
||
| ||
| 5. CHECK REAR SPEED SENSOR INSTALLATION |
Check that the speed sensor installation bolt is tightened properly.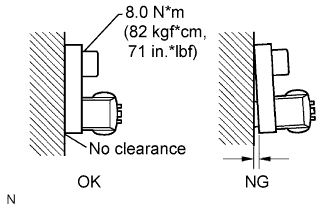
- OK:
- The installation bolt is tightened properly.
- Torque:
- 8.0 N*m{ 82 kgf*cm , 71 in.*lbf }
|
|
||||
| OK | |
|
| 6. CHECK REAR SPEED SENSOR |
Visually check the speed sensor for deformation and damage.
- OK:
- No deformation or damage.
There is no gap between the sensor and rear axle carrier.
|
|
||||
| OK | |
|
| 7. INSPECT SKID CONTROL SENSOR WIRE |
Disconnect the rear speed sensor wire.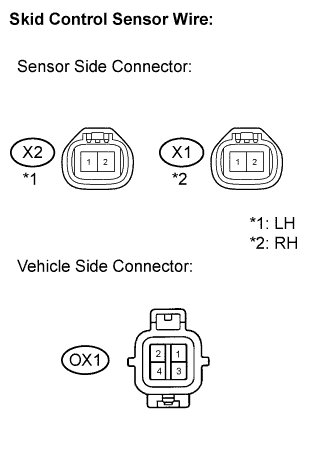
Measure the resistance.
- Standard resistance (LH):
Tester Connection
Specified Condition
X2-2 - OX1-1
10 kΩ or higher
X2-2 - OX1-2
Below 1 Ω
X2-2 - OX1-3
10 kΩ or higher
X2-2 - OX1-4
10 kΩ or higher
X2-2 - Body ground
10 kΩ or higher
X2-1 - OX1-1
Below 1 Ω
X2-1 - OX1-2
10 kΩ or higher
X2-1 - OX1-3
10 kΩ or higher
X2-1 - OX1-4
10 kΩ or higher
X2-1 - Body ground
10 kΩ or higher
- Standard resistance (RH):
Tester Connection
Specified Condition
X1-1 - OX1-1
10 kΩ or higher
X1-1 - OX1-2
10 kΩ or higher
X1-1 - OX1-3
Below 1 Ω
X1-1 - OX1-4
10 kΩ or higher
X1-1 - Body ground
10 kΩ or higher
X1-2 - OX1-1
10 kΩ or higher
X1-2 - OX1-2
10 kΩ or higher
X1-2 - OX1-3
10 kΩ or higher
X1-2 - OX1-4
Below 1 Ω
X1-2 - Body ground
10 kΩ or higher
|
|
||||
| OK | |
|
| 8. CHECK HARNESS AND CONNECTOR (SKID CONTROL ECU - SKID CONTROL SENSOR) |
Disconnect the skid control ECU connector.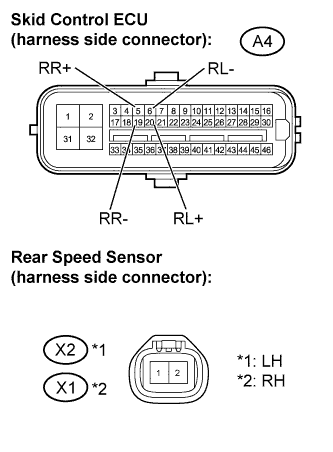
Disconnect the rear speed sensor connector.
Measure the resistance.
- Standard resistance (LH):
Tester Connection
Specified Condition
A4-20 (RL+) - X2-2
Below 1 Ω
A4-6 (RL-) - X2-1
Below 1 Ω
- Standard resistance (RH):
Tester Connection
Specified Condition
A4-5 (RR+) - X1-2
Below 1 Ω
A4-19 (RR-) - X1-1
Below 1 Ω
|
|
||||
| OK | |
|
| 9. CHECK SKID CONTROL SENSOR (INPUT VOLTAGE) |
Disconnect the rear speed sensor connector.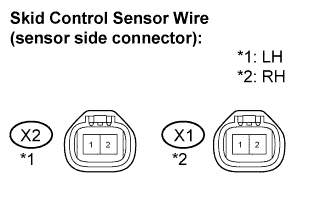
Turn the ignition switch to ON.
Measure the voltage.
- Standard voltage (LH):
Tester Connection
Specified Condition
X2-2 - Body ground
5.7 to 17.3 V
- Standard voltage (RH):
Tester Connection
Specified Condition
X1-2 - Body ground
5.7 to 17.3 V
|
|
||||
| OK | |
|
| 10. RECONFIRM DTC |
Clear the DTC(s) (Click here).
Start the engine.
Drive the vehicle at a speed of 20 km/h (12 mph) or more for at least 60 seconds.
Check if the same DTC(s) is output (Click here).
- Result:
Result
Proceed to
DTC output
A
DTC not output
B
|
|
||||
| A | |
|
| 11. REPLACE REAR SPEED SENSOR |
Replace the rear speed sensor (Click here).
| NEXT | |
|
| 12. RECONFIRM DTC |
Clear the DTC(s) (Click here).
Start the engine.
Drive the vehicle at a speed of 20 km/h (12 mph) or more for at least 60 seconds.
Check if the same DTC(s) is output (Click here).
- Result:
Result
Proceed to
DTC output
A
DTC not output
B
|
|
||||
| A | ||
|
||
| ||