INSTALLATION
Removal / installation · Vehicles built Aug 2009 – Oct 2010
Versions by build date: Aug 2009 – Oct 2010 from Nov 2010
| 1. INSTALL REAR CRANKSHAFT OIL SEAL |

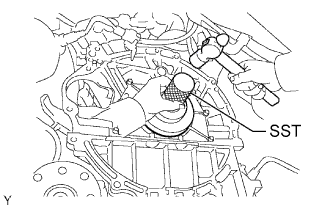  |
Apply MP grease to the lip of a new oil seal.
Using SST and a hammer, tap in the oil seal until its surface is flush with the rear oil seal retainer edge.
- SST
- 09223-78010
- NOTICE:
- Keep the lip free from foreign matter.
- Do not tap the oil seal at an angle.
- Keep the lip free from foreign matter.
| 2. INSTALL FLYWHEEL SUB-ASSEMBLY (for Manual Transmission) |
Using SST, hold the crankshaft.
- SST
- 09213-54015
(91651-60855)
09330-00021
Temporarily install the flywheel with the 8 new bolts.
Install and tighten the 8 mounting bolts uniformly in several steps.
- Torque:
- 30 N*m{ 306 kgf*cm , 22 ft.*lbf }
Mark the top of the bolts with paint.
Tighten the 8 bolts 90° in the same sequence.
Check that the paint marks are now at a 90° angle to the top.
| 3. INSTALL CLUTCH DISC ASSEMBLY (for Manual Transmission) |
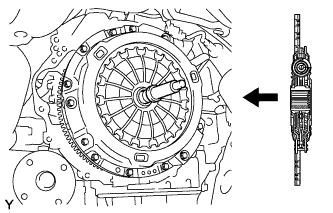 |
Insert SST into the clutch disc assembly, then insert them into the flywheel sub-assembly.
- SST
- 09301-00220
- NOTICE:
- Insert the clutch disc assembly in the correct orientation.
| 4. INSTALL CLUTCH COVER ASSEMBLY (for Manual Transmission) |
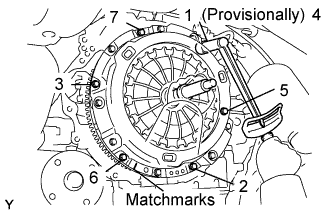 |
Align the matchmarks on the clutch cover assembly and flywheel sub-assembly.
Following the procedures shown in the illustration, tighten the 6 bolts, in the order starting with the bolt located near the knock pin on the top.
- Torque:
- 19 N*m{ 195 kgf*cm , 14 ft.*lbf }
- HINT:
- Following the order in the illustration, uniformly tighten the bolts.
- Move SST up and down, right and left lightly, after checking that the disc is in the center, and tighten the bolts.
- Following the order in the illustration, uniformly tighten the bolts.
| 5. INSPECT AND ADJUST CLUTCH COVER ASSEMBLY (for Manual Transmission) |
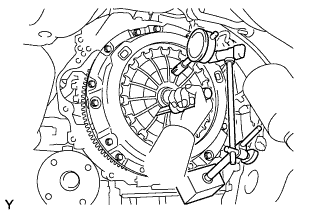 |
Using a dial indicator with roller instrument, check the diaphragm spring tip alignment.
- Maximum non-alignment:
- 0.5 mm (0.020 in.)
- SST
- 09333-00013
| 6. INSTALL DRIVE PLATE AND RING GEAR SUB-ASSEMBLY (for Automatic Transmission) |
Using SST, hold the crankshaft.
- SST
- 09213-54015
(91651-60855)
09330-00021
Install the front spacer, drive plate and rear spacer onto the crankshaft.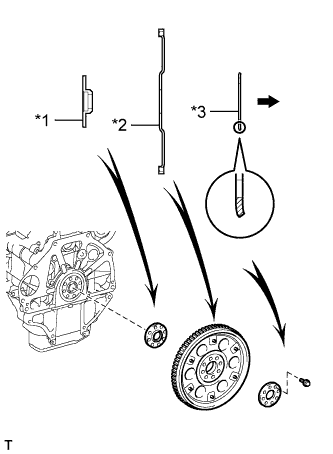
Text in Illustration *1
Front Spacer
*2
Drive Plate and Ring Gear
*3
Rear Spacer

Transmission Side
- HINT:
- As the front spacer, drive plate and ring gear and rear spacer are not reversible, be sure to install it in the direction shown in the illustration.
Apply adhesive to the 2 or 3 end threads of the bolts.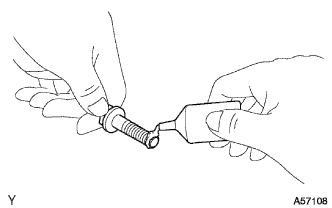
- Adhesive:
- Toyota Genuine Adhesive 1324, Three Bond 1324 or the equivalent.
Uniformly install and tighten the 8 bolts in several steps in the sequence shown in the illustration.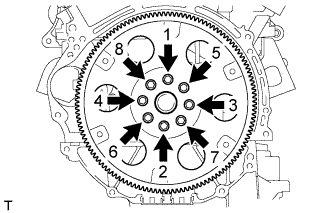
- Torque:
- 83 N*m{ 846 kgf*cm , 61 ft.*lbf }
- NOTICE:
- Do not start the engine for at least 1 hour after installing.
| 7. INSTALL MANUAL TRANSMISSION UNIT ASSEMBLY (for Manual Transmission) |
Install the manual transmission (Click here).
| 8. INSTALL AUTOMATIC TRANSMISSION ASSEMBLY (for Automatic Transmission) |
Install the automatic transmission (Click here).