Home › ENGINE › 1GR-FE ENGINE CONTROL SYSTEM › SFI SYSTEM

DTC    P0365    Camshaft Position Sensor "B" Circuit (Bank 1)

DTC    P0367    Camshaft Position Sensor "B" Circuit Low Input (Bank 1)

DTC    P0368    Camshaft Position Sensor "B" Circuit High Input (Bank 1)

DTC    P0390    Camshaft Position Sensor "B" Circuit (Bank 2)

DTC    P0392    Camshaft Position Sensor "B" Circuit Low Input (Bank 2)

DTC    P0393    Camshaft Position Sensor "B" Circuit High Input (Bank 2)

for Preparation Click here


DESCRIPTION

The exhaust camshaft's Variable Valve Timing (VVT) sensor (EV1, 2 signal) consists of a magnet and MRE (Magneto Resistance Element).
The exhaust camshaft has a timing rotor for the VVT sensor. When the camshaft rotates, changes occur in the air gaps between the timing rotor and MRE element, which affect the magnetic field. As a result, the resistance of the MRE material fluctuates. The VVT sensor converts the camshaft rotation data to pulse signals, and uses the pulse signals to determine the camshaft angle, which it sends to the ECM. Then the ECM uses this data to control fuel injection duration, injection timing and the VVT system.

DTC No.
DTC Detection Condition
Trouble Area
P0365
P0390
No VVT sensor signal to ECM for 5 seconds at engine speed of 600 rpm or more (1 trip detection logic)
  1. Open or short in VVT sensor (for exhaust side) circuit
  2. VVT sensor (for exhaust side)
  3. Camshaft sub-assembly (for exhaust side)
  4. ECM
P0367
P0392
Output voltage of VVT sensor less than 0.3 V for 4 seconds (1 trip detection logic)
  1. Open or short in VVT sensor (for exhaust side) circuit
  2. VVT sensor (for exhaust side)
  3. Camshaft sub-assembly (for exhaust side)
  4. ECM
P0368
P0393
Output voltage of VVT sensor more than 4.7 V for 4 seconds (1 trip detection logic)
  1. Open or short in VVT sensor (for exhaust side) circuit
  2. VVT sensor (for exhaust side)
  3. Camshaft sub-assembly (for exhaust side)
  4. ECM

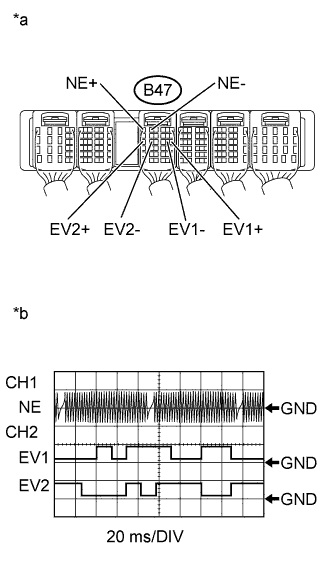
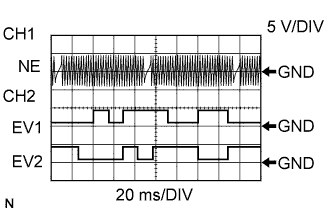
EV1, EV2 and NE signal waveforms
  1. A122768E10
  2. Inspection using an oscilloscope

    HINT:
    1. The correct waveform is shown above.
    2. EV1+ and EV2+ stand for the VVT sensor (for exhaust side) signal, and NE+ stands for the crankshaft position sensor signal.
      Item
      Content
      Terminal
      NE+ - NE-
      EV1+ - EV1-
      EV2+ - EV2-
      Equipment Setting
      5 V/DIV
      20 ms/DIV
      Condition
      Idling


MONITOR DESCRIPTION

If no signal is transmitted by the VVT sensor despite the engine revolving, or the rotations of the camshaft and the crankshaft are not synchronized, the ECM interprets this as a malfunction of the sensor.

MONITOR STRATEGY


Related DTCs
P0365: Exhaust VVT sensor (Bank 1) verify pulse input
P0367: Exhaust VVT sensor (Bank 1) range check (low voltage)
P0368: Exhaust VVT sensor (Bank 1) range check (high voltage)
P0390: Exhaust VVT sensor (Bank 2) verify pulse input
P0392: Exhaust VVT sensor (Bank 2) range check (low voltage)
P0393: Exhaust VVT sensor (Bank 2) range check (high voltage)
Required Sensors/Components (Main)
Exhaust VVT sensor
Required Sensors/Components (Related)
Crankshaft position sensor
Frequency of Operation
Continuous
Duration
4 seconds:
P0367, P0368, P0392 and P0393
5 seconds:
P0365 and P0390
MIL Operation
Immediate
Sequence of Operation
None

TYPICAL ENABLING CONDITIONS


All 
Monitor runs whenever following DTCs not present
None

P0365, P0390 VVT Sensor Verify Pulse Input 
Engine speed
600 rpm or more
Starter
OFF
Battery voltage
8 V or more
Ignition switch
ON
Exhaust VVT sensor range check fail (P0367, P0368, P0392, P0393)
Not detected
Exhaust VVT sensor voltage
0.3 V or more, and 4.7 V or less

P0367, P0368, P0392, P0393 VVT Sensor Range Check (Low Voltage, High Voltage) 
Starter
OFF
Ignition switch
ON
Time after ignition switch off to ON
2 seconds or more
Battery voltage
8 V or more
Exhaust VVT sensor pulse input fail (P0365, P0390)
Not detected

TYPICAL MALFUNCTION THRESHOLDS


P0365, P0390 VVT Sensor Verify Pulse Input 
Exhaust VVT sensor signal
No signal

P0367, P0392 VVT Sensor Range Check (Low Voltage) 
Exhaust VVT sensor voltage
Less than 0.3 V

P0368, P0393 VVT Sensor Range Check (High Voltage) 
Exhaust VVT sensor voltage
More than 4.7 V

COMPONENT OPERATING RANGE


Exhaust VVT sensor voltage
0.3 to 4.7 V

CONFIRMATION DRIVING PATTERN

  1. Connect the Techstream to the DLC3.
  2. Turn the ignition switch to ON and turn the Techstream on.
  3. Clear DTCs (even if no DTCs are stored, perform the clear DTC operation).
  4. Turn the ignition switch off and wait for at least 30 seconds.
  5. Turn the ignition switch to ON and turn the Techstream on.
  6. Start the engine.
  7. Idle the engine for 10 seconds or more [A].
  8. Enter the following menus: Powertrain / Engine and ECT / Trouble Codes [B].
  9. Read DTCs.

    HINT:
    1. If a DTC is output, the system is malfunctioning.
    2. If a DTC is not output, perform the following procedure.

  10. Enter the following menus: Powertrain / Engine and ECT / Utility / All Readiness.
  11. Input the DTC: P0365, P0367, P0368, P0390, P0392 or P0393.
  12. Check the DTC judgment result.

    Techstream Display
    Description
    NORMAL
    1. DTC judgment completed
    2. System normal
    ABNORMAL
    1. DTC judgment completed
    2. System abnormal
    INCOMPLETE
    1. DTC judgment not completed
    2. Perform driving pattern after confirming DTC enabling conditions
    N/A
    1. Unable to perform DTC judgment
    2. Number of DTCs which do not fulfill DTC preconditions has reached ECU's memory limit

    HINT:
    1. If the judgment result shows NORMAL, the system is normal.
    2. If the judgment result shows ABNORMAL, the system has a malfunction.
    3. If the judgment result shows INCOMPLETE or N/A, perform steps [A] and [B] again.

  13. If no DTC is output, perform a universal trip and check for permanent DTCs (Click here).

    HINT:
    1. If a permanent DTC is output, the system is malfunctioning.
    2. If no permanent DTC is output, the system is normal.


WIRING DIAGRAM

Refer to DTC P0335 .

INSPECTION PROCEDURE

HINT:
  1. If no problem is found through this diagnostic troubleshooting procedure, there may be a mechanical problem with the engine.
  2. Bank 1 refers to the bank that includes the No. 1 cylinder*.
    *: The No. 1 cylinder is the cylinder which is farthest from the transmission.
  3. Bank 2 refers to the bank that does not include the No. 1 cylinder.
  4. Read freeze frame data using the Techstream. Freeze frame data record the engine condition when malfunctions are detected. When troubleshooting, freeze frame data can help determine if the vehicle was moving or stationary, if the engine was warmed up or not, if the air-fuel ratio was lean or rich, and other data, from the time the malfunction occurred.

1.INSPECT ECM TERMINAL VOLTAGE
A226983E03
  1. Inspect the ECM using an oscilloscope.

    1. While the engine is idling, check the waveform between the terminals of the ECM connector.

      OK:
      Tester Connection
      Tool Setting
      Condition
      Specified Condition
      B47-13 (EV1+) - B47-14 (EV1-)
      5 V/DIV
      20 ms/DIV
      Idling
      Correct waveform as shown in illustration
      B47-18 (EV2+) - B47-17 (EV2-)
      5 V/DIV
      20 ms/DIV
      Idling
      Correct waveform as shown in illustration
      B47-6 (NE+) - B47-5 (NE-)
      5 V/DIV
      20 ms/DIV
      Idling
      Correct waveform as shown in illustration

      Text in Illustration 
      *a
      Component with harness connected
      (ECM)
      *b
      EV1, EV2 and NE Signal Waveforms


NG
Go to step 2
OK

CHECK FOR INTERMITTENT PROBLEMS (Click here)  

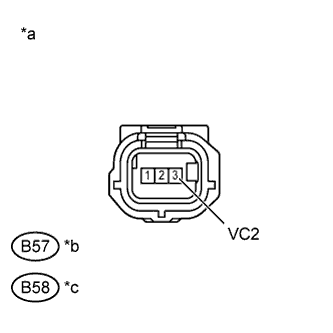
2.CHECK VVT SENSOR (FOR EXHAUST SIDE) (SENSOR POWER SOURCE)
A193258E09
  1. Disconnect the VVT sensor (for exhaust side) connectors.

  1. Turn the ignition switch to ON.

  1. Measure the voltage according to the value(s) in the table below.

    Standard Voltage:
    Tester Connection
    Switch Condition
    Specified Condition
    B57-3 (VC2) - Body ground
    Ignition switch ON
    4.5 to 5.5 V
    B58-3 (VC2) - Body ground
    Ignition switch ON
    4.5 to 5.5 V

    Text in Illustration 
    *a
    Front view of wire harness connector
    (to VVT Sensor (for Exhaust Side))
    *b
    Bank 1
    *c
    Bank 2


NG
Go to step 8
OK


3.CHECK HARNESS AND CONNECTOR (VVT SENSOR (FOR EXHAUST SIDE) - ECM)
  1. Disconnect the B57 and B58 VVT sensor (for exhaust side) connectors.

  1. Disconnect the B47 ECM connector.

  1. Measure the resistance according to the value(s) in the table below.

    Standard Resistance:

    Tester Connection
    Condition
    Specified Condition
    B57-1 (EX+) - B47-13 (EV1+)
    Always
    Below 1 Ω
    B57-2 (EX-) - B47-14 (EV1-)
    Always
    Below 1 Ω
    B58-1 (EX+) - B47-18 (EV2+)
    Always
    Below 1 Ω
    B58-2 (EX-) - B47-17 (EV2-)
    Always
    Below 1 Ω
    B57-1 (EX+) or B47-13 (EV1+) - Body ground
    Always
    10 kΩ or higher
    B57-2 (EX-) or B47-14 (EV1-) - Body ground
    Always
    10 kΩ or higher
    B58-1 (EX+) or B47-18 (EV2+) - Body ground
    Always
    10 kΩ or higher
    B58-2 (EX-) or B47-17 (EV2-) - Body ground
    Always
    10 kΩ or higher


NG
REPAIR OR REPLACE HARNESS OR CONNECTOR
OK


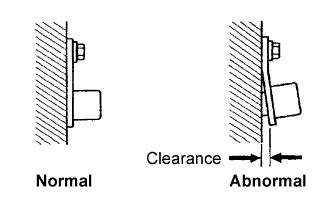
4.CHECK SENSOR INSTALLATION (VVT SENSOR (FOR EXHAUST SIDE))
BR03795E32
  1. Check the VVT sensor (for exhaust side) installation.

    OK:
    VVT sensor (for exhaust side) is installed correctly.


NG
SECURELY REINSTALL VVT SENSOR (FOR EXHAUST SIDE) (Click here)
OK


5.INSPECT CAMSHAFT SUB-ASSEMBLY (TIMING ROTOR)
  1. Check the timing rotor of the exhaust camshaft.

    OK:
    Camshaft timing rotor does not have any cracks or deformation.

    HINT:
    Perform "Inspection After Repair" after replacing the exhaust camshaft (Click here).


NG
REPLACE CAMSHAFT SUB-ASSEMBLY (FOR EXHAUST SIDE) (Click here)
OK


6.REPLACE VVT SENSOR (FOR EXHAUST SIDE)
  1. Replace the VVT sensor (for exhaust side) (Click here).


NEXT


7.CHECK WHETHER DTC OUTPUT RECURS (P0365, P0367, P0368, P0390, P0392 OR P0393)
  1. Connect the Techstream to the DLC3.

  1. Turn the ignition switch to ON.

  1. Turn the Techstream on.

  1. Clear the DTCs (Click here).

  1. Refer to the confirmation driving pattern.

  1. Enter the following menus: Powertrain / Engine and ECT / Trouble Codes.

  1. Read DTCs.
    Result 
    Result
    Proceed to
    P0365, P0367, P0368, P0390, P0392 or P0393 is output
    A
    No output
    B

    HINT:
    If the engine does not start, replace the ECM.


B
END
A

REPLACE ECM (Click here)  

8.CHECK HARNESS AND CONNECTOR (VVT SENSOR (FOR EXHAUST SIDE) - ECM)
  1. Disconnect the B57 and B58 VVT sensor (for exhaust side) connectors.

  1. Disconnect the B47 ECM connector.

  1. Measure the resistance according to the value(s) in the table below.

    Standard Resistance:

    Tester Connection
    Condition
    Specified Condition
    B57-3 (VC2) - B47-15 (VCV1)
    Always
    Below 1 Ω
    B58-3 (VC2) - B47-16 (VCV2)
    Always
    Below 1 Ω
    B57-3 (VC2) or B47-15 (VCV1) - Body ground
    Always
    10 kΩ or higher
    B58-3 (VC2) or B47-16 (VCV2) - Body ground
    Always
    10 kΩ or higher


NG
REPAIR OR REPLACE HARNESS OR CONNECTOR
OK

REPLACE ECM (Click here)