 |
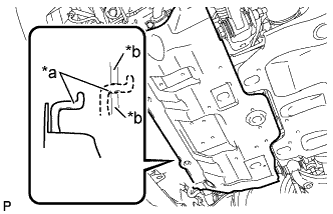
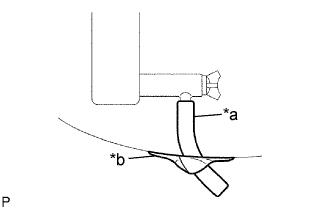
Unhook the No. 1 engine under cover sub-assembly from the frame as shown in the illustration.
| *a | Hook |
| *b | Frame |
ENGINE ASSEMBLY > REMOVAL |
| 1. DISCHARGE FUEL SYSTEM PRESSURE |
| 2. DISCONNECT CABLE FROM NEGATIVE BATTERY TERMINAL |
| 3. REMOVE NO. 1 ENGINE UNDER COVER SUB-ASSEMBLY |
Remove the 4 bolts from the No. 1 engine under cover sub-assembly.
|
Unhook the No. 1 engine under cover sub-assembly from the frame as shown in the illustration.
| *a | Hook |
| *b | Frame |
| 4. REMOVE REAR ENGINE UNDER COVER ASSEMBLY |
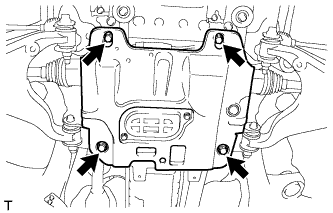 |
Remove the 4 bolts and rear engine under cover assembly from the frame.
| 5. REMOVE FRONT FENDER APRON SEAL LH |
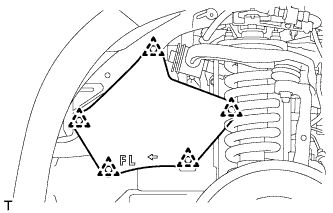 |
Remove the 5 clips and front fender apron seal LH from the front fender apron sub-assembly LH.
| 6. REMOVE FRONT FENDER REAR SPLASH SHIELD LH |
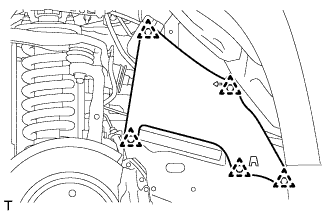 |
Remove the 5 clips and front fender rear splash shield LH from the front fender apron sub-assembly LH.
| 7. REMOVE FRONT FENDER APRON SEAL RH |
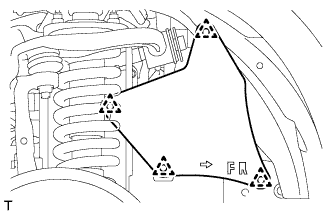 |
Remove the 4 clips and front fender apron seal RH from the front fender apron sub-assembly RH.
| 8. REMOVE FRONT FENDER REAR SPLASH SHIELD RH |
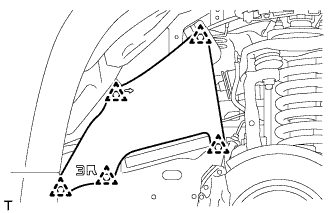 |
Remove the 5 clips and front fender rear splash shield RH from the front fender apron sub-assembly RH.
| 9. REMOVE UPPER RADIATOR SUPPORT SEAL |
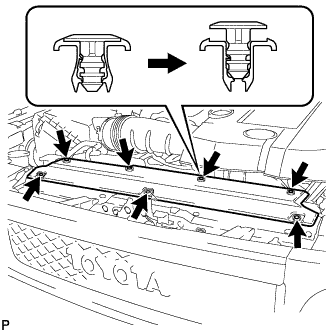 |
Disengage the 7 clips and remove the upper radiator support seal from the fan shroud.
| 10. REMOVE RADIATOR GRILLE |
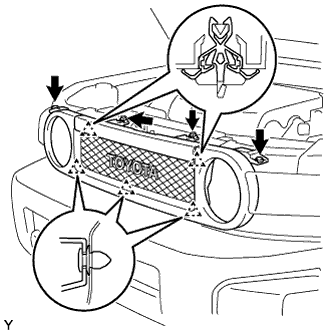 |
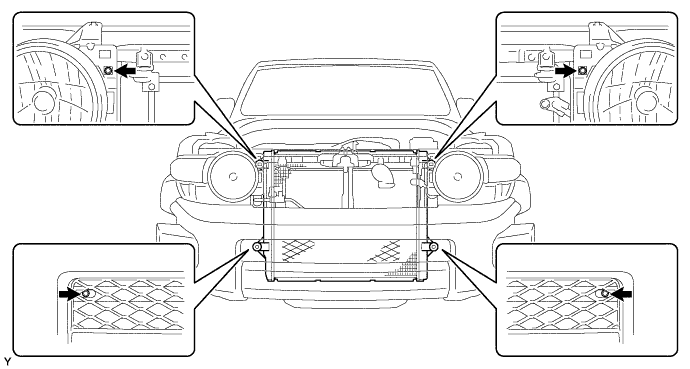
Using a clip remover, remove the 2 clips.
Remove the 2 screws.
Disengage the 5 clips and remove the radiator grille.
| 11. DRAIN ENGINE COOLANT |
Remove the service hole cover from the engine under cover.
 |
Install a vinyl hose to the radiator drain cock on the radiator assembly side.
| *a | Vinyl Hose |
| *b | Tape |
Fix the vinyl hose with tape.
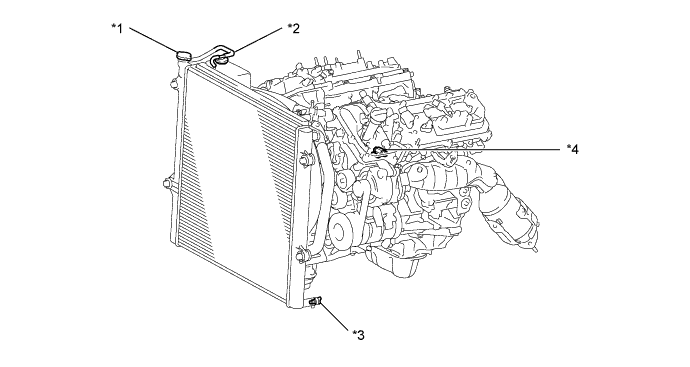
| *1 | Radiator Cap Sub-assembly | *2 | Radiator Reserve Tank Cap Sub-assembly |
| *3 | Radiator Drain Cock Plug | *4 | Cylinder Block Drain Cock Plug |
Loosen the radiator drain cock plug.
Remove the radiator cap sub-assembly and drain the engine coolant.
Loosen the cylinder block drain cock plug and drain the engine coolant from the engine.
| 12. DRAIN ENGINE OIL |
Remove the oil filler cap.
Remove the oil pan drain plug and drain the engine oil into a container.
Install a new gasket and the oil pan drain plug.
| 13. REMOVE HOOD SUPPORT |
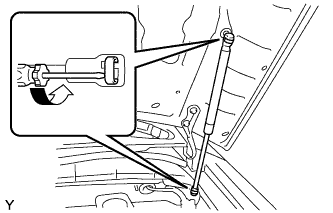 |
Using a screwdriver with its tip wrapped in protective tape, remove the 2 stop rings and the hood support.
| 14. REMOVE HOOD SUB-ASSEMBLY |
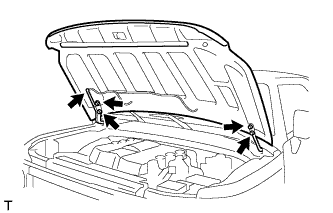 |
Disconnect the windshield washer hose from the hood sub-assembly.
Remove the 4 bolts and the hood sub-assembly form the 2 hinges.
| 15. REMOVE BATTERY HOLD DOWN CLAMP |
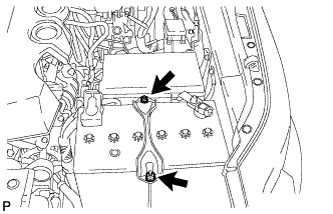 |
Loosen the 2 nuts and remove the battery hold down clamp.
| 16. REMOVE BATTERY |
| 17. REMOVE BATTERY TRAY |
| 18. REMOVE FAN SHROUD |
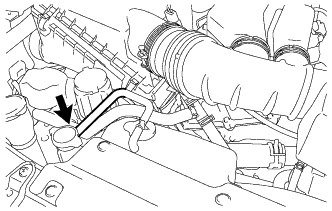 |
Disconnect the radiator reserve tank hose from the radiator assembly.
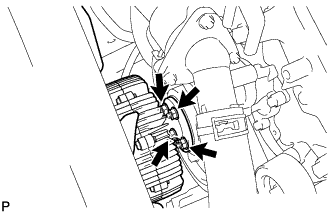 |
Loosen the 4 nuts holding the fan and fluid coupling assembly.
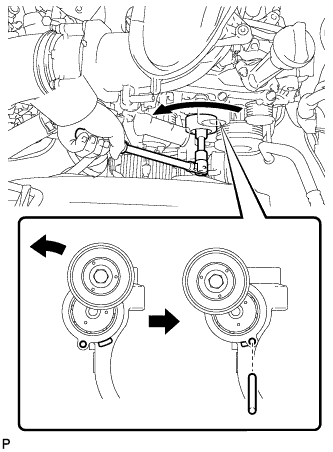 |
While turning the V-ribbed belt tensioner assembly counterclockwise, align the service hole for the V-ribbed belt tensioner assembly and the V-ribbed belt tensioner assembly fixing position, and then insert a bar of φ 6 mm (0.236 in.) into the service hole to fix the V-ribbed belt tensioner assembly in place.
Remove the fan and generator V belt.
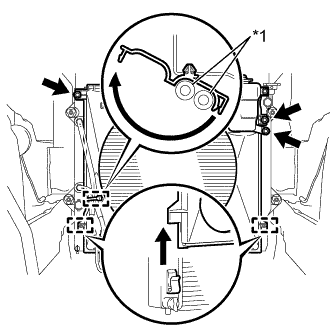 |
Disengage the clamp and disconnect the 2 oil cooler hoses from the hose clamp.
| *1 | Oil Cooler Hose |
Remove the bolt and separate the radiator reserve tank assembly from the radiator assembly.
Remove the 2 bolts and separate the fan shroud from the radiator assembly.
Disengage the 2 guides of the fan shroud from the radiator assembly as shown in the illustration.
Remove the 4 nuts of the fan and fluid coupling assembly, and then remove the fan shroud together with the fan and fluid coupling assembly.
Remove the fan pulley from the engine water pump assembly.
| 19. DISCONNECT NO. 1 RADIATOR HOSE |
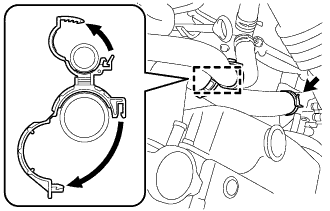 |
Remove the hose clamp from the No. 1 radiator hose and the No. 1 air injection system hose.
Loosen the hose clip and disconnect the No. 1 radiator hose from the water inlet housing.
| 20. DISCONNECT NO. 2 RADIATOR HOSE |
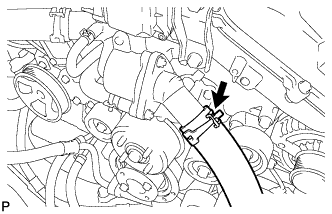 |
Loosen the hose clip and disconnect the No. 2 radiator hose from the water inlet with thermostat.
| 21. DISCONNECT OIL COOLER HOSE (for Automatic Transmission) |
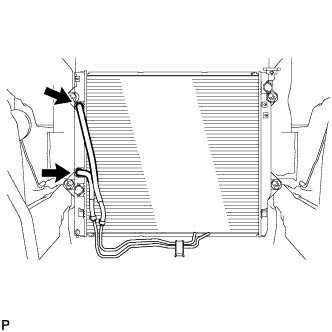 |
Loosen the 2 hose clips and disconnect the 2 oil cooler hoses from the radiator assembly.
| 22. REMOVE RADIATOR ASSEMBLY |
Remove the 4 bolts, and the radiator assembly from the vehicle.
| 23. REMOVE V-BANK COVER |
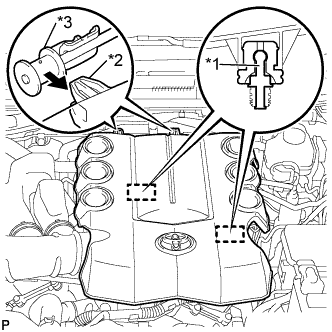 |
Raise the front of the V-bank cover to disengage the 2 pins.
| *1 | Pin |
| *2 | Hook |
| *3 | No. 1 V-bank Cover Bracket |
Disengage the 2 hooks and remove the V-bank cover from the No. 1 V-bank cover bracket.
| 24. REMOVE AIR CLEANER CAP AND HOSE |
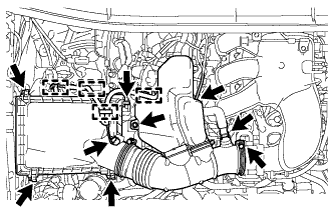 |
Disconnect the MAF meter connector.
Disengage the 4 wire harness clamps.
Disconnect the ventilation hose and vacuum hose.
Remove the bolt.
Loosen the No. 1 air cleaner hose clamp.
Release the 4 hinges.
Remove the air cleaner cap and hose.
| 25. REMOVE AIR CLEANER FILTER ELEMENT SUB-ASSEMBLY |
| 26. REMOVE AIR CLEANER CASE SUB-ASSEMBLY |
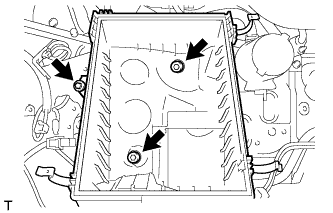 |
Remove the 3 bolts and the air cleaner case sub-assembly.
| 27. DISCONNECT NO. 1 AIR INJECTION SYSTEM HOSE (w/ Secondary Air Injection System) |
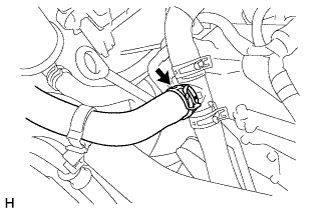 |
Loosen the hose clip and disconnect the No. 1 air injection system hose from the air hose assembly.
| 28. REMOVE AIR HOSE ASSEMBLY (w/ Secondary Air Injection System) |
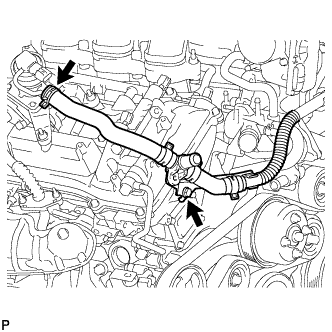 |
Remove the bolt and disconnect the air hose assembly from the timing chain cover sub-assembly.
Loosen the hose clip and disconnect the air hose assembly from the No. 1 emission control valve set.
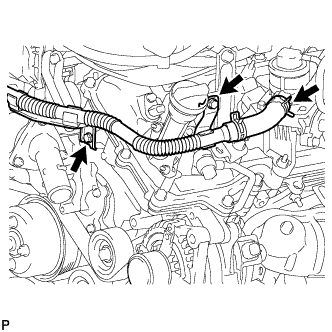 |
Remove the 2 bolts and disconnect the air hose assembly from the timing chain cover sub-assembly and No. 1 surge tank stay.
Loosen the hose clip and remove the air hose assembly from the No. 2 emission control valve set.
| 29. REMOVE INTAKE AIR SURGE TANK |
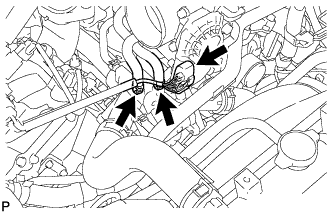 |
Disconnect the throttle with motor body assembly connector.
Loosen the 2 hose clips and disconnect the No. 4 water by-pass hose and No. 5 water by-pass hose from the water inlet housing.
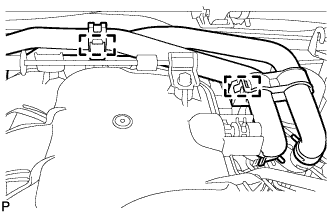 |
Disconnect the 2 clamps of the heater water hose from the intake air surge tank.
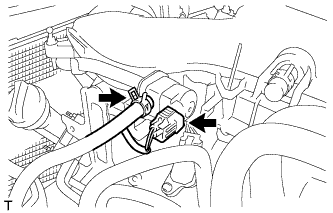 |
Loosen the hose clip and disconnect the No. 1 fuel vapor feed hose from the vacuum switching valve.
Disconnect the No. 1 vacuum switching valve connector.
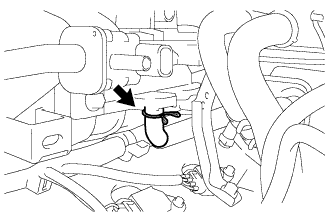 |
Loosen the hose clip and disconnect the No. 1 ventilation hose from the intake air surge tank.
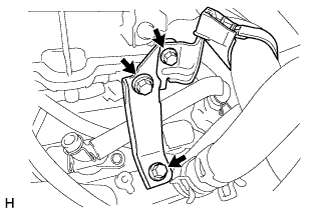 |
Remove the bolt and disconnect the wire harness clamp bracket from the No. 2 surge tank stay.
Remove the 2 bolts and No. 2 surge tank stay from the intake air surge tank.
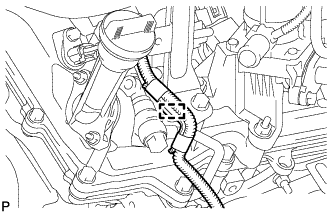 |
Disengage the clamp and disconnect the wire harness from the No. 1 surge tank stay.
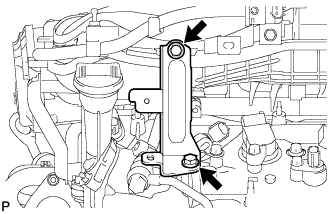 |
Remove the 2 bolts and No. 1 surge tank stay from the intake air surge tank.
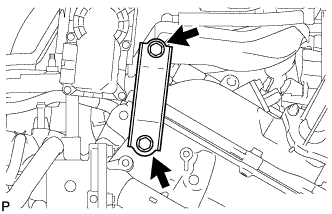 |
Remove the 2 bolts and throttle body bracket from the intake air surge tank.
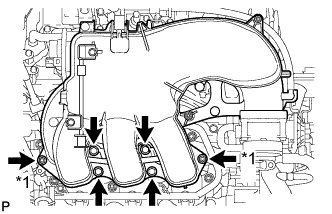 |
Using an 8 mm socket hexagon wrench, remove the 4 bolts, 2 nuts and intake air surge tank from the intake manifold.
| *1 | Nut |
Remove the air surge tank to intake manifold gasket from the intake air surge tank.
| 30. REMOVE EXHAUST PIPE STOPPER BRACKET (for 4WD) |
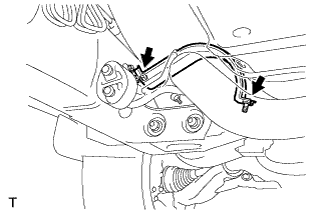 |
Remove the 2 bolts and exhaust pipe stopper bracket from the frame sub-assembly.
| 31. REMOVE FRONT NO. 2 EXHAUST PIPE ASSEMBLY |
Disconnect the heated oxygen sensor connector.
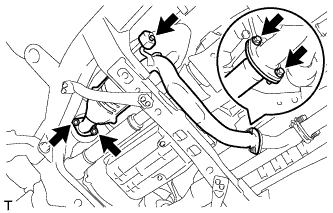 |
Remove the 2 bolts and disconnect the front No. 2 exhaust pipe assembly from the front exhaust pipe assembly.
Remove the 2 nuts and disconnect the front No. 2 exhaust pipe assembly from the exhaust manifold sub-assembly LH.
Disconnect the exhaust pipe support and remove the front No. 2 exhaust pipe assembly.
Remove the 2 gaskets from the front No. 2 exhaust pipe assembly.
| 32. REMOVE FRONT EXHAUST PIPE ASSEMBLY |
Disconnect the heated oxygen sensor connector.
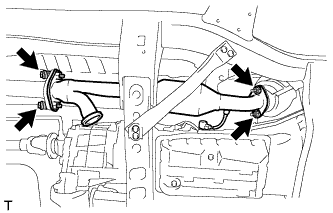 |
Remove the 2 bolts and 2 compression springs and disconnect the front exhaust pipe assembly from the center exhaust pipe assembly.
Remove the 2 nuts and front exhaust pipe assembly from the exhaust manifold sub-assembly RH.
Remove the 2 gaskets from the front exhaust pipe assembly.
| 33. REMOVE MANIFOLD STAY |
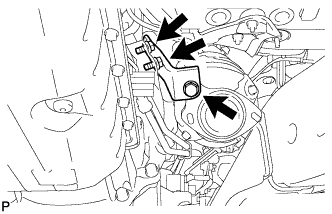 |
Remove the 3 bolts and manifold stay from the exhaust manifold sub-assembly RH.
| 34. REMOVE NO. 1 EXHAUST MANIFOLD HEAT INSULATOR |
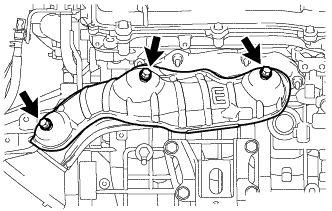 |
Remove the 3 bolts and No. 1 exhaust manifold heat insulator from the exhaust manifold sub-assembly RH.
| 35. REMOVE AIR TUBE (w/ Secondary Air Injection System) |
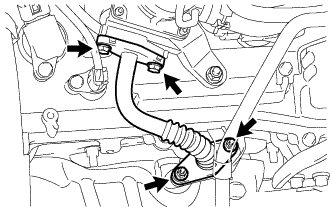 |
Remove the 2 bolts, 2 nuts and the air tube from the emission control valve set and exhaust manifold sub-assembly RH.
Remove the 2 gaskets from the air tube.
| 36. REMOVE EXHAUST MANIFOLD SUB-ASSEMBLY RH (w/ Secondary Air Injection System) |
Disconnect the air fuel ratio sensor connector.
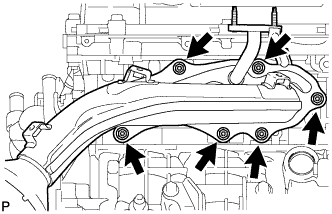 |
Remove the 6 nuts and exhaust manifold sub-assembly RH from the cylinder head sub-assembly.
| 37. REMOVE EXHAUST MANIFOLD SUB-ASSEMBLY RH (w/o Secondary Air Injection System) |
Disconnect the air fuel ratio sensor connector.
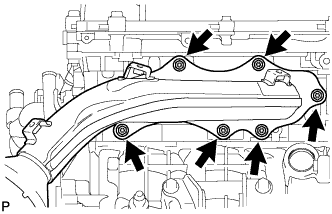 |
Remove the 6 nuts and exhaust manifold sub-assembly RH from the cylinder head sub-assembly.
| 38. REMOVE EXHAUST MANIFOLD TO HEAD GASKET RH |
Remove the exhaust manifold to head gasket RH from the cylinder head sub-assembly.
| 39. REMOVE NO. 2 MANIFOLD STAY |
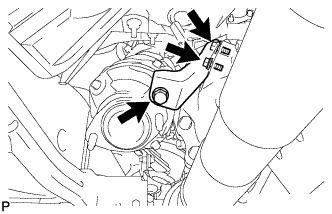 |
Remove the 3 bolts and No. 2 manifold stay from the exhaust manifold sub-assembly LH.
| 40. REMOVE NO. 2 EXHAUST MANIFOLD HEAT INSULATOR |
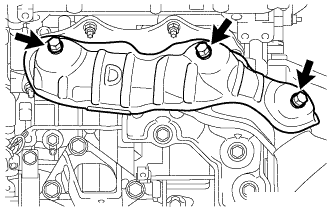 |
Remove the 3 bolts and No. 2 exhaust manifold heat insulator from the exhaust manifold sub-assembly LH.
| 41. REMOVE NO. 2 AIR TUBE (w/ Secondary Air Injection System) |
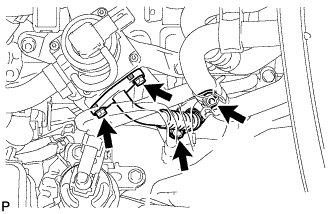 |
Remove the 2 bolts, 2 nuts and the No. 2 air tube from the No. 2 emission control valve set and exhaust manifold sub-assembly LH.
Remove the 2 gaskets from the No. 2 air tube.
| 42. REMOVE EXHAUST MANIFOLD SUB-ASSEMBLY LH (w/ Secondary Air Injection System) |
Disconnect the air fuel ratio sensor connector.
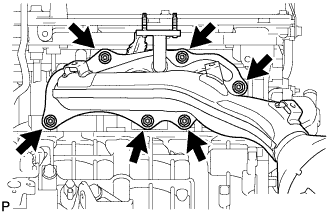 |
Remove the 6 nuts and exhaust manifold sub-assembly LH from the cylinder head sub-assembly.
| 43. REMOVE EXHAUST MANIFOLD SUB-ASSEMBLY LH (w/o Secondary Air Injection System) |
Disconnect the air fuel ratio sensor connector.
|
Remove the 6 nuts and exhaust manifold sub-assembly RH from the cylinder head sub-assembly.
| 44. REMOVE EXHAUST MANIFOLD TO HEAD GASKET LH |
Remove the exhaust manifold to head gasket LH from the cylinder head sub-assembly.
| 45. REMOVE WIRING HARNESS CLAMP BRACKET |
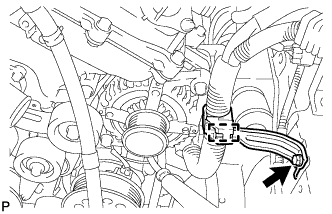 |
Disconnect the clamp.
Remove the bolt and wire harness clamp bracket.
| 46. REMOVE GENERATOR ASSEMBLY |
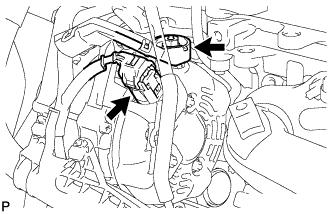 |
Open the terminal cap.
Remove the nut and disconnect the wire harness from terminal B.
Disconnect the generator connector from the generator assembly.
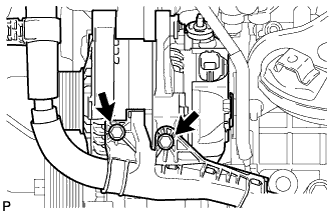 |
Remove the 2 bolts and disconnect the wire harness.
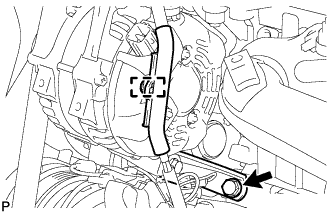 |
Disconnect the wire harness clamp.
Remove the bolt and disconnect the generator bracket from the cylinder block.
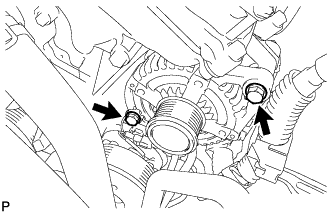 |
Remove the 2 bolts and generator assembly.
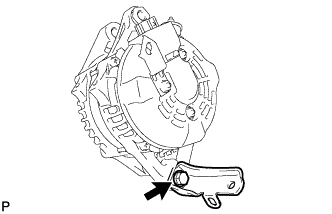 |
Remove the bolt and generator bracket.
| 47. SEPARATE COOLER COMPRESSOR ASSEMBLY |
Disconnect the cooler compressor connector.
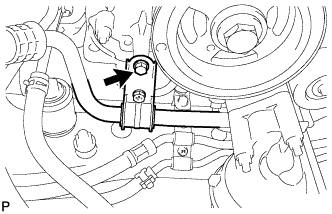 |
Remove the bolt and separate the suction hose.
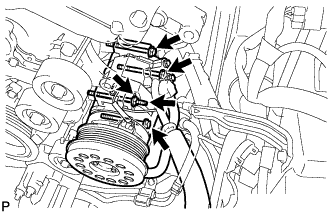 |
Remove the 3 bolts and nut.
Using a E8 "TORX" socket wrench, remove the stud bolt and separate the cooler compressor assembly.
| 48. SEPARATE VANE PUMP ASSEMBLY |
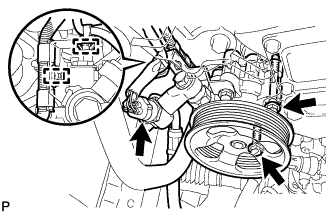 |
Disconnect the 2 clamps and vane pump connector.
Remove the 2 bolts and separate the vane pump.
| 49. DISCONNECT NO. 1 FUEL PIPE SUB-ASSEMBLY |
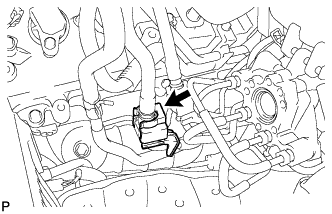 |
Remove the No. 1 fuel pipe clamp.
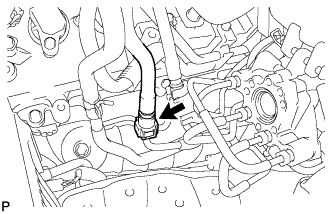 |
Disconnect the No. 1 fuel pipe (Click here).
| 50. DISCONNECT NO. 2 FUEL PIPE SUB-ASSEMBLY |
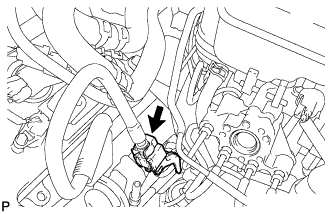 |
Remove the No. 2 fuel pipe clamp.
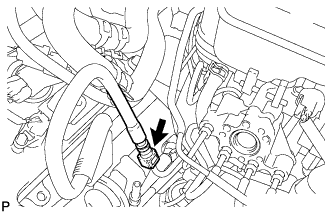 |
Disconnect the No. 2 fuel pipe (Click here).
| 51. DISCONNECT INLET HEATER WATER HOSE |
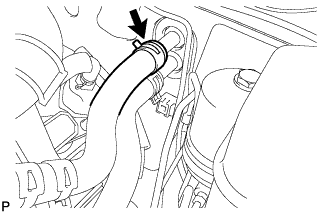 |
Disconnect the inlet heater water hose.
| 52. DISCONNECT OUTLET HEATER WATER HOSE |
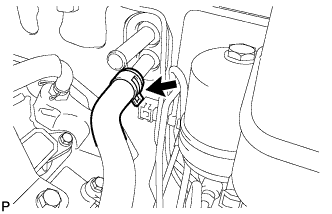 |
Disconnect the outlet heater water hose.
| 53. REMOVE MANUAL TRANSMISSION UNIT ASSEMBLY (for Manual Transmission) |
| 54. REMOVE AUTOMATIC TRANSMISSION ASSEMBLY (for Automatic Transmission) |
| 55. REMOVE CLUTCH COVER ASSEMBLY (for Manual Transmission) |
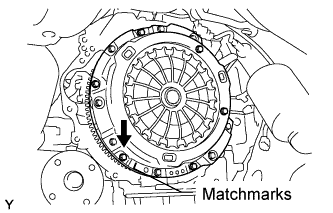 |
Align the matchmark on the clutch cover assembly with the one on the flywheel sub-assembly.
Loosen each set bolt one turn at a time until the spring tension is released.
Remove the 6 bolts and clutch cover assembly.
| 56. REMOVE CLUTCH DISC ASSEMBLY (for Manual Transmission) |
| 57. REMOVE FLYWHEEL SUB-ASSEMBLY (for Manual Transmission) |
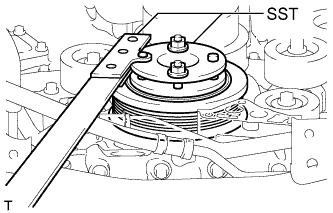 |
Using SST, hold the crankshaft.
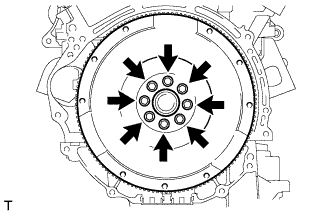 |
Remove the 8 bolts and flywheel.
| 58. REMOVE DRIVE PLATE AND RING GEAR SUB-ASSEMBLY (for Automatic Transmission) |
|
Using SST, hold the crankshaft.
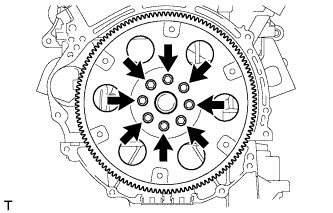 |
Remove the 8 bolts, rear drive plate spacer, drive plate and ring gear and front drive plate spacer.
| 59. REMOVE GLOVE COMPARTMENT DOOR ASSEMBLY |
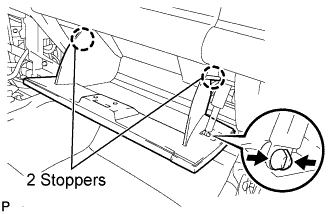 |
Disengage the claw and separate the glove compartment door stoppers from the glove compartment door.
Slightly flex the upper part of the glove compartment door assembly to release the 2 stoppers and open the glove compartment door until it becomes horizontal.
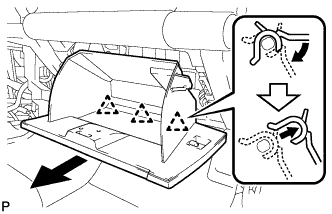 |
Pull the glove compartment door assembly toward the rear of the vehicle to release the 3 hinges and remove the glove compartment door assembly.
| 60. DISCONNECT ENGINE WIRE (for 2WD) |
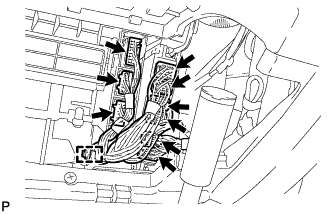 |
Disconnect the 6 connectors from the ECM.
Disconnect the 3 connectors and the clamp from the air conditioning unit.
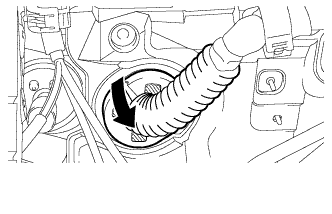 |
Disengage the grommet from the wire harness support.
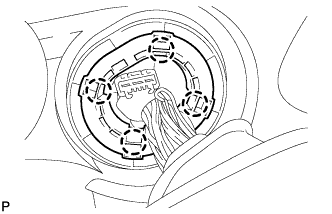 |
Disengage the 4 claws to remove the wire harness support from the vehicle, and then pull out the ECM connector to remove it from the vehicle.
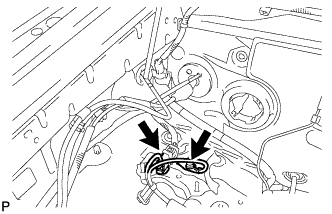 |
Disconnect the connector.
Remove the bolt and separate the ground wire from the body.
| 61. DISCONNECT ENGINE WIRE (for 4WD) |
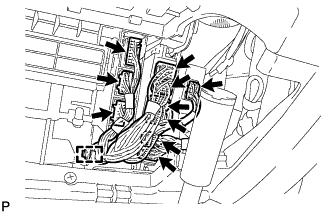 |
Disconnect the connector from the four wheel drive control ECU.
Disconnect the 6 connectors from the ECM.
Disconnect the 3 connectors and the clamp from the air conditioning unit.
|
Disengage the grommet from the wire harness support.
|
Disengage the 4 claws to remove the wire harness support from the vehicle, and then pull out the ECM connector to remove it from the vehicle.
|
Disconnect the connector.
Remove the bolt and separate the ground wire from the body.
| 62. DISCONNECT ENGINE WIRE (for Automatic Transmission 4WD) |
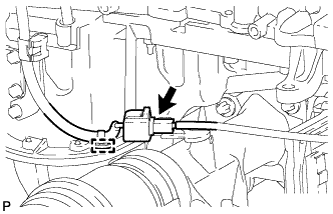 |
Disconnect the front differential connector and clamp.
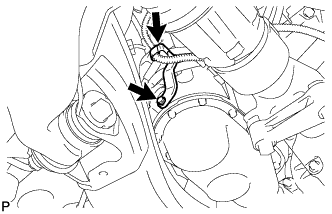 |
Disconnect the harness clamp.
Remove the bolt and wire harness clamp bracket.
| 63. REMOVE ENGINE ASSEMBLY |
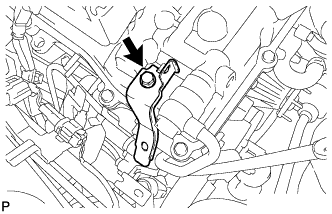 |
Remove the bolt and wire harness clamp bracket.
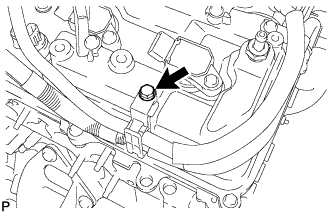 |
Remove the bolt and separate the fuel pipe clamp.
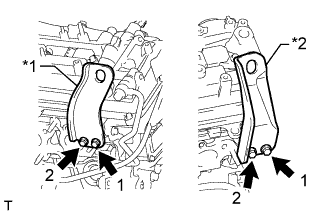 |
Install the 2 engine hangers with the 4 bolts in the order shown in the illustration.
| *1 | No. 1 Engine Hanger |
| *2 | No. 2 Engine Hanger |
| No. 1 engine hanger | 12281-31110 |
| No. 2 engine hanger | 12282-31140 |
| Bolt | 91671-C0830 |
Attach the engine sling device and hang the engine with a chain block.
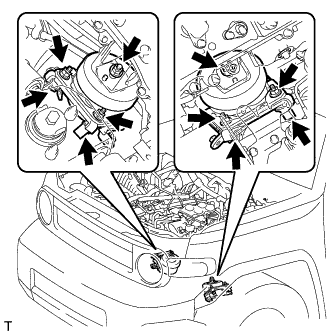 |
Remove the 6 nuts and 4 bolts from the 2 front engine mounting insulators.
Lift the engine out of the vehicle carefully.
Remove the 2 front engine mounting insulators.
Place the engine onto a work bench.
| 64. REMOVE ENGINE WIRE |
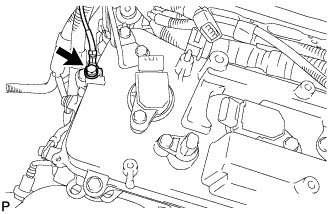 |
Remove the bolt and separate the ground wire from the bank 1 cylinder head cover.
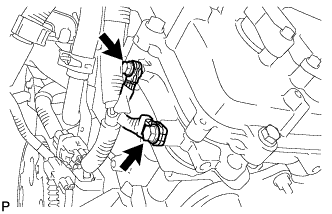 |
Remove the 2 bolts and separate the ground wire from the bank 1 camshaft housing.
Disconnect all connectors from the engine.
Disengage all clamps and remove the engine wire.