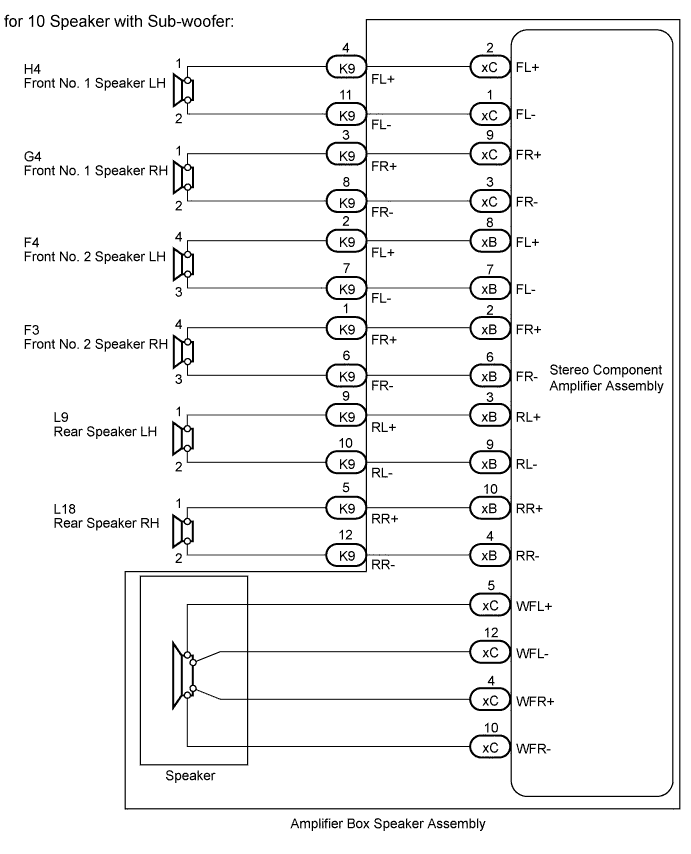
AUDIO AND VISUAL SYSTEM > Speaker Circuit |
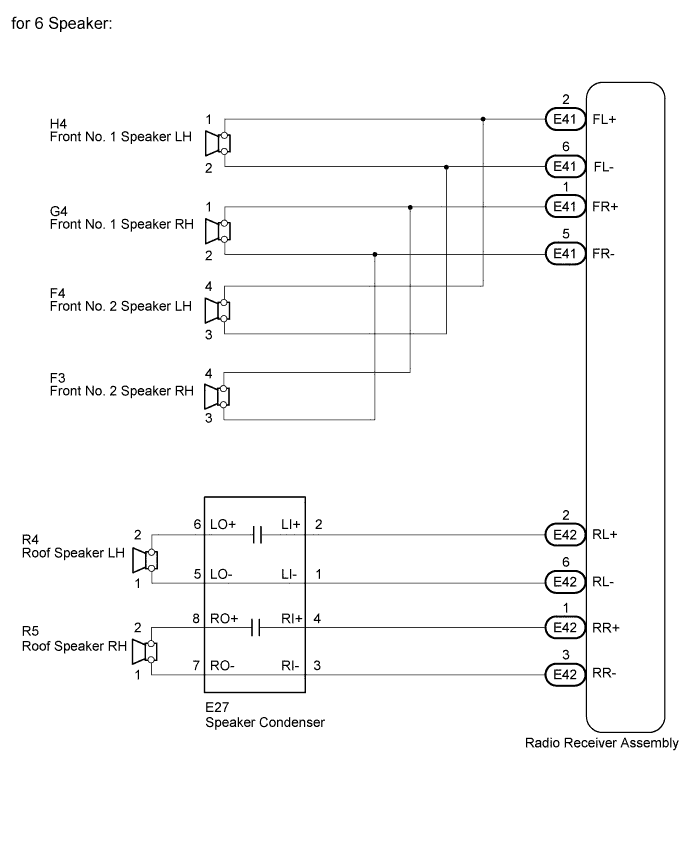
| 1.CONFIRM MODEL |
| Result | Proceed to |
| for 10 speaker with sub-woofer | A |
| for 6 speaker | B |
|
| ||||
| A | |
 |
| 2.CHECK SPEAKER |
Check the malfunctioning speakers.
| Result | Proceed to |
| Front No. 1 speaker | A |
| Front No. 2 speaker | B |
| Rear speaker | C |
| Amplifier box speaker assembly | D |
|
| ||||
|
| ||||
|
| ||||
| A | |
|
| 3.INSPECT FRONT NO. 1 SPEAKER ASSEMBLY |
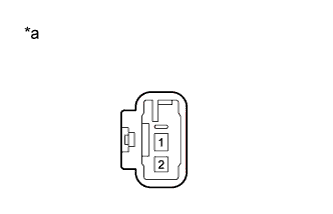 |
Disconnect the H4 and G4 speaker connectors.
Measure the resistance according to the value(s) in the table below.
| Tester Connection | Condition | Specified Condition |
| 1 - 2 | Always | Approximately 1.8 Ω |
| *a | Component without harness connected (Front No. 1 Speaker) |
|
| ||||
| OK | |
|
| 4.CHECK HARNESS AND CONNECTOR (AMPLIFIER BOX SPEAKER ASSEMBLY - FRONT NO. 1 SPEAKER) |
Disconnect the H4 and G4 speaker connectors.
Disconnect the K9 box speaker connector.
Measure the resistance according to the value(s) in the table below.
| Tester Connection | Condition | Specified Condition |
| K9-4 (FL+) - H4-1 | Always | Below 1 Ω |
| K9-11 (FL-) - H4-2 | Always | Below 1 Ω |
| K9-4 (FL+) - Body ground | Always | 10 kΩ or higher |
| K9-11 (FL-) - Body ground | Always | 10 kΩ or higher |
| Tester Connection | Condition | Specified Condition |
| K9-3 (FR+) - G4-1 | Always | Below 1 Ω |
| K9-8 (FR-) - G4-2 | Always | Below 1 Ω |
| K9-3 (FR+) - Body ground | Always | 10 kΩ or higher |
| K9-8 (FR-) - Body ground | Always | 10 kΩ or higher |
|
| ||||
| OK | |
|
| 5.INSPECT AMPLIFIER BOX SPEAKER ASSEMBLY |
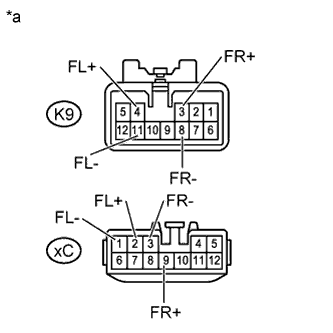 |
Remove the amplifier box speaker assembly (Click here).
Remove the stereo component amplifier assembly from the amplifier box speaker assembly (Click here).
Measure the resistance according to the value(s) in the table below.
| Tester Connection | Condition | Specified Condition |
| K9-4 (FL+) - xC-2 (FL+) | Always | Below 1 Ω |
| K9-11 (FL-) - xC-1 (FL-) | Always | Below 1 Ω |
| K9-3 (FR+) - xC-9 (FR+) | Always | Below 1 Ω |
| K9-8 (FR-) - xC-3 (FR-) | Always | Below 1 Ω |
| *a | Component without harness connected (Amplifier Box Speaker Assembly) |
|
| ||||
| OK | ||
 | ||
| ||
| 6.INSPECT FRONT NO. 2 SPEAKER ASSEMBLY |
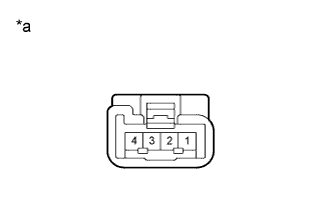 |
Disconnect the F3 and F4 speaker connectors.
Measure the resistance according to the value(s) in the table below.
| Tester Connection | Condition | Specified Condition |
| 3 - 4 | Always | Approximately 1.9 Ω |
| *a | Component without harness connected (Front No. 2 Speaker) |
|
| ||||
| OK | |
|
| 7.CHECK HARNESS AND CONNECTOR (AMPLIFIER BOX SPEAKER ASSEMBLY - FRONT NO. 2 SPEAKER) |
Disconnect the F3 and F4 speaker connectors.
Disconnect the K9 box speaker connector.
Measure the resistance according to the value(s) in the table below.
| Tester Connection | Condition | Specified Condition |
| K9-2 (FL+) - F4-4 | Always | Below 1 Ω |
| K9-7 (FL-) - F4-3 | Always | Below 1 Ω |
| K9-2 (FL+) - Body ground | Always | 10 kΩ or higher |
| K9-7 (FL-) - Body ground | Always | 10 kΩ or higher |
| Tester Connection | Condition | Specified Condition |
| K9-1 (FR+) - F3-4 | Always | Below 1 Ω |
| K9-6 (FR-) - F3-3 | Always | Below 1 Ω |
| K9-1 (FR+) - Body ground | Always | 10 kΩ or higher |
| K9-6 (FR-) - Body ground | Always | 10 kΩ or higher |
|
| ||||
| OK | |
|
| 8.INSPECT AMPLIFIER BOX SPEAKER ASSEMBLY |
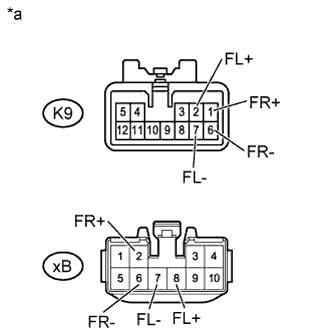 |
Remove the amplifier box speaker assembly (Click here).
Remove the stereo component amplifier assembly from the amplifier box speaker assembly (Click here).
Measure the resistance according to the value(s) in the table below.
| Tester Connection | Condition | Specified Condition |
| K9-2 (FL+) - xB-8 (FL+) | Always | Below 1 Ω |
| K9-7 (FL-) - xB-7 (FL-) | Always | Below 1 Ω |
| K9-1 (FR+) - xB-2 (FR+) | Always | Below 1 Ω |
| K9-6 (FR-) - xB-6 (FR-) | Always | Below 1 Ω |
| *a | Component without harness connected (Amplifier Box Speaker Assembly) |
|
| ||||
| OK | ||
| ||
| ||
| 9.INSPECT REAR SPEAKER ASSEMBLY |
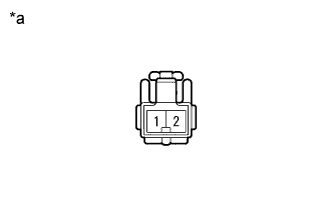 |
Disconnect the L9 and L18 speaker connectors.
Measure the resistance according to the value(s) in the table below.
| Tester Connection | Condition | Specified Condition |
| 1 - 2 | Always | Approximately 1.9 Ω |
| *a | Component without harness connected (Rear Speaker) |
|
| ||||
| OK | |
|
| 10.CHECK HARNESS AND CONNECTOR (AMPLIFIER BOX SPEAKER ASSEMBLY - REAR SPEAKER) |
Disconnect the L9 and L18 speaker connectors.
Disconnect the K9 box speaker connector.
Measure the resistance according to the value(s) in the table below.
| Tester Connection | Condition | Specified Condition |
| K9-9 (RL+) - L9-1 | Always | Below 1 Ω |
| K9-10 (RL-) - L9-2 | Always | Below 1 Ω |
| K9-9 (RL+) - Body ground | Always | 10 kΩ or higher |
| K9-9 (RL+) - Body ground | Always | 10 kΩ or higher |
| Tester Connection | Condition | Specified Condition |
| K9-5 (RR+) - L18-1 | Always | Below 1 Ω |
| K9-12 (RR-) - L18-2 | Always | Below 1 Ω |
| K9-5 (RR+) - Body ground | Always | 10 kΩ or higher |
| K9-12 (RR-) - Body ground | Always | 10 kΩ or higher |
|
| ||||
| OK | |
|
| 11.INSPECT AMPLIFIER BOX SPEAKER ASSEMBLY |
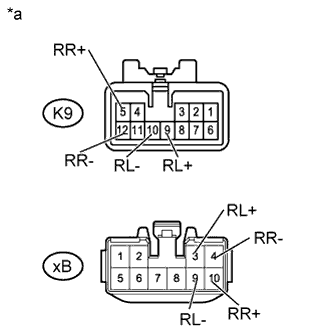 |
Remove the amplifier box speaker assembly (Click here).
Remove the stereo component amplifier assembly from the amplifier box speaker assembly (Click here).
Measure the resistance according to the value(s) in the table below.
| Tester Connection | Condition | Specified Condition |
| K9-9 (RL+) - xB-3 (RL-) | Always | Below 1 Ω |
| K9-10 (RL-) - xB-9 (RL-) | Always | Below 1 Ω |
| K9-5 (RR+) - xB-10 (RR+) | Always | Below 1 Ω |
| K9-12 (RR-) - xB-4 (RR-) | Always | Below 1 Ω |
| *a | Component without harness connected (Amplifier Box Speaker Assembly) |
|
| ||||
| OK | ||
| ||
| ||
| 12.INSPECT AMPLIFIER BOX SPEAKER ASSEMBLY |
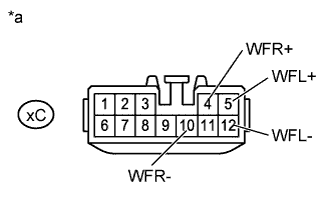 |
Remove the amplifier box speaker assembly (Click here).
Remove the stereo component amplifier assembly from amplifier box speaker assembly (Click here).
Measure the resistance according to the value(s) in the table below.
| Tester Connection | Condition | Specified Condition |
| xC-5 (WFL+) - xC-12 (WFL-) | Always | Approximately 2 Ω |
| xC-4 (WFR+) - xC-10 (WFR-) | Always | Approximately 2 Ω |
| *a | Component without harness connected (Amplifier Box Speaker Assembly) |
|
| ||||
| OK | ||
| ||
| ||
| 13.CHECK SPEAKER |
Check the malfunctioning speakers.
| Result | Proceed to |
| Front No. 1 speaker | A |
| Front No. 2 speaker | B |
| Roof speaker | C |
|
| ||||
|
| ||||
| A | |
|
| 14.INSPECT FRONT NO. 1 SPEAKER ASSEMBLY |
|
Disconnect the H4 and G4 speaker connectors.
Measure the resistance according to the value(s) in the table below.
| Tester Connection | Condition | Specified Condition |
| 1 - 2 | Always | Approximately 4 Ω |
| *a | Component without harness connected (Front No. 1 Speaker) |
|
| ||||
| OK | |
|
| 15.CHECK HARNESS AND CONNECTOR (RADIO RECEIVER - FRONT NO. 1 SPEAKER) |
Disconnect the H4 and G4 speaker connectors.
Disconnect the E41 receiver connector.
Measure the resistance according to the value(s) in the table below.
| Tester Connection | Condition | Specified Condition |
| E41-2 (FL+) - H4-1 | Always | Below 1 Ω |
| E41-6 (FL-) - H4-2 | Always | Below 1 Ω |
| E41-2 (FL+) - Body ground | Always | 10 kΩ or higher |
| E41-6 (FL-) - Body ground | Always | 10 kΩ or higher |
| Tester Connection | Condition | Specified Condition |
| E41-1 (FR+) - G4-1 | Always | Below 1 Ω |
| E41-5 (FR-) - G4-2 | Always | Below 1 Ω |
| E41-1 (FR+) - Body ground | Always | 10 kΩ or higher |
| E41-5 (FR-) - Body ground | Always | 10 kΩ or higher |
|
| ||||
| OK | ||
| ||
| ||
| 16.INSPECT FRONT NO. 2 SPEAKER ASSEMBLY |
|
Disconnect the F3 and F4 speaker connectors.
Measure the resistance according to the value(s) in the table below.
| Tester Connection | Condition | Specified Condition |
| 3 - 4 | Always | Approximately 8 Ω |
| *a | Component without harness connected (Front No. 2 Speaker) |
|
| ||||
| OK | |
|
| 17.CHECK HARNESS AND CONNECTOR (RADIO RECEIVER - FRONT NO. 2 SPEAKER) |
Disconnect the F3 and F4 speaker connectors.
Disconnect the E41 receiver connector.
Measure the resistance according to the value(s) in the table below.
| Tester Connection | Condition | Specified Condition |
| E41-2 (FL+) - F4-4 | Always | Below 1 Ω |
| E41-6 (FL-) - F4-3 | Always | Below 1 Ω |
| E41-2 (FL+) - Body ground | Always | 10 kΩ or higher |
| E41-6 (FL-) - Body ground | Always | 10 kΩ or higher |
| Tester Connection | Condition | Specified Condition |
| E41-1 (FR+) - F3-4 | Always | Below 1 Ω |
| E41-5 (FR-) - F3-3 | Always | Below 1 Ω |
| E41-1 (FR+) - Body ground | Always | 10 kΩ or higher |
| E41-5 (FR-) - Body ground | Always | 10 kΩ or higher |
|
| ||||
| OK | ||
| ||
| ||
| 18.INSPECT ROOF SPEAKER ASSEMBLY |
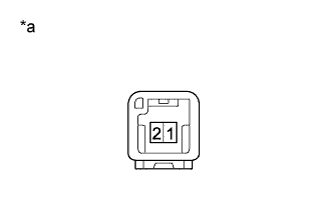 |
Disconnect the R4 and R5 speaker connectors.
Measure the resistance according to the value(s) in the table below.
| Tester Connection | Condition | Specified Condition |
| 1 - 2 | Always | Approximately 4 Ω |
| *a | Component without harness connected (Roof Speaker) |
|
| ||||
| OK | |
|
| 19.CHECK HARNESS AND CONNECTOR (RADIO RECEIVER - SPEAKER CONDENSER) |
Disconnect the E42 receiver connector.
Disconnect the E27 condenser connector.
Measure the resistance according to the value(s) in the table below.
| Tester Connection | Condition | Specified Condition |
| E42-2 (RL+) - E27-2 (LI+) | Always | Below 1 Ω |
| E42-6 (RL-) - E27-1 (LI-) | Always | Below 1 Ω |
| E42-2 (RL+) - Body ground | Always | 10 kΩ or higher |
| E42-6 (RL-) - Body ground | Always | 10 kΩ or higher |
| Tester Connection | Condition | Specified Condition |
| E42-1 (RR+) - E27-4 (RI+) | Always | Below 1 Ω |
| E42-3 (RR-) - E27-3 (RI-) | Always | Below 1 Ω |
| E42-1 (RR+) - Body ground | Always | 10 kΩ or higher |
| E42-3 (RR-) - Body ground | Always | 10 kΩ or higher |
|
| ||||
| OK | |
|
| 20.CHECK HARNESS AND CONNECTOR (SPEAKER CONDENSER - ROOF SPEAKER) |
Disconnect the E27 condenser connector.
Disconnect the R4 and R5 speaker connectors.
Measure the resistance according to the value(s) in the table below.
| Tester Connection | Condition | Specified Condition |
| E27-6 (LO+) - R4-2 | Always | Below 1 Ω |
| E27-5 (LO-) - R4-1 | Always | Below 1 Ω |
| E27-6 (LO+) - Body ground | Always | 10 kΩ or higher |
| E27-5 (LO-) - Body ground | Always | 10 kΩ or higher |
| Tester Connection | Condition | Specified Condition |
| E27-8 (RO+) - R5-2 | Always | Below 1 Ω |
| E27-7 (RO-) - R5-1 | Always | Below 1 Ω |
| E27-8 (RO+) - Body ground | Always | 10 kΩ or higher |
| E27-7 (RO-) - Body ground | Always | 10 kΩ or higher |
|
| ||||
| OK | |
|
| 21.REPLACE SPEAKER CONDENSER |
Temporarily replace the condenser with a new or normally functioning one.
Check that the sound is normal.
|
| ||||
| OK | ||
| ||
| ||

