CYLINDER HEAD > INSTALLATION |
| 1. INSTALL CYLINDER HEAD GASKET |
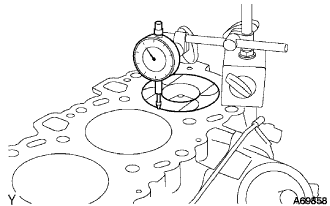
Check each piston head protrusion.
![]() |
Using a dial indicator, measure the amount of each piston head protrusion between the top surfaces of each cylinder head and piston head.
![]() |
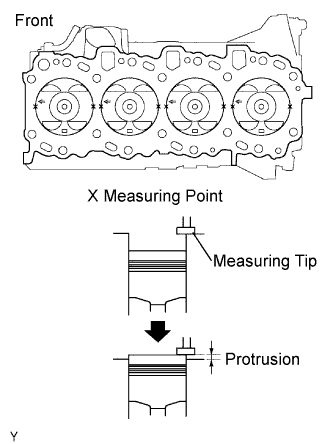
Perform the measurement at 2 places for each cylinder as shown in the illustration, making a total of 8 measurements.
For the piston protrusion value of each cylinder, use the average of the 2 measurements of each cylinder.
![]() |
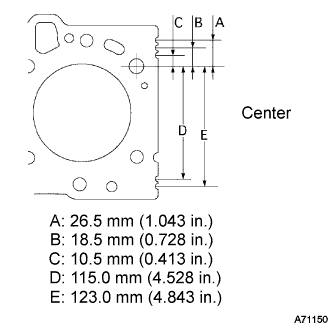
Select an appropriate cylinder head gasket.
Find the maximum value among all the measured piston head protrusion length to select an appropriate cylinder head gasket from A to E.
| Gasket size | Piston protrusion mm (in.) |
| A | 0.005 to 0.054 (0.0002 to 0.00213) |
| B | 0.055 to 0.104 (0.00217 to 0.00409) |
| C | 0.105 to 0.154 (0.00413 to 0.00606) |
| D | 0.155 to 0.204 (0.00610 to 0.00803) |
| E | 0.205 to 0.255 (0.00807 to 0.01004) |
| Gasket size | Gasket thickness mm (in.) |
| A | 0.80 to 0.90 (0.0315 to 0.0354) |
| B | 0.85 to 0.95 (0.0335 to 0.0374) |
| C | 0.90 to 1.00 (0.0354 to 0.0394) |
| D | 0.95 to 1.05 (0.0374 to 0.0413) |
| E | 1.00 to 1.10 (0.0394 to 0.0433) |
Install the selected gasket to the cylinder block.
| 2. INSTALL CYLINDER HEAD SUB-ASSEMBLY |
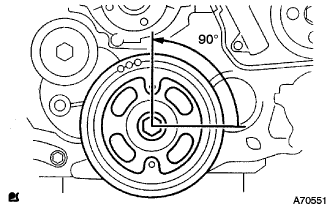
![]() |
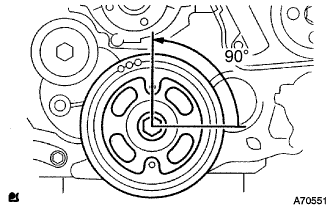
Set the crankshaft at 90° position in a counterclockwise direction from the TDC.
Set a new cylinder head gasket and install the cylinder head.
Apply a small amount of engine oil to each cylinder head bolt, screw, and washer.
Set the washers to the cylinder head bolts, and insert the bolts to the cylinder head.
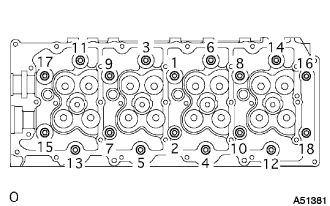
![]() |
Tighten the cylinder head bolts equally in the specific order shown in the illustration in several steps, and then tighten them with the specified torque completely.
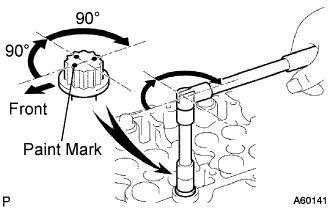
![]() |
Put a paint mark on the top surface of the cylinder bolt head in the engine front direction.
Tighten each cylinder head bolt by 90°.
Tighten the bolts by additional 90°.
Make sure that all the paint marks come toward the opposite side to the engine front.
| 3. INSTALL CAMSHAFT |
![]() |
Set the crankshaft to 90° position from the TDC/compression.
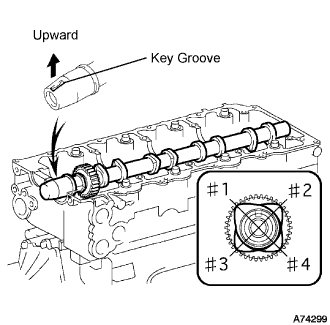
![]() |
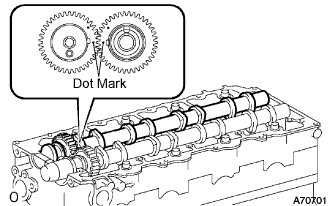
Place the camshaft to the cylinder head as shown in the illustration.
![]() |
Align the dot marks of the camshaft and No.2 camshaft by meshing the both gears before placing the No.2 camshaft.
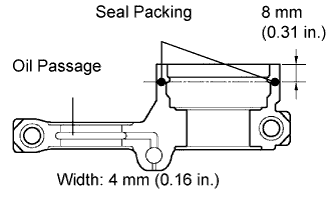
Remove old packing (FIPG) from the camshaft bearing cap.
![]() |
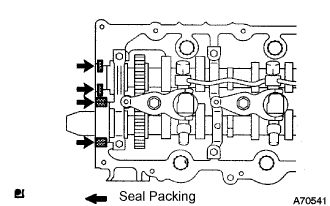
Apply seal packing to the specific places shown in the illustration.
![]() |
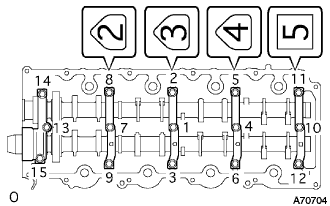
Install the camshaft bearing cap as shown in the illustration.
Tighten the 15 bolts for the camshaft bearing cap in the specified order shown in the illustration.
Adjust and inspect valve clearance.
Fix the timing belt cover No.2 with the 4 bolts and nuts.
Tighten the bolt for the camshaft timing pulley while holding the camshaft with a monkey wrench.
Adjust and inspect the valve clearance. (Click here)
Remove the camshaft timing pulley and timing belt cover No.2.
| 4. INSTALL CAMSHAFT SETTING OIL SEAL |
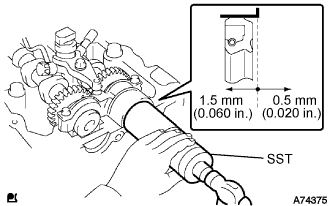
Apply a bit of MP grease to a new oil seal's lip.
![]() |
Using SST and a hammer, fit the oil seal.
| 5. INSTALL INJECTOR ASSEMBLY |
| 6. CHECK NOZZLE LEAKAGE PIPE LEAK |
| 7. INSTALL TIMING BELT NO.2 COVER |
![]() |
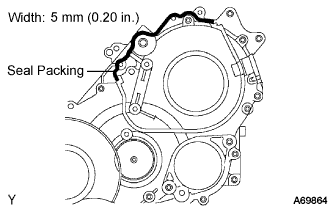
Remove old seal packing (FIPG) from the timing gear case.
Apply seal packing to the specific places shown in the illustration.
Fix the timing belt cover No.2 with the 4 bolts and nuts.
| 8. INSTALL TIMING BELT IDLER SUB-ASSEMBLY NO.1 |
![]() |
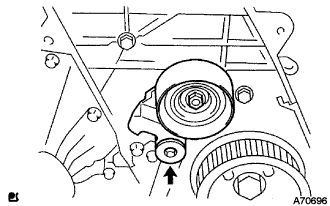
Using a 10 mm socket hexagon wrench, install the new plate washer and timing belt idler No.1.
| 9. INSTALL CAMSHAFT TIMING PULLEY |
![]() |
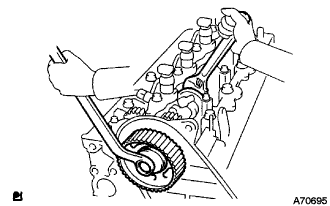
Install the camshaft timing pulley.
Tighten the bolt for the camshaft timing pulley while holding the camshaft with a monkey wrench.
| 10. PISTON AND VALVE BREAKE PREVENT WORK |
![]() |
When turning the camshaft with the timing belt removed, turn the crankshaft 90° counterclockwise.
| 11. INSTALL TIMING BELT |
![]() |
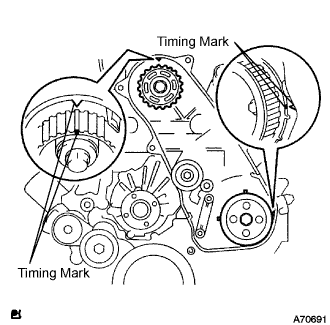
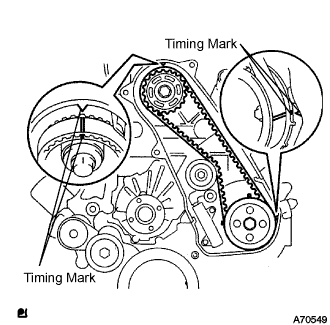
Check that the timing marks are aligned as shown in the illustration.
Install the timing belt to pump drive shaft pulley, camshaft timing pulley and timing belt idler No.1 in sequence.
![]() |
Set the tensioner to the press upright.
Using a press, slowly apply 981 to 9,807 N (100 to 1,000 kgf, 220 to 2,205 lbf) of force to the push rod.
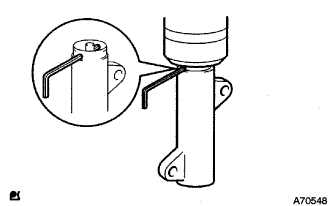
Align the holes of push rod and housing, pass a 1.27 mm hexagon wrench through the holes to keep the setting position of the push rod.
Temporarily install the timing belt tensioner with the 2 bolts while pushing the idler pulley toward the timing belt.
Tighten the 2 bolts.
Remove the 1.5 mm hexagon wrench from the tensioner.
![]() |
Turn the crankshaft in the clockwise direction twice, check that the timing marks are aligned as shown in the illustration.
| 12. INSTALL TIMING BELT NO.1 COVER |
![]() |
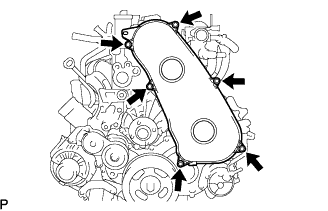
Install the timing belt No.1 cover with the 6 bolts.
Install the wire harness clamp.
| 13. INSTALL CYLINDER HEAD COVER SUB-ASSEMBLY |
Remove old seal packing (FIPG) from the cylinder head.
![]() |
Apply a seal packing to the specific places described in the illustration.
Install the cylinder head cover with 10 bolts and 2 nuts.
Connect the ventilation hose.
Install a new nozzle holder seal.
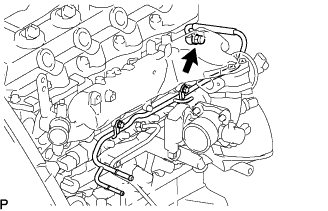
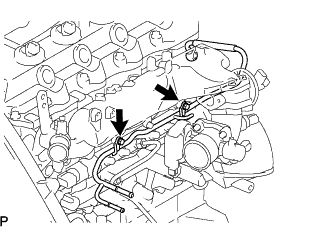
| 14. INSTALL NOZZLE LEAKAGE PIPE ASSEMBLY NO.2 |
Temporarily install the nozzle leakage pipe with the 2 bolts.
![]() |
Install the new gasket and union bolt to the nozzle leakage pipe.
![]() |
Tighten the 2 bolts.
| 15. INSTALL FUEL INLET PIPE SUB-ASSEMBLY |
Temporarily install the fuel inlet pipe.
Using SST, tighten the injection pipe on the common rail side.
Using SST, tighten the injection pipe on the supply pump side.
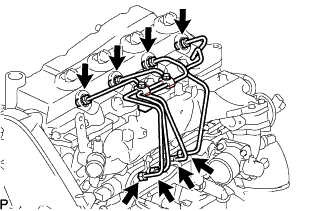
| 16. INSTALL INJECTION PIPE |
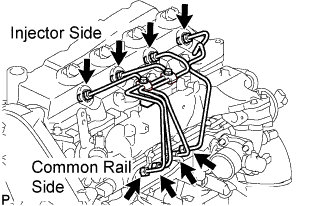
Install the injection pipes.
![]() |
Temporarily install the 4 injection pipes.
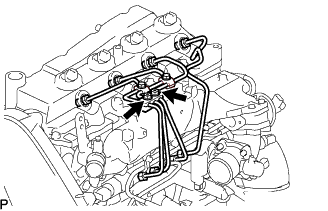
![]() |
Install the injection pipe clamp No.3 in 2 nuts.
![]() |
Fasten the union sequentially, from the injection pipe common rail to the injector, using SST.
| 17. INSTALL OIL LEVEL GAUGE GUIDE |
Install a new O-ring to the oil level gauge guide.
Apply a light coat of engine oil to the O-ring.
Install the oil level gauge guide with the bolt.
Install the oil level gauge.
| 18. INSTALL ELECTRIC EGR CONTROL VALVE ASSEMBLY (w/ EGR Valve) |
Temporarily tighten the EGR valve assembly with the sensor.
![]() |
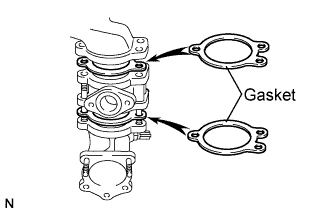
Install 2 new gaskets and the EGR valve to the intake air connector as shown in the illustration.
![]() |
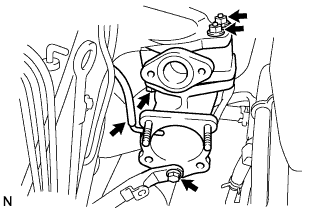
Temporarily tighten the intake air connector with EGR valve assembly to the intake manifold with the bolt and the 2 nuts.
Install the vacuum hose to the intake air connector.
Temporarily tighten the manifold stay with the bolt.
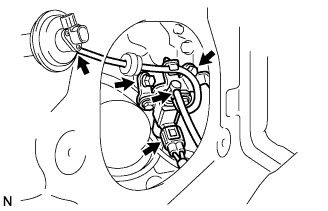
![]() |
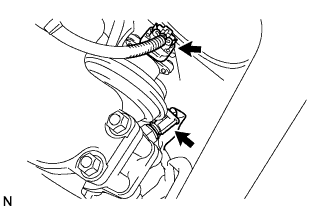
Connect the EGR valve position sensor connector.
Connect the intake air temperature sensor connector.
Install the vacuum regulating valve.
![]() |
Install the vacuum regulating valve with the 2 bolts.
Connect the 2 vacuum hoses and the regulating valve connector.
| 19. REMOVE INTAKE AIR CONNECTOR (w/o EGR Valve) |
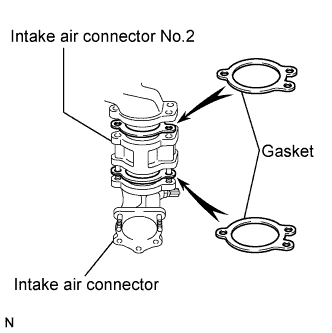
![]() |
Temporarily install 2 new gaskets and intake air connector No.2 to the intake air connector.
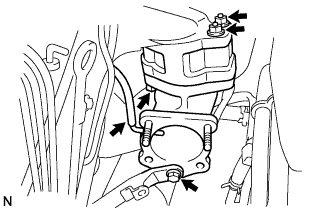
![]() |
Temporarily tighten the intake air connector assembly with the bolt and 2 nuts.
Tighten the manifold stay with the bolt.
Tighten the intake air connector with the bolt and 2 nuts.
Install the vacuum hose to the intake air connector.
| 20. INSTALL DIESEL THROTTLE BODY ASSEMBLY |
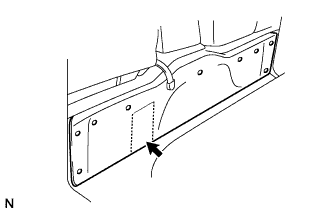
| 21. INSTALL ENGINE SERVICE HOLE COVER NO.2 |
Install the engine service hole cover No.2 with the 3 bolts.
![]() |
Return the carpet.
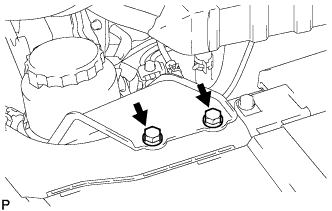
| 22. INSTALL VANE PUMP OIL RESERVOIR ASSEMBLY |
![]() |
Install the vane pump oil reservoir assembly with the 2 bolts.
| 23. CONNECT WATER BY-PASS HOSE NO.3 |
Connect the water by-pass hose No.3 with the clamp to the water by-pass pipe No.2.
| 24. CONNECT RADIATOR HOSE NO.4 |
Connect the radiator hose No.4 with the clamp to the water outlet.
| 25. CONNECT AIR HOSE NO.4 |
Connect the air hose No.4 with the clamp to the diesel throttle body.
| 26. CONNECT OIL RETURN HOSE (w/ Intercooler) |
| 27. INSTALL TURBOCHARGER SUB-ASSEMBLY |
| 28. INSTALL VENTILATION HOSE INSULATOR HEAT |
Install the ventilation hose insulator heat with the 2 bolts.
| 29. INSTALL VENTILATION PIPE |
Install the ventilation pipe with the bolt.
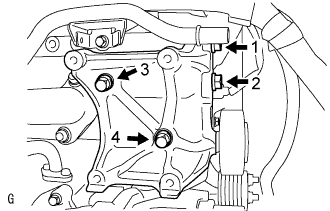
| 30. INSTALL COMPRESSOR BRACKET (w/ Air Conditioning) |
![]() |
Temporarily install the compressor bracket with the 4 bolts.
Install the compressor bracket by tightening the 4 bolts as shown in the illustration.
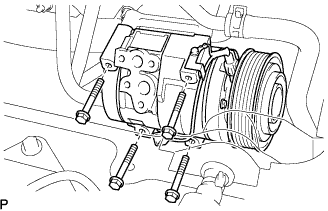
| 31. INSTALL COMPRESSOR AND MAGNETIC CLUTCH (w/ Air Conditioning) |
![]() |
Install the compressor and magnetic clutch with the 4 bolts.
| 32. INSTALL COMPRESSOR OUTLET ELBOW |
![]() |
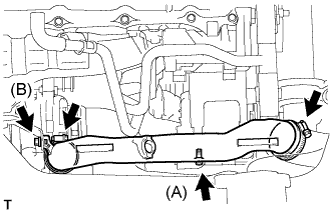
Install the compressor outlet elbow with the 2 bolts and 2 clamps.
| 33. INSTALL AIR CLEANER HOSE ASSEMBLY |
Install the air cleaner hose assembly with the clamp.
| 34. INSTALL AIR TUBE ASSEMBLY |
Install the air tube assembly with the 2 clamps and 2 bolts.
| 35. INSTALL FENDER APRON MUDGUARD SEAL RH |
| 36. INSTALL EXHAUST PIPE ASSEMBLY FRONT |
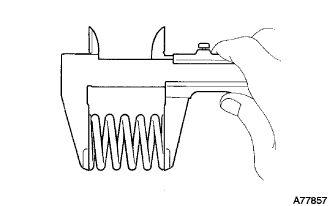
Inspect the compression spring.
![]() |
Using vernier calipers, measure the free length of the compression springs.
![]() |
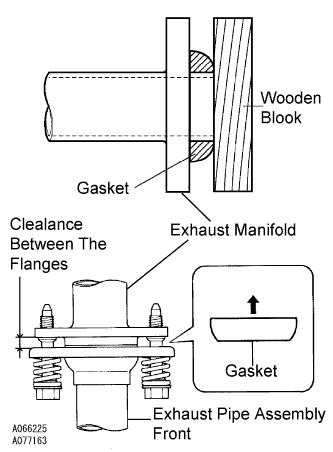
Install the gasket.
Fully insert a new gasket to the exhaust manifold by hand.
Using a wooden block, uniformly strike the gasket so that the gasket and exhaust manifold are properly fit.
Connect the exhaust pipe support, and install the exhaust pipe assembly front and a new gasket with the 4 bolts, 2 compression springs and 2nuts.
| 37. INSTALL FAN AND GENERATOR V BELT |
![]() |
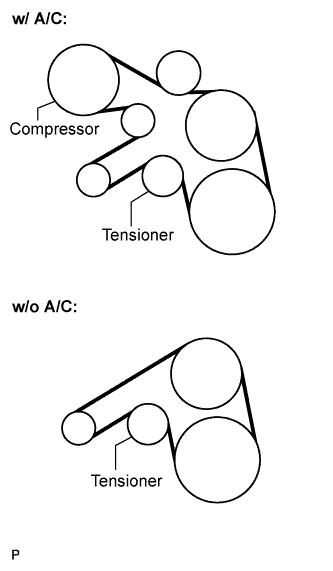
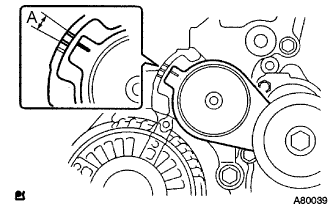
Install the drive belt by rotating the tensioner pulley in clockwise direction with the pulley set bolt of the tensioner.
![]() |
Make sure that the indicator mark of the tensioner is within range A.
| 38. INSTALL ENGINE SERVICE HOLE SUB COVER SUB-ASSEMBLY |
Install the engine service hole sub cover with the 5 bolts.
| 39. INSTALL FRONT DOOR SCUFF PLATE RH |
| 40. INSTALL FRONT SEAT ASSEMBLY RH (for Hi-back Seat Type) |
Perform the same procedure as above on the opposite side.
| 41. INSTALL FRONT SEAT ASSEMBLY RH (for Low-back Seat Type) |
Perform the same procedure as above on the opposite side.
| 42. INSTALL FRONT WHEEL |
| 43. CONNECT BATTERY NEGATIVE TERMINAL |
| 44. ADD ENGINE COOLANT |
Firmly tighten the drain plugs and fill the radiator reserve tank assembly with coolant to the top of the inlet.
Loosen the bleeder plug of outlet housing.
When air is bled and the coolant drains out, firmly install the bleeder plug.
Add coolant up to the B line mark in the radiator reserve tank assembly and install the radiator cap.
| Condition | Capacity |
| w/ rear heater | 17.0 liters (18.0 US qts, 15.0 imp. qts) |
| w/o rear heater | 15.0 liters (15.9 US qts, 13.2 imp. qts) |
Warm up the engine.
After the engine cools down check that the coolant level is between the LOW and FULL level marks.
| 45. BLEED FUEL LINE |
Move the priming pump in the upper part of the fuel filter assembly up and down, and fill the injection pump assembly and fuel system with fuel.
| 46. CHECK FUEL LEAK |
PERFORM ACTIVE TEST
Connect the intelligent tester to the DLC3.
Turn the ignition switch on.
Turn the intelligent tester on.
Enter the following menus: Powertrain / ECD / Active Test.
Perform the Active Test.
| Intelligent Tester Display | Test Details | Control Range | Diagnostic Notes |
| Test the Fuel Leak | Pressurizes common rail internal fuel pressure, and checks for fuel leaks | Stop/Start |
|
| 47. CHECK FOR ENGINE OIL LEAKS |
| 48. CHECK FOR ENGINE COOLANT LEAKS |
Fill the radiator with coolant and attach a radiator cap tester to the radiator.
Warm up the engine.
Using a radiator cap tester, increase the pressure inside the radiator to 137 kPa (1.4 kgf/cm2, 19.9 psi), and check that the pressure does not drop.
| 49. CHECK EXHAUST LEAKAGE |
| 50. INSTALL ENGINE UNDER COVER NO.1 (w/ Engine Under Cover No.1) |
| 51. CHECK IDLE SPEED |
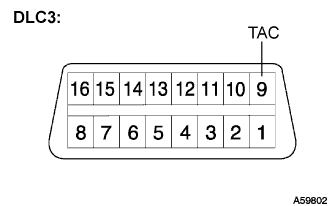
Connect the intelligent tester to the DLC3.
![]() |
If the tester is not available, connect a tester probe of a tachometer to terminal 9 (TAC) of the DLC3 with SST.
Start the engine and check the idle speed.
In case of the tester probe of the tachometer is connected to the DLC3, disconnect the tester probe from terminal 9 of the DLC3 with SST.
Disconnect the intelligent tester from the DLC3.
| 52. INSPECT MAXIMUM ENGINE SPEED |
Connect the intelligent tester to the DLC3.
![]() |
If the tester is not available, connect a tester probe of a tachometer to terminal 9 (TAC) of the DLC3 with SST.
Start the engine.
Depress the accelerator pedal all the way to the limit.
Check the maximum speed.
In case of the tester probe of the tachometer is connected to the DLC3, disconnect the tester probe from terminal 9 of the DLC3 with SST.
Disconnect the intelligent tester from the DLC3.
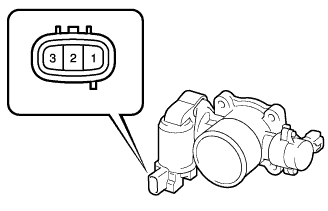
| 53. CHECK FUNCTION OF THROTTLE BODY |
Inspect the throttle control motor.
![]() |
Using an ohmmeter, measure the resistance between the terminals.
| Tester Connection | Specified Condition |
| 1 (DUTY) - Body ground | 2 Ω to 10 kΩ |
| 54. PERFORM INITIALIZATION |