Speedometer Malfunction
Circuit diagnosis · Vehicles built Oct 2014 – Dec 2014
Versions by build date: Oct 2014 – Dec 2014 Jan 2015 – Dec 2016 from Jan 2017
WIRING DIAGRAM
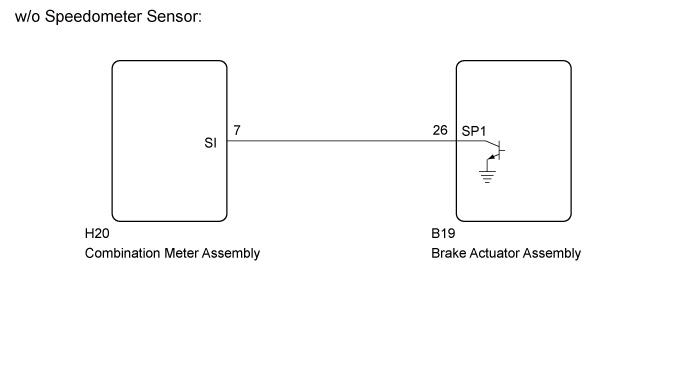

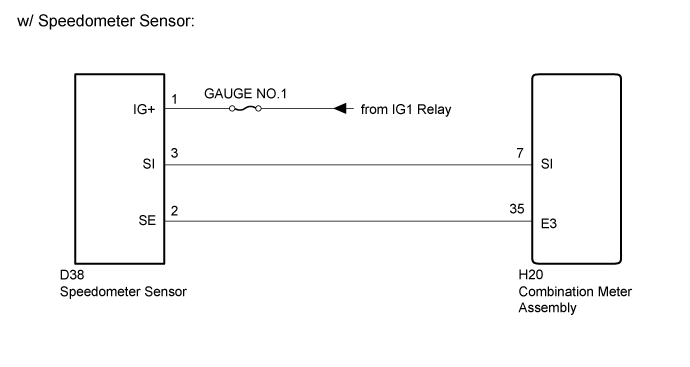
INSPECTION PROCEDURE
- NOTICE:
- Inspect the fuses for circuits related to this system before performing the following inspection procedure.
| 1. PERFORM ACTIVE TEST USING GTS (SPEED METER OPERATION) |

Use the Active Test to check the operation of the speedometer (Click here).
Combination Meter Tester Display
Test Part
Control Range
Diagnostic Note
Speed Meter Operation
Speedometer
OFF, 0, 40 or 80 (mph)*1
Acceptable range (mph): [Control range → Speedometer display]- 40 → 42.0 to 44.5
- 80 → 83.1 to 87.1
OFF, 0, 40, 80, 120 or 160 (km/h)*2
Acceptable range (km/h): [Control range → Speedometer display]*3- 40 → 41.7 to 46.2
- 80 → 83.4 to 88.4
- 120 → 125.1 to 130.6
- 160 → 166.2 to 173.2
Acceptable range (km/h): [Control range → Speedometer display]*4- 40 → 41.0 to 45.5
- 80 → 82.0 to 87.0
- 120 → 122.8 to 128.3
- 160 → 163.8 to 170.3
Acceptable range (km/h): [Control range → Speedometer display]*5- 40 → 41.3 to 45.8
- 80 → 82.6 to 87.6
- 120 → 123.9 to 128.9
- 160 → 165.2 to 170.2
Acceptable range (km/h): [Control range → Speedometer display]*6- 40 → 40.2 to 44.5
- 80 → 80.5 to 85.5
- 120 → 120.7 to 126.2
- 160 → 160.9 to 167.4
- *1: for mph
- *2: for km/h
- *3: except Australia
- *4: except 1KD-FTV, Manual Transmission (for Australia)
- *5: for 1KD-FTV, Manual Transmission (for Australia)
- *6: for Automatic Transmission (for Australia)
- OK:
- Needle indication is normal.
- 40 → 42.0 to 44.5
|
|
||||

| OK | |
 |
| 2. READ VALUE USING GTS (VEHICLE SPEED METER) |
Use the Data List to check if the speedometer is operating properly (Click here).
Combination Meter Tester Display
Measurement Item/Range
Normal Condition
Diagnostic Note
Vehicle Speed Meter
Vehicle speed / Min.: 0 km/h (0 mph), Max.: 255 km/h (158 mph)
Almost same as actual vehicle speed
-
- OK:
- Vehicle speed displayed on the GTS is almost the same as the actual vehicle speed measured using a speedometer tester (calibrated chassis dynamometer).
Result Result
Proceed to
OK
A
NG (w/o Speedometer Sensor)
B
NG (w/ Speedometer Sensor)
C
|
|
||||
|
|
||||

| A | ||
 |
||
| ||
| 3. READ VALUE USING GTS (VEHICLE SPEED) |
Use the Data List to check if the speedometer is operating properly (Click here).
ABS/VSC/TRC (w/ ABS) Tester Display
Measurement Item/Range
Normal Condition
Diagnostic Note
Vehicle Speed
Vehicle speed / Min.: 0 km/h (0 mph), Max.: 326 km/h (202 mph)
Almost same as actual vehicle speed measured using speedometer tester
-
- OK:
- Vehicle speed displayed on the GTS is almost the same as the actual vehicle speed measured using a speedometer tester (calibrated chassis dynamometer).
|
|
||||
| OK | |
|
| 4. CHECK COMBINATION METER ASSEMBLY (OUTPUT SIGNAL) |
Disconnect the brake actuator assembly connector.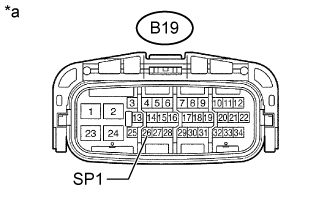
Measure the voltage according to the value(s) in the table below.
- Standard Voltage:
Tester Connection
Condition
Specified Condition
B19-26 (SP1) - Body ground
Ignition switch ON
11 to 14 V
Text in Illustration *a
Front view of wire harness connector
(to Brake Actuator Assembly)
|
|
||||
| OK | |
|
| 5. CHECK COMBINATION METER ASSEMBLY (INPUT SIGNAL) |
Check the input signal waveform using an oscilloscope.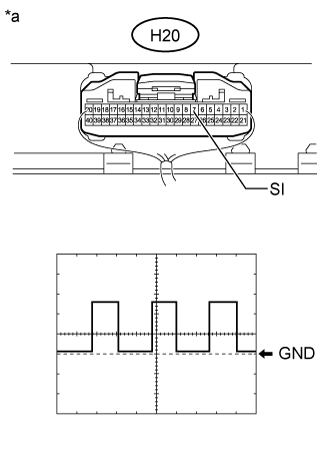
Item
Condition
Tester Connection
H20-7 (SI) - Body ground
Tool Setting
5 V/DIV., 20 ms/DIV.
Vehicle Condition
Ignition switch ON, driving at approximately 20 km/h (12 mph)
- OK:
- The correct waveform appears as shown in the illustration.
- HINT:
- As vehicle speed increases, the cycle of the signal waveform narrows.
Text in Illustration *a
Component with harness connected
(Combination Meter Assembly)
|
|
||||
| OK | ||
|
||
| ||
| 6. CHECK HARNESS AND CONNECTOR (COMBINATION METER ASSEMBLY - BRAKE ACTUATOR ASSEMBLY) |
Disconnect the H20 combination meter assembly connector.
Disconnect the B19 brake actuator assembly connector.
Measure the resistance according to the value(s) in the table below.
- Standard Resistance:
Tester Connection
Condition
Specified Condition
H20-7 (SI) - B19-26 (SPI)
Always
Below 1 Ω
H20-7 (SI) or B19-26 (SPI) - Body ground
Always
10 kΩ or higher
|
|
||||
| OK | ||
|
||
| ||
| 7. CHECK COMBINATION METER ASSEMBLY |
Check the input signal waveform using an oscilloscope.
Item
Condition
Tester Connection
H20-7 (SI) - Body ground
Tool Setting
5 V/DIV., 20 ms/DIV.
Vehicle Condition
Ignition switch ON, driving at approximately 20 km/h (12 mph)
- OK:
- The correct waveform appears as shown in the illustration.
- HINT:
- As vehicle speed increases, the cycle of the signal waveform narrows.
Text in Illustration *a
Component with harness connected
(Combination Meter Assembly)
|
|
||||
| OK | ||
|
||
| ||
| 8. CHECK HARNESS AND CONNECTOR (SPEEDOMETER SENSOR - COMBINATION METER ASSEMBLY AND BATTERY) |
Disconnect the D38 speedometer sensor connector.
Disconnect the H20 combination meter assembly connector.
Measure the voltage according to the value(s) in the table below.
- Standard Voltage:
Tester Connection
Switch Condition
Specified Condition
D38-1 (IG+) - Body ground
Ignition switch ON
11 to 14 V
Measure the resistance according to the value(s) in the table below.
- Standard Resistance:
Tester Connection
Condition
Specified Condition
D38-3 (SI) - H20-7 (SI)
Always
Below 1 Ω
D38-2 (SE) - H20-35 (E3)
Always
Below 1 Ω
D38-3 (SI) or H20-7 (SI) - Body ground
Always
10 kΩ or higher
D38-2 (SE) or H20-35 (E3) - Body ground
Always
10 kΩ or higher
Result Result
Proceed to
OK (for 1KD-FTV)
A
OK (for 2KD-FTV)
B
NG
C
|
|
||||
|
|
||||
| A | ||
|
||
| ||