C1337/37 Diameter of the Tire is not Uniform
Diagnostic trouble codes · Vehicles built Jan 2015 – Dec 2016
Versions by build date: Oct 2014 – Dec 2014 Jan 2015 – Dec 2016 from Jan 2017
DESCRIPTION
The skid control ECU measures the speed of each wheel by receiving signals from the speed sensors. These signals are used for recognizing that all 4 wheels are operating properly. Therefore, all wheel signals must be equal.| DTC No. |
DTC Detection Condition |
Trouble Area |
| C1337/37 |
With the vehicle speed 20 km/h (12 mph) or higher, an average vehicle speed difference between the front and rear wheels continuously exceeding 20% for 20 seconds is detected 3 times consecutively. |
|
WIRING DIAGRAM
Front speed sensor circuit: Refer to DTCs C0200/31, C0205/32, C1235/35 and C1236/36 (Click here).Rear speed sensor circuit: Refer to DTCs C0210/33, C0215/34, C1238/38 and C1239/39 (Click here).
INSPECTION PROCEDURE
| 1. CHECK TIRE SIZE |

Check the size and condition of all 4 tires.
|
|
||||

| OK | |
 |
| 2. CHECK HARNESS AND CONNECTOR (BRAKE ACTUATOR ASSEMBLY - SPEED SENSOR) |
Turn the ignition switch off.
Make sure that there is no looseness at the locking part and the connecting part of the connectors.
Disconnect the B19 skid control ECU (brake actuator assembly) connector and the B18, B20 and/or P1 speed sensor connector.
Measure the resistance according to the value(s) in the table below.
- Standard Resistance:
for Front RH Tester Connection
Condition
Specified Condition
B19-31 (FR+) - B18-2
Always
Below 1 Ω
B19-31 (FR+) or B18-2 - Body ground
Always
10 kΩ or higher
B19-30 (FR-) - B18-1
Always
Below 1 Ω
B19-30 (FR-) or B18-1 - Body ground
Always
10 kΩ or higher
for Front LH Tester Connection
Condition
Specified Condition
B19-9 (FL+) - B20-2
Always
Below 1 Ω
B19-9 (FL+) or B20-2 - Body ground
Always
10 kΩ or higher
B19-8 (FL-) - B20-1
Always
Below 1 Ω
B19-8 (FL-) or B20-1 - Body ground
Always
10 kΩ or higher
for Rear RH Tester Connection
Condition
Specified Condition
B19-33 (RR+) - P1-4 (RR+)
Always
Below 1 Ω
B19-33 (RR+) or P1-4 (RR+) - Body ground
Always
10 kΩ or higher
B19-34 (RR-) - P1-3 (RR-)
Always
Below 1 Ω
B19-34 (RR-) or P1-3 (RR-) - Body ground
Always
10 kΩ or higher
for Rear LH Tester Connection
Condition
Specified Condition
B19-11 (RL+) - P1-2 (RL+)
Always
Below 1 Ω
B19-11 (RL+) or P1-2 (RL+) - Body ground
Always
10 kΩ or higher
B19-12 (RL-) - P1-1 (RL-)
Always
Below 1 Ω
B19-12 (RL-) or P1-1 (RL-) - Body ground
Always
10 kΩ or higher
- Result:
Result
Proceed to
OK (for Rear LH)
A
OK (for Front RH, Front LH or Rear RH)
B
NG
C
|
|
||||
|
|
||||

| A | |
|
| 3. INSPECT REAR SPEED SENSOR RH |
Turn the ignition switch off.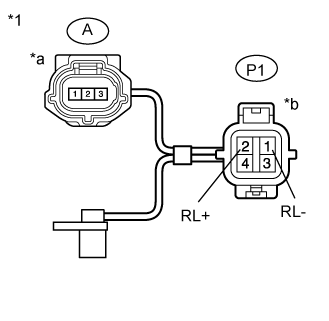

Make sure that there is no looseness at the locking part and the connecting part of the connectors.
Disconnect the A rear speed sensor RH connector.
Measure the resistance according to the value(s) in the table below.
- Standard Resistance:
Tester Connection
Condition
Specified Condition
A-3 - P1-1 (RL-)
Always
Below 1 Ω
A-3 or P1-1 (RL-) - Body ground
Always
10 kΩ or higher
A-1 - P1-2 (RL+)
Always
Below 1 Ω
A-1 or P1-2 (RL+) - Body ground
Always
10 kΩ or higher
Text in Illustration *1
Rear Speed Sensor RH
*a
Front view of wire harness connector
(to Sensor Side Connector)
*b
Front view of wire harness connector
(to Vehicle Side Connector)
- NOTICE:
- Check the speed sensor signal after replacement (Click here).
|
|
||||
| OK | |
|
| 4. INSPECT BRAKE ACTUATOR ASSEMBLY |
Reconnect the B19 skid control ECU (brake actuator assembly) connector.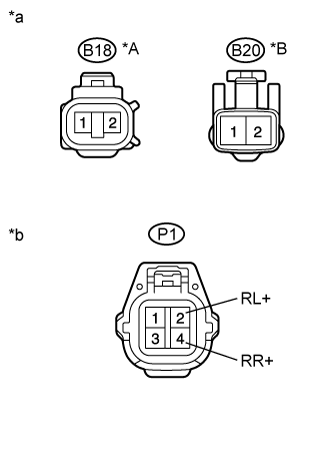
Turn the ignition switch to ON.
Measure the voltage according to the value(s) in the table below.
- Standard Voltage:
for Front RH Tester Connection
Switch Condition
Specified Condition
B18-2 - Body ground
Ignition switch ON
5.7 to 14 V
for Front LH Tester Connection
Switch Condition
Specified Condition
B20-2 - Body ground
Ignition switch ON
5.7 to 14 V
for Rear RH Tester Connection
Switch Condition
Specified Condition
P1-4 (RR+) - Body ground
Ignition switch ON
5.7 to 14 V
for Rear LH Tester Connection
Switch Condition
Specified Condition
P1-2 (RL+) - Body ground
Ignition switch ON
5.7 to 14 V
Text in Illustration *A
for Front RH
*B
for Front LH
*a
Front view of wire harness connector
(to Front Speed Sensor)
*b
Front view of wire harness connector
(to Rear Speed Sensor RH)
|
|
||||
| OK | |
|
| 5. RECONFIRM DTC |
Disconnect the B18, B20 and/or P1 speed sensor connector.
Clear the DTCs (Click here).
Drive the vehicle at a speed of approximately 30 km/h (19 mph) or more for 60 seconds or more.
Check that the same DTC is recorded (Click here).
- Result:
Result
Proceed to
DTC is not output
A
DTC is output
B
|
|
||||
| A | ||
 |
||
| ||
| 6. INSPECT SPEED SENSOR TIP |
Remove the front speed sensor (Click here).
Remove the rear speed sensor (Click here).
Check the sensor tip.
- OK:
- No scratches or foreign matter on the sensor tip.
- NOTICE:
- If no damage to the speed sensor tip is found during this inspection, do not replace the speed sensor.
- If there is iron powder sticking to the rotor, this will result in a malfunction, so confirm that the rotor is not contaminated with foreign material before replacing the sensor.
- Check the speed sensor signal after cleaning or replacement (Click here).
- If no damage to the speed sensor tip is found during this inspection, do not replace the speed sensor.
|
|
||||
| OK | ||
|
||
| ||