VC Output Circuit
Circuit diagnosis · Vehicles built Dec 2015 – Mar 2016
Versions by build date: Oct 2014 – Dec 2014 Jan 2015 – Nov 2015 Dec 2015 – Mar 2016 Apr 2016 – Dec 2016 from Jan 2017
DESCRIPTION
The ECM constantly generates 5 V of power from the battery voltage supplied to the +B (BATT) terminal to operate the microprocessor. The ECM also provides this power to the sensors through the VC output circuit.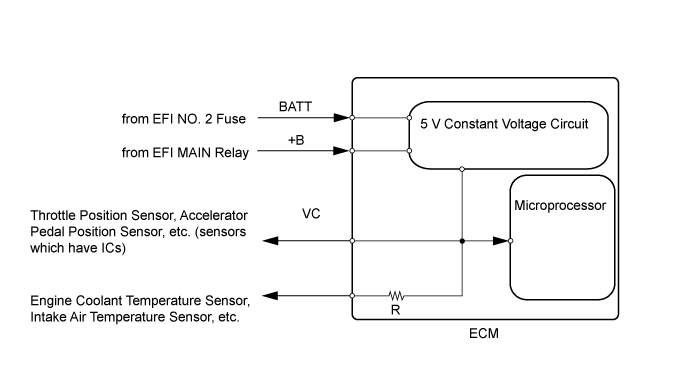

When the VC circuit is short-circuited, the microprocessor in the ECM and sensors that are supplied with power through the VC circuit are inactivated because the power is not supplied from the VC circuit. Under this condition, the system does not start up and the MIL does not illuminate even if the system malfunctions.
- HINT:
- Under normal conditions, the MIL is illuminated for several seconds when the ignition switch is first turned to ON. The MIL goes off when the engine is started.
WIRING DIAGRAM
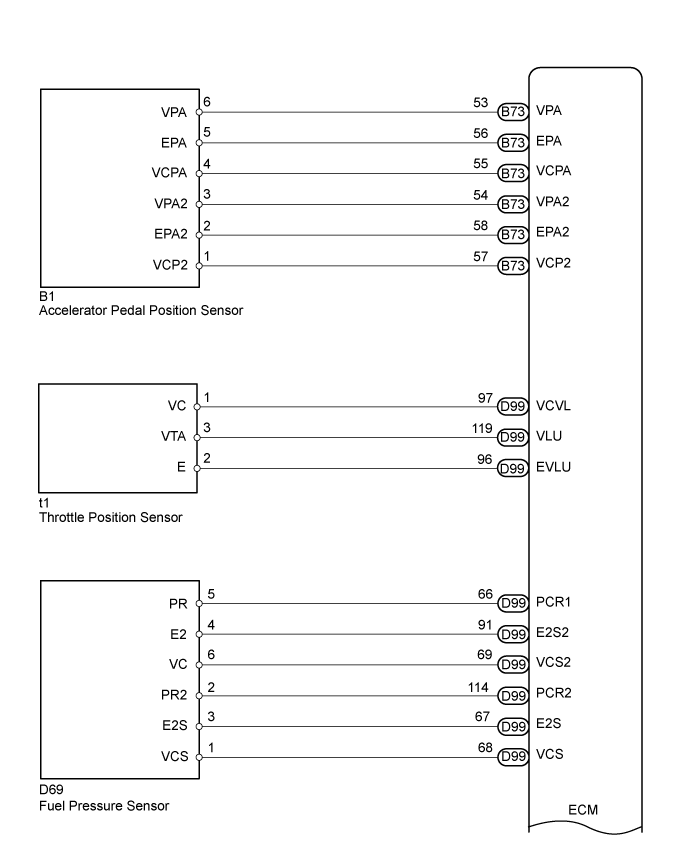
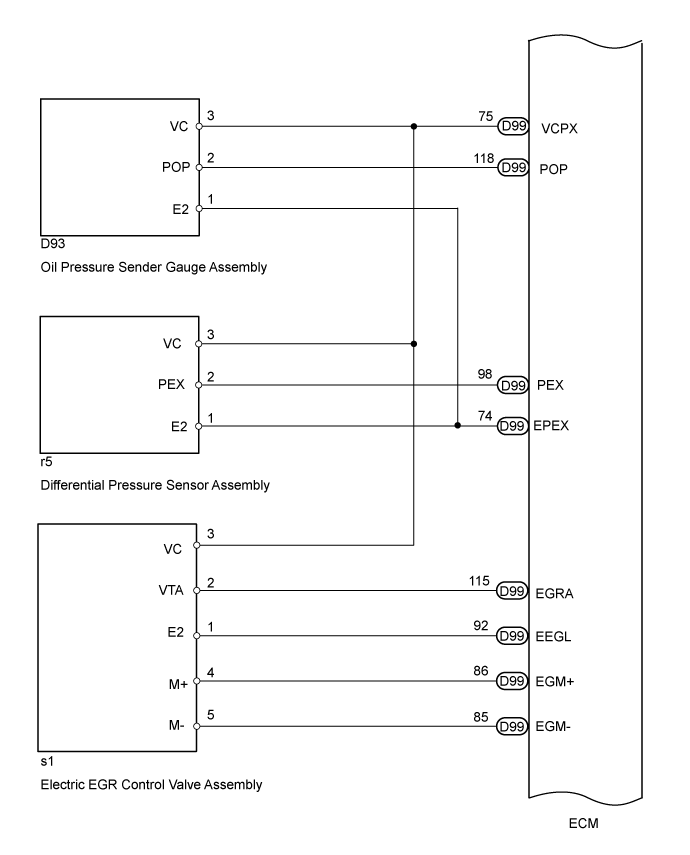
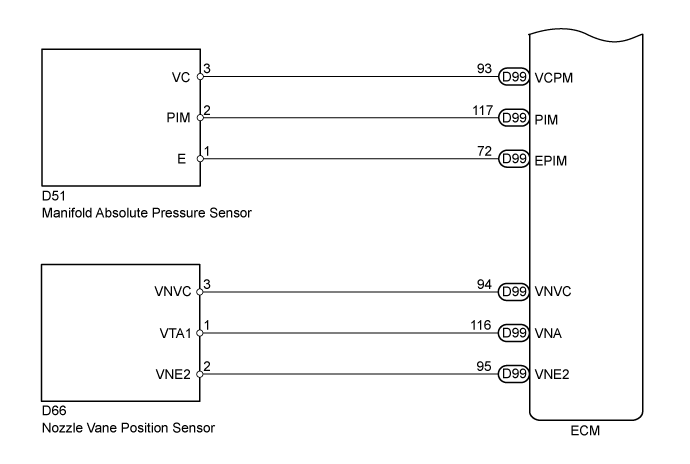
INSPECTION PROCEDURE
- NOTICE:
- Inspect the fuses of circuits related to this system before performing the following inspection procedure.
- After replacing the ECM, the new ECM needs registration (Click here) and initialization (Click here).
- After replacing the fuel supply pump assembly, the ECM needs initialization (Click here).
- After replacing an injector assembly, the ECM needs registration (Click here).
- Inspect the fuses of circuits related to this system before performing the following inspection procedure.
| 1. CHECK MIL |

Check that the Malfunction Indicator Lamp (MIL) lights up when turning the ignition switch to ON.
Result Result
Proceed to
MIL illuminates
A
MIL does not illuminate
B
|
|
||||

| B | |
 |
| 2. CHECK COMMUNICATION BETWEEN GTS AND ECM |
Connect the GTS to the DLC3.
Turn the ignition switch to ON and GTS on.
Check the communication between the GTS and ECM.
Result Result
Proceed to
Communication is possible
A
Communication is not possible
B
|
|
||||
| B | |
|
| 3. CHECK MIL (ACCELERATOR PEDAL POSITION SENSOR) |
Disconnect the accelerator pedal position sensor connector.
Turn the ignition switch to ON.
Check the MIL.
Result Result
Proceed to
MIL illuminates
A
MIL does not illuminate
B
Reconnect the accelerator pedal position sensor connector.
|
|
||||
| B | |
|
| 4. CHECK MIL (THROTTLE POSITION SENSOR) |
Disconnect the throttle position sensor connector.
Turn the ignition switch to ON.
Check the MIL.
Result Result
Proceed to
MIL illuminates
A
MIL does not illuminate
B
Reconnect the throttle position sensor connector.
|
|
||||
| B | |
|
| 5. CHECK MIL (FUEL PRESSURE SENSOR) |
Disconnect the fuel pressure sensor connector.
Turn the ignition switch to ON.
Check the MIL.
Result Result
Proceed to
MIL illuminates
A
MIL does not illuminate
B
Reconnect the fuel pressure sensor connector.
|
|
||||
| B | |
|
| 6. CHECK MIL (ELECTRIC EGR CONTROL VALVE ASSEMBLY) |
Disconnect the electric EGR control valve assembly connector.
Turn the ignition switch to ON.
Check the MIL.
Result Result
Proceed to
MIL illuminates
A
MIL does not illuminate
B
Reconnect the electric EGR control valve assembly connector.
|
|
||||
| B | |
|
| 7. CHECK MIL (OIL PRESSURE SENDER GAUGE ASSEMBLY) |
Disconnect the oil pressure sender gauge assembly connector.
Turn the ignition switch to ON.
Check the MIL.
Result Result
Proceed to
MIL illuminates
A
MIL does not illuminate
B
Reconnect the oil pressure sender gauge assembly connector.
|
|
||||
| B | |
|
| 8. CHECK MIL (DIFFERENTIAL PRESSURE SENSOR ASSEMBLY) |
Disconnect the differential pressure sensor assembly connector.
Turn the ignition switch to ON.
Check the MIL.
Result Result
Proceed to
MIL illuminates
A
MIL does not illuminate
B
Reconnect the differential pressure sensor assembly connector.
|
|
||||
| B | |
|
| 9. CHECK MIL (MANIFOLD ABSOLUTE PRESSURE SENSOR) |
Disconnect the manifold absolute pressure sensor connector.
Turn the ignition switch to ON.
Check the MIL.
Result Result
Proceed to
MIL illuminates
A
MIL does not illuminate
B
Reconnect the manifold absolute pressure sensor connector.
|
|
||||
| B | |
|
| 10. CHECK MIL (NOZZLE VANE POSITION SENSOR) |
Disconnect the nozzle vane position sensor connector.
Turn the ignition switch to ON.
Check the MIL.
Result Result
Proceed to
MIL illuminates
A
MIL does not illuminate
B
Reconnect the nozzle vane position sensor connector.
|
|
||||
| B | |
|
| 11. CHECK HARNESS AND CONNECTOR |
Disconnect the accelerator pedal position sensor connector.
Disconnect the throttle position sensor connector.
Disconnect the fuel pressure sensor connector.
Disconnect the electric EGR control valve assembly connector.
Disconnect the oil pressure sender gauge assembly connector.
Disconnect the differential pressure sensor assembly connector.
Disconnect the nozzle vane position sensor connector.
Disconnect the manifold absolute pressure sensor connector.
Disconnect the ECM connectors.
Measure the resistance according to the value(s) in the table below.
- Standard Resistance:
Tester Connection
Condition
Specified Condition
B73-55 (VCPA) - Body ground
Always
10 kΩ or higher
B73-57 (VCP2) - Body ground
Always
10 kΩ or higher
D99-97 (VCVL) - Body ground
Always
10 kΩ or higher
D99-69 (VCS2) - Body ground
Always
10 kΩ or higher
D99-68 (VCS) - Body ground
Always
10 kΩ or higher
D99-75 (VCPX) - Body ground
Always
10 kΩ or higher
D99-93 (VCPM) - Body ground
Always
10 kΩ or higher
D99-94 (VNVC) - Body ground
Always
10 kΩ or higher
Reconnect the accelerator pedal position sensor connector.
Reconnect the throttle position sensor connector.
Reconnect the fuel pressure sensor connector.
Reconnect the electric EGR control valve assembly connector.
Reconnect the oil pressure sender gauge assembly connector.
Reconnect the differential pressure sensor assembly connector.
Reconnect the nozzle vane position sensor connector.
Reconnect the manifold absolute pressure sensor connector.
Reconnect the ECM connectors.
|
|
||||
| OK | ||
 |
||
| ||