AC60E AUTOMATIC TRANSMISSION / TRANSAXLE AUTOMATIC TRANSMISSION ASSEMBLY(for 1GD-FTV) REMOVAL
CAUTION / NOTICE / HINT
The necessary procedures (adjustment, calibration, initialization, or registration) that must be performed after parts are removed, installed, or replaced during the automatic transmission assembly removal/installation are shown below.
| Replacement Part or Procedure | Necessary Procedures | Effects/Inoperative when not Performed | Link |
|---|---|---|---|
| Battery terminal is disconnected/reconnected | Memorize steering angle neutral point | Parking assist monitor system | ( ) |
| Panoramic view monitor system | |||
w/ Stop and Start System:
Starter assembly
|
Clear the number of starter operations | Stop and start system | ()
|
| Automatic transmission assembly | Reset memory | ·
Large shift shock ·
Engine overruns |
for 1GD-FTV:()
for 1GD-FTV for EGR with Exhaust Gas Temperature Sensor:( )
|
| Automatic transmission fluid | ATF thermal degradation estimate reset | The value of the Data List item "ATF Thermal Degradation Estimate" is not estimated correctly |
- HINT:
-
When the cable is disconnected / reconnected to the battery terminal, systems temporarily stop operating. However, each system has a function that completes learning the first time the system is used.
- ·
Learning completes when vehicle is driven
Effect/Inoperative Function When Necessary Procedures are not Performed Necessary Procedures Link Stop and start system Drive the vehicle until stop and start control is permitted (approximately 5 to 60 minutes). ( )
Lane control system Drive the vehicle straight ahead at 15 km/h (10 mph) or more for 1 second or more. ( )
Pre-collision system
·Learning completes when vehicle is operated normally
Effect/Inoperative Function When Necessary Procedures are not Performed Necessary Procedures Link Power slide door system Fully close the slide door by hand.
- HINT:
-
Initialization is not necessary if the above procedures are performed while the slide door is closed.
( )
Air conditioning system After the ignition switch is turned to ON, the servo motor standard position is recognized. -
- CAUTION:
- ·
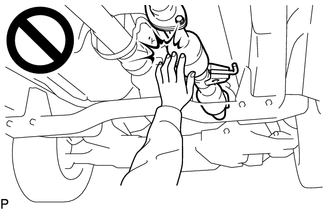
To prevent burns, do not touch the engine, exhaust pipe or other high temperature components while the engine is hot.
·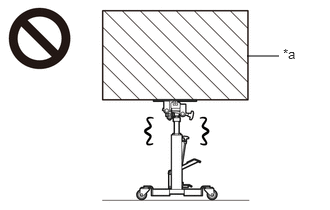 2.573,0.583 2.906,0.583 false 2.948,0.479 3.26,0.677 0.313,0.198 10 false *a
*a Object Exceeding Weight Limit of Transmission Jack
The automatic transmission assembly is very heavy. Be sure to follow the procedure described in the repair manual, or the transmission jack may suddenly drop or a part may fall.
PROCEDURE

 1. PRECAUTION
- NOTICE:
-
After turning the ignition switch off, waiting time may be required before disconnecting the cable from the battery terminal. Therefore, make sure to read the disconnecting the cable from the battery terminal notice before proceeding with work.
-
Click hereGeneral>INTRODUCTION>REPAIR INSTRUCTION>PRECAUTION
2.DISCONNECT CABLE FROM NEGATIVE BATTERY TERMINAL
3.DRAIN AUTOMATIC TRANSMISSION FLUID
37100
4.REMOVE PROPELLER WITH CENTER BEARING SHAFT ASSEMBLY
for Standard Roof:
Click hereDrivetrain>DRIVE SHAFT / PROPELLER SHAFT>PROPELLER SHAFT ASSEMBLY (for Standard Roof)>REMOVAL
for High Roof:
Click hereDrivetrain>DRIVE SHAFT / PROPELLER SHAFT>PROPELLER SHAFT ASSEMBLY (for High Roof)>REMOVAL
17410
5.REMOVE FRONT EXHAUST PIPE ASSEMBLY
28100
6.REMOVE STARTER ASSEMBLY
for 2.0 kW Type:
Click hereEngine / Hybrid System>1GD-FTV (STARTING)>STARTER (for 2.0 kW Type)>REMOVAL
for 3.0 kW Type:
Click hereEngine / Hybrid System>1GD-FTV (STARTING)>STARTER (for 3.0 kW Type)>REMOVAL
w/ Stop and Start System:
Click hereEngine / Hybrid System>1GD-FTV (STARTING)>STARTER (w/ Stop And Start System)>REMOVAL
33820B
7.DISCONNECT TRANSMISSION CONTROL CABLE ASSEMBLY
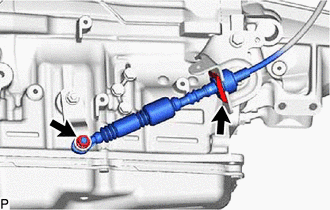
Remove the clip and nut and disconnect the transmission control cable assembly from the transmission control shaft lever LH and transmission control cable bracket.
35979B
8.REMOVE TRANSMISSION INSULATOR RH
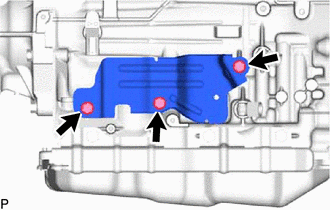
Remove the 3 bolts and transmission insulator RH from the automatic transmission assembly.
3516A
9.REMOVE TRANSMISSION OIL PAN HEAT INSULATOR
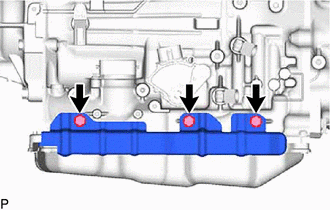
Remove the 3 bolts and transmission oil pan heat insulator from the automatic transmission assembly.
32921
10.DISCONNECT NO. 1 OIL COOLER INLET TUBE AND NO. 1 OIL COOLER OUTLET TUBE
33119B
11.REMOVE STIFFENER PLATE LH (ATM)
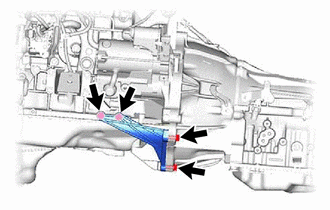
Remove the 4 bolts and stiffener plate LH (ATM) from the automatic transmission assembly and engine assembly.
33118B
12.REMOVE STIFFENER PLATE RH (ATM)
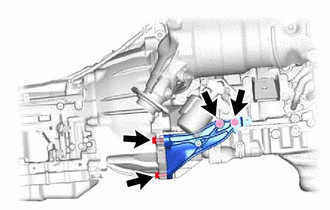
Remove the 4 bolts, stiffener plate RH (ATM) and wire harness clamp bracket from the automatic transmission assembly and engine assembly.
12584
13.REMOVE NO. 4 CYLINDER BLOCK INSULATOR
Remove the No. 4 cylinder block insulator from the engine assembly.
11356A
14.REMOVE NO. 2 REAR END PLATE
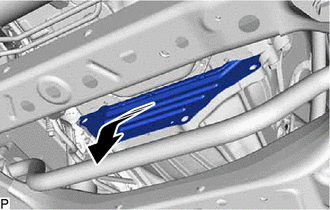

|
Remove |
Remove the No. 2 rear end plate from the automatic transmission assembly.
15.REMOVE DRIVE PLATE AND TORQUE CONVERTER ASSEMBLY SETTING BOLT
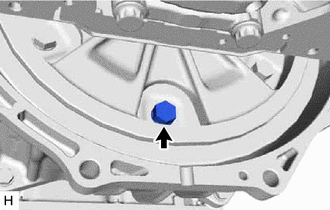
Turn the crankshaft to gain access to the removable locations of the 6 drive plate and torque converter assembly setting bolts and remove each bolt while holding the crankshaft pulley bolt with a wrench.
35000
16.SUPPORT AUTOMATIC TRANSMISSION ASSEMBLY
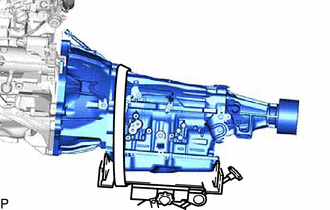
Support the automatic transmission assembly with a transmission jack.
- NOTICE:
- ·
In order to protect the automatic transmission oil pan sub-assembly, place attachments on the transmission jack.
·Make sure that the attachments and the automatic transmission oil pan sub-assembly are centered on the transmission jack.
·To prevent the automatic transmission oil pan sub-assembly from deforming, do not place any attachments under the automatic transmission oil pan sub-assembly of the automatic transmission assembly.
·Secure the automatic transmission assembly to the transmission jack using a belt, etc. to prevent it from falling.
57209B
17.REMOVE REAR ENGINE MOUNTING MEMBER SUB-ASSEMBLY
w/ Cover:
Remove the step plate cover RH.
Click hereEngine / Hybrid System>1GD-FTV (ENGINE MECHANICAL)>ENGINE ASSEMBLY>REMOVAL
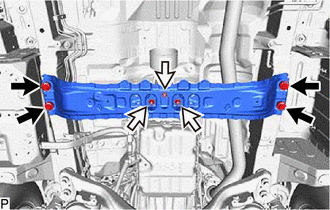

|
Bolt |

|
Nut |
Remove the 3 nuts from the rear engine mounting member sub-assembly.
Remove the 4 bolts and rear engine mounting member sub-assembly from the vehicle body.
12380
18.REMOVE REAR ENGINE MOUNTING INSULATOR ASSEMBLY
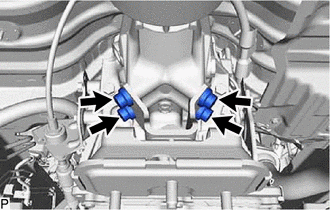
Remove the 4 bolts and rear engine mounting insulator assembly from the automatic transmission assembly.
82122A
19.DISCONNECT NO. 2 ENGINE WIRE
Tilt down the automatic transmission assembly.
- NOTICE:
-
Make sure that the cooling fan and fan shroud do not contact the engine assembly when tilting the automatic transmission assembly.
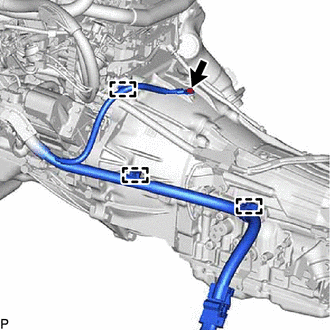
Remove the bolt from the automatic transmission assembly.
Detach the 3 clamps.
82121
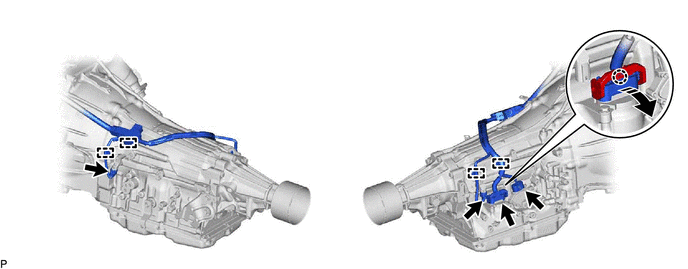
20.DISCONNECT ENGINE WIRE
Disconnect the park/neutral position switch assembly connector, transmission wire connector and 2 transmission revolution sensor connectors.
- HINT:
-
Detach the claw, press down the lever, and then disconnect the transmission wire connector.
|
|
Press Down | - | - |
Detach the 4 wire harness clamps and disconnect the engine wire from the 2 wire harness clamp brackets.
35000
21.REMOVE AUTOMATIC TRANSMISSION ASSEMBLY
Using an engine lifter, jacks, etc, support the engine at an angle where the automatic transmission assembly can be removed and in such a manner that the engine angle remains the same after the automatic transmission assembly is removed.
- NOTICE:
-
Make sure that the engine does not contact parts such as the body panel or fan shroud.
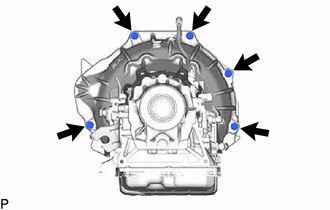
Remove the 5 bolts and automatic transmission assembly from the engine assembly.
- NOTICE:
-
To prevent damage to the 2 knock pins, do not pry between the automatic transmission assembly and engine assembly.
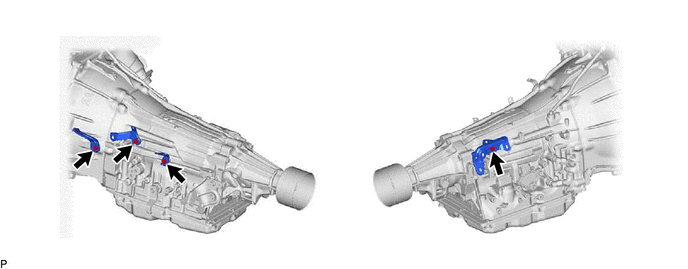
22.REMOVE WIRE HARNESS CLAMP BRACKET
Remove the 4 bolts and 4 wire harness clamp brackets from the automatic transmission assembly.
33829E
23.REMOVE TRANSMISSION CONTROL CABLE BRACKET
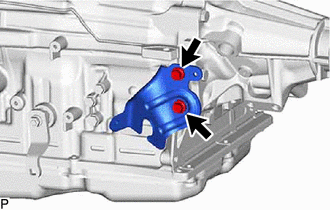
Remove the 2 bolts and transmission control cable bracket from the automatic transmission assembly.
32000
24.REMOVE TORQUE CONVERTER ASSEMBLY
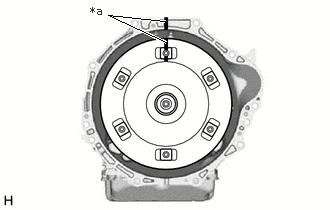
| *a | Matchmark |
Put matchmarks on the automatic transmission assembly and the torque converter assembly.
Remove the torque converter assembly from the automatic transmission assembly.
- NOTICE:
-
Remove the torque converter assembly from the input shaft horizontally.
32000
25.INSPECT TORQUE CONVERTER ASSEMBLY
32111
26.INSPECT PUMP IMPELLER DRIVE PLATE