P0171 System Too Lean (Bank 1)
Diagnostic trouble codes · Vehicles built from Jul 2010
Also covers:
- P0172 System Too Rich (Bank 1)
- P0174 System Too Lean (Bank 2)
- P0175 System Too Rich (Bank 2)
Versions by build date: May 2007 – Jul 2008 Aug 2008 – Jun 2010 from Jul 2010
DESCRIPTION
The fuel trim is related to the feedback compensation value, not to the basic injection time. The fuel trim consists of both the short-term and long-term fuel trims.The short-term fuel trim is fuel compensation that is used to constantly maintain the air fuel ratio at stoichiometric levels. The signal from the air fuel ratio sensor indicates whether the air fuel ratio is rich or lean compared to the stoichiometric ratio. This triggers a reduction in the fuel injection volume if the air fuel ratio is rich and an increase in the fuel injection volume if it is lean.
Factors such as individual engine differences, wear over time and changes in operating environment cause short-term fuel trim to vary from the central value. The long-term fuel trim, which controls overall fuel compensation, compensates for long-term deviations in the fuel trim from the central value caused by the short- term fuel trim compensation.
If both the short-term and long-term fuel trims are lean or rich beyond predetermined values, it is interpreted as a malfunction, and the ECM illuminates the MIL and sets a DTC.
| DTC No. |
DTC Detection Condition |
Trouble Area |
| P0171 P0174 |
With warm engine and stable air fuel ratio feedback, fuel trim considerably in error to lean side (2 trip detection logic) |
|
| P0172 P0175 |
With warm engine and stable air fuel ratio feedback, fuel trim considerably in error to rich side (2 trip detection logic) |
|
- HINT:
- When DTC P0171 or P0174 is set, the actual air fuel ratio is on the lean side. When DTC P0172 or P0175 is set, the actual air fuel ratio is on the rich side.
- If the vehicle runs out of fuel, the air fuel ratio is lean and DTC P0171 or P0174 may be set. The MIL is then illuminated.
- When the total of the short-term and long-term fuel trim values is within the malfunction threshold (and the engine coolant temperature is more than 75°C [167°F]), the system is functioning normally.
- When DTC P0171 or P0174 is set, the actual air fuel ratio is on the lean side. When DTC P0172 or P0175 is set, the actual air fuel ratio is on the rich side.
MONITOR DESCRIPTION
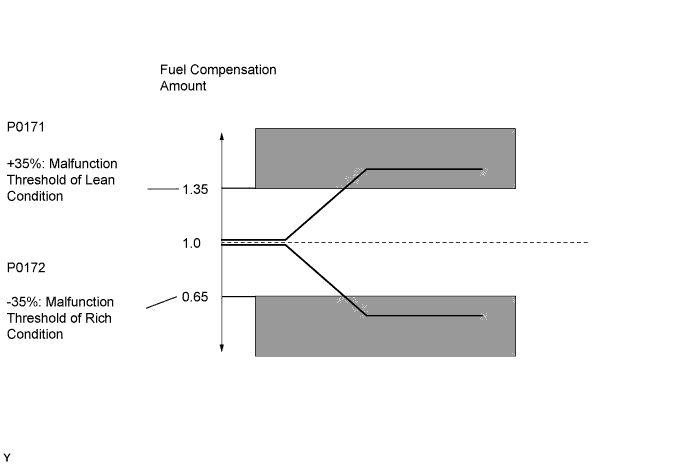
Under closed-loop fuel control, fuel injection volumes that deviate from those estimated by the ECM cause changes in the long-term fuel trim compensation value. The long-term fuel trim is adjusted when there are persistent deviations in the short-term fuel trim values. Deviations from the ECM's estimated fuel injection volumes also affect the average fuel trim learning value, which is a combination of the average short-term fuel trim (fuel feedback compensation value) and the average long-term fuel trim (learning value of the air fuel ratio). If the average fuel trim learning value exceeds the malfunction thresholds, the ECM interprets this a fault in the fuel system and sets a DTC.Example:
The average fuel trim learning value is more than +35% or less than -35%, the ECM interprets this as a fuel system malfunction.

WIRING DIAGRAM
Refer to DTC P0102 (Click here).Refer to DTC P2195 (Click here).
CONFIRMATION DRIVING PATTERN
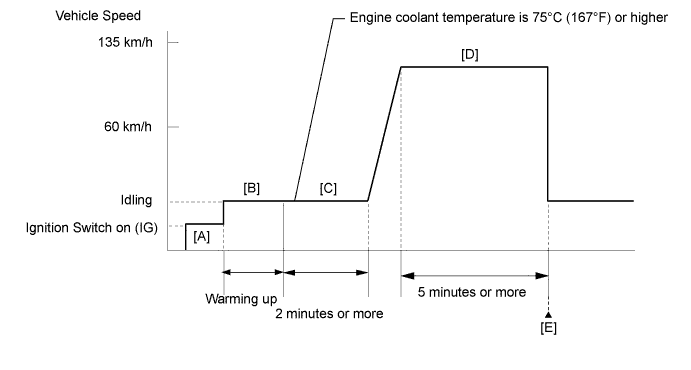
- Connect the intelligent tester to the DLC3.
- Turn the ignition switch on (IG) and turn the tester on.
- Clear DTCs (even if no DTCs are stored, perform the clear DTC operation).
- Turn the ignition switch off and wait for at least 30 seconds.
- Turn the ignition switch on (IG) and turn the tester on [A].
- Start the engine and warm it up until the engine coolant temperature is 75°C (167°F) or higher with all the accessories switched off [B].
- With the engine warmed up, idle the engine for 2 minutes or more [C].
- Drive the vehicle at a speed between 60 and 135 km/h (38 and 85 mph) for 5 minutes or more [D].
- CAUTION:
- When performing the confirmation driving pattern, obey all speed limits and traffic laws.
- Enter the following menus: Powertrain / Engine and ECT / DTC [E].
- Read the pending DTCs.
- HINT:
- If a pending DTC is output, the system is malfunctioning.
INSPECTION PROCEDURE
- NOTICE:
- Inspect the fuses for circuits related to this system before performing the following inspection procedure.
- HINT:
- Malfunctioning areas can be identified by performing the Control the Injection Volume for A/F Sensor function provided in the Active Test. The Control the Injection Volume for A/F Sensor function can help to determine whether the air fuel ratio sensor, heated oxygen sensor and other potential trouble areas are malfunctioning.
- The following instructions describe how to conduct the Control the Injection Volume for A/F Sensor operation using the intelligent tester.
- Connect the intelligent tester to the DLC3.
- Start the engine.
- Turn the tester on.
- Warm up the engine at an engine speed of 2500 rpm for approximately 90 seconds.
- Enter the following menus: Powertrain / Engine and ECT / Active Test / Control the Injection Volume for A/F Sensor.
- Perform the Active Test operation with the engine in an idling condition (press the RIGHT or LEFT button to change the fuel injection volume.)
- Monitor the output voltages of the air fuel ratio and heated oxygen sensors (AFS Voltage B1S1 or AFS Voltage B2S1 and O2S B1S2 or O2S B2S2) displayed on the tester.
- Connect the intelligent tester to the DLC3.
- HINT:
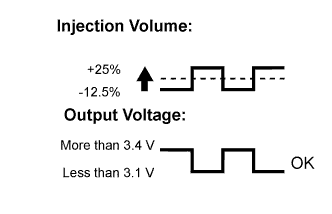
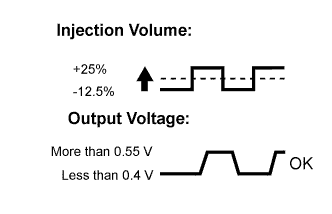
- The Control the Injection Volume for A/F sensor operation lowers the fuel injection volume by 12.5% or increases the injection volume by 25%.
- Each sensor reacts in accordance with increases and decreases in the fuel injection volume.
- The Control the Injection Volume for A/F sensor operation lowers the fuel injection volume by 12.5% or increases the injection volume by 25%.
| Tester Display |
Injection Volume |
Status |
Voltage |
| AFS Voltage B1S1 AFS Voltage B2S1 (Air fuel ratio sensor) |
+25% |
Rich |
Less than 3.1 V |
| -12.5% |
Lean |
More than 3.4 V |
|
| O2S B1S2 O2S B2S2 (Heated oxygen) |
+25% |
Rich |
More than 0.55 V |
| -12.5% |
Lean |
Less than 0.4 V |
- NOTICE:
- The air fuel ratio sensor has an output delay of a few seconds and the heated oxygen sensor has a maximum output delay of approximately 20 seconds.
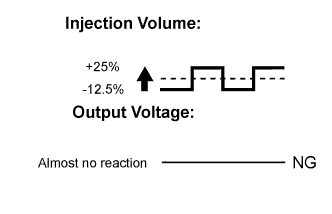
| Case |
Air Fuel Ratio Sensor (Sensor 1) Output Voltage |
Heated Oxygen Sensor (Sensor 2) Output Voltage |
Main Suspected Trouble Area |
| 1 |
 |
 |
- |
| 2 |
 |
|
|
| 3 |
|
|
|
| 4 |
|
|
|
- Following the Control the Injection Volume for A/F Sensor procedure enables technicians to check and graph the voltage outputs of both the air fuel ratio and heated oxygen sensors.
- To display the graph, enter the following menus:
Powertrain / Engine and ECT / Active Test / Control the Injection Volume for A/F Sensor / All Data / AFS Voltage B1S1 or AFS Voltage B2S1 and O2S B1S2 or O2S B2S2; then press the graph button on the Data List view.
- HINT:
- Read freeze frame data using the intelligent tester. Freeze frame data records the engine condition when malfunctions are detected. When troubleshooting, freeze frame data can help determine if the vehicle was moving or stationary, if the engine was warmed up or not, if the air fuel ratio was lean or rich, and other data from the time the malfunction occurred.
- Bank 1 refers to the bank that includes the No. 1 cylinder*.
*: The No. 1 cylinder is the cylinder which is farthest from the transmission.
- Bank 2 refers to the bank that does not include the No. 1 cylinder.
- Sensor 1 refers to the sensor closest to the engine assembly.
- Sensor 2 refers to the sensor farthest away from the engine assembly.
- A low air fuel ratio sensor voltage could be caused by a rich air fuel mixture. Check for conditions that would cause the engine to run rich.
- A high air fuel ratio sensor voltage could be caused by a lean air fuel mixture. Check for conditions that would cause the engine to run lean.
- Read freeze frame data using the intelligent tester. Freeze frame data records the engine condition when malfunctions are detected. When troubleshooting, freeze frame data can help determine if the vehicle was moving or stationary, if the engine was warmed up or not, if the air fuel ratio was lean or rich, and other data from the time the malfunction occurred.
| 1. CHECK ANY OTHER DTCS OUTPUT (IN ADDITION TO DTC P0171, P0172, P0174 OR P0175) |

Connect the intelligent tester to the DLC3.
Turn the ignition switch on (IG).
Turn the tester on.
Enter the following menus: Powertrain / Engine and ECT / DTC.
Read DTCs.
- Result:
Result
Proceed to
P0171, P0172, P0174 or P0175
A
P0171, P0172, P0174 or P0175 and other DTCs
B
- HINT:
- If any DTCs other than P0171, P0172, P0174 or P0175 are output, troubleshoot those DTCs first.
|
|
||||

| A | |
 |
| 2. CHECK PCV HOSE CONNECTIONS |
Check the PCV hose connections.
- OK:
- PCV hose is connected correctly and is not damaged.
|
|
||||
| OK | |
|
| 3. CHECK AIR INDUCTION SYSTEM |
Check the air induction system for vacuum leak (Click here).
- OK:
- No leak from air induction system.
|
|
||||
| OK | |
|
| 4. PERFORM ACTIVE TEST USING INTELLIGENT TESTER (CONTROL THE INJECTION VOLUME) |
Connect the intelligent tester to the DLC3.
Start the engine.
Turn the tester on.
Warm up the engine at an engine speed of 2500 rpm for approximately 90 seconds.
Enter the following menus: Powertrain / Engine and ECT / Active Test / Control the Injection Volume for A/F Sensor.
Perform the Control the Injection Volume for A/F Sensor operation with the engine in an idling condition (press the RIGHT or LEFT button to change the fuel injection volume).
Monitor the voltage outputs of the air fuel ratio sensor and the heated oxygen sensor (AFS Voltage B1S1 or AFS Voltage B2S1 and O2S B1S2 or O2S B2S2) displayed on the tester.
- HINT:
- The Control the Injection Volume for A/F Sensor operation lowers the fuel injection volume by 12.5% or increases the injection volume by 25%.
- Each sensor reacts in accordance with increases and decreases in the fuel injection volume.
- The Control the Injection Volume for A/F Sensor operation lowers the fuel injection volume by 12.5% or increases the injection volume by 25%.
- Standard:
Tester Display
Injection Volume
Status
Voltage
AFS Voltage B1S1
AFS Voltage B2S1
(Air fuel ratio sensor)
+25%
Rich
Less than 3.1 V
-12.5%
Lean
More than 3.4 V
O2S B1S2
O2S B2S2
(Heated oxygen)
+25%
Rich
More than 0.55 V
-12.5%
Lean
Less than 0.4 V
Lean: During Control the Injection Volume for A/F Sensor, the air fuel ratio sensor output voltage (AFS) is consistently more than 3.4 V, and the heated oxygen sensor output voltage (O2S) is consistently less than 0.4 V.Rich: During Control the Injection Volume for A/F Sensor, the AFS is consistently less than 3.1 V, and the O2S is consistently more than 0.55 V.Lean/Rich: During Control the Injection Volume for A/F Sensor of the Active Test, the output voltage of the heated oxygen sensor alternates correctly.Result Status
AFS Voltage B1S1
AFS Voltage B2S1
Status
O2S B1S2
O2S B2S2
Air Fuel Ratio Condition and
Air Fuel Ratio Sensor Condition
Misfire
Suspected Trouble Area
Proceed to
Lean/Rich
Lean/Rich
Normal
-
-
A
Lean
Lean
Actual air fuel ratio lean
May occur
- PCV valve and hose
- PCV hose connections
- Fuel injector assembly blockage
- Gas leak from exhaust system
- Air induction system
- Fuel pressure
- Mass air flow meter sub-assembly
- Engine coolant temperature sensor
A
Rich
Rich
Actual air fuel ratio rich
-
- Fuel injector assembly blockage or blockage
- Gas leak from exhaust system
- Ignition system
- Fuel pressure
- Mass air flow meter sub-assembly
- Engine coolant temperature sensor
Lean
Lean/Rich
Air fuel ratio sensor malfunction
-
- Air fuel ratio sensor
B
Rich
Lean/Rich
Air fuel ratio sensor malfunction
-
- Air fuel ratio sensor
|
|
||||

| A | |
|
| 5. READ VALUE USING INTELLIGENT TESTER (COOLANT TEMP) |
Connect the intelligent tester to the DLC3.
Turn the ignition switch on (IG).
Turn the tester on.
Enter the following menus: Powertrain / Engine and ECT / Data List / All Data / Coolant Temp.
Read the Data List twice, when the engine is both cold and warmed up.
- Standard value:
- With cold engine: Same as ambient air temperature.
With warm engine: 80 to 100°C (176 to 212°F).
|
|
||||
| OK | |
|
| 6. INSPECT MASS AIR FLOW METER SUB-ASSEMBLY |
Connect the intelligent tester to the DLC3.
Turn the ignition switch on (IG).
Turn the tester on.
Enter the following menus: Powertrain / Engine and ECT/ Data List / All Data / MAF and Coolant Temp.
Allow the engine to idle until Coolant Temp reaches 75°C (167°F) or higher.
Read MAF with the engine speed at 2500 rpm.
- Standard:
- Between 8 g/sec. and 19 g/sec. (shift lever: N; A/C: off).
|
|
||||
| OK | |
|
| 7. CHECK FUEL PRESSURE |
Check the fuel pressure (Click here).
|
|
||||
| OK | |
|
| 8. CHECK FOR EXHAUST GAS LEAK |
Check for exhaust gas leaks from the exhaust manifold sub-assembly and exhaust pipe.
- OK:
- No gas leak.
|
|
||||
| OK | |
|
| 9. CHECK SPARK AND IGNITION |
- HINT:
- Refer to the ignition system inspection procedure (Click here).
- If the spark plugs or ignition system malfunctions, engine misfire may occur. The misfire count can be read using the intelligent tester. Enter the following menus: Powertrain / Engine and ECT / Data List / All Data / Cylinder #1 Misfire Count (to Cylinder #6 Misfire Count)
- Refer to the ignition system inspection procedure (Click here).
|
|
||||
| OK | |
|
| 10. INSPECT FUEL INJECTOR ASSEMBLY (INJECTION AND VOLUME) |
- HINT:
- Refer to the fuel injector assembly inspection procedure (Click here).
- If the fuel injector assemblies malfunction, engine misfire may occur. The misfire count can be read using the intelligent tester. Enter the following menus: Powertrain / Engine and ECT / Data List / All Data / Cylinder #1 Misfire Count (to Cylinder #6 Misfire Count).
- Refer to the fuel injector assembly inspection procedure (Click here).
|
|
||||
|
|
||||
| 11. INSPECT AIR FUEL RATIO SENSOR (HEATER RESISTANCE) |
Disconnect the air fuel ratio sensor connector.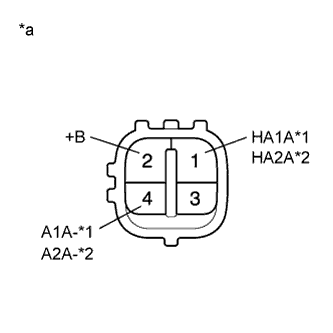
Measure the resistance according to the value(s) in the table below.
- Standard resistance:
- Bank 1:
Tester Connection
Condition
Specified Condition
1 (HA1A) - 2 (+B)
20°C (68°F)
1.6 to 3.2 Ω
1 (HA1A) - 4 (A1A-)
Always
10 kΩ or higher
- Bank 2:
Tester Connection
Condition
Specified Condition
1 (HA2A) - 2 (+B)
20°C (68°F)
1.6 to 3.2 Ω
1 (HA2A) - 4 (A2A-)
Always
10 kΩ or higher
Text in Illustration *1
Bank 1
*2
Bank 2
*a
Component without harness connected
(Air Fuel Ratio Sensor)
Reconnect the air fuel ratio sensor connector.
|
|
||||
| OK | |
|
| 12. CHECK TERMINAL VOLTAGE (POWER SOURCE OF AIR FUEL RATIO SENSOR) |
Disconnect the air fuel ratio sensor connector.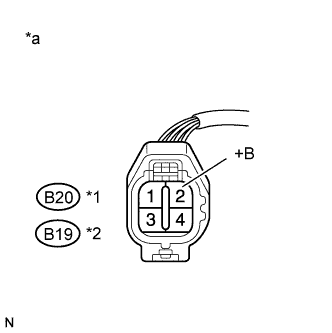
Turn the ignition switch on (IG).
Measure the voltage according to the value(s) in the table below.
- Standard voltage:
- Bank 1:
Tester Connection
Switch Condition
Specified Condition
B20-2 (+B) - Body ground
Ignition switch on (IG)
11 to 14 V
- Bank 2:
Tester Connection
Switch Condition
Specified Condition
B19-2 (+B) - Body ground
Ignition switch on (IG)
11 to 14 V
Text in Illustration *1
Bank 1
*2
Bank 2
*a
Front view of wire harness connector
(to Air Fuel Ratio Sensor)
Reconnect the air fuel ratio sensor connector.
|
|
||||
| OK | |
|
| 13. CHECK HARNESS AND CONNECTOR (AIR FUEL RATIO SENSOR - ECM) |
Disconnect the air fuel ratio sensor connector.
Disconnect the ECM connector.
Measure the resistance according to the value(s) in the table below.
- Standard resistance (Check for open):
- Bank 1:
Tester Connection
Condition
Specified Condition
B20-1 (HA1A) - B47-17 (HA1A)
Always
Below 1 Ω
- Bank 2:
Tester Connection
Condition
Specified Condition
B19-1 (HA2A) - B47-19 (HA2A)
Always
Below 1 Ω
- Standard resistance (Check for short):
- Bank 1:
Tester Connection
Condition
Specified Condition
B20-1 (HA1A) or B47-17 (HA1A) - Body ground
Always
10 kΩ or higher
- Bank 2:
Tester Connection
Condition
Specified Condition
B19-1 (HA2A) or B47-19 (HA2A) - Body ground
Always
10 kΩ or higher
Reconnect the ECM connector.
Reconnect the air fuel ratio sensor connector.
|
|
||||
| OK | |
|
| 14. REPLACE AIR FUEL RATIO SENSOR |
Replace the air fuel ratio sensor (Click here).
| NEXT | |
|
| 15. PERFORM CONFIRMATION DRIVING PATTERN |
Connect the intelligent tester to the DLC3.
Turn the ignition switch on (IG).
Turn the tester on.
Clear DTCs (Click here).
Turn the ignition switch off.
Turn the ignition switch on (IG) and turn the tester on.
Start the engine and warm it up.
Drive the vehicle in accordance with the driving pattern described in Confirmation Driving Pattern.
Enter the following menus: Powertrain / Engine and ECT / DTC / Pending.
Read the pending DTCs.
- Result:
Result
Proceed to
DTC P0171, P0172, P0174 or P0175 is output
A
DTC is not output
B
|
|
||||
| A | |
|
| 16. CHECK HARNESS AND CONNECTOR |
Check the connection and terminal contact pressure of connectors and wire harness between the mass air flow meter sub-assembly and ECM (Click here).
- HINT:
- Repair any problems.
| NEXT | |
|
| 17. CHECK WHETHER DTC OUTPUT RECURS |
Connect the intelligent tester to the DLC3.
Turn the ignition switch on (IG).
Turn the tester on.
Clear DTCs (Click here).
Turn the ignition switch off.
Turn the ignition switch on (IG) and turn the tester on.
Start the engine and warm it up.
Drive the vehicle in accordance with the driving pattern described in Confirmation Driving Pattern.
Enter the following menus: Powertrain / Engine and ECT / DTC / Pending.
Read the pending DTCs.
- Result:
Result
Proceed to
DTC P0171, P0172, P0174 or P0175 is output
A
DTC is not output
B
|
|
||||
| A | |
|
| 18. CHECK HARNESS AND CONNECTOR (MASS AIR FLOW METER SUB-ASSEMBLY - ECM) |
Disconnect the mass air flow meter sub-assembly connector.
Disconnect the ECM connector.
Measure the resistance according to the value(s) in the table below.
- Standard Resistance (Check for Open):
Tester Connection
Condition
Specified Condition
B10-5 (VG) - B49-14 (VG)
Always
Below 1 Ω
B10-4 (E2G) - B49-13 (E2G)
Always
Below 1 Ω
- Standard Resistance (Check for Short):
Tester Connection
Condition
Specified Condition
B10-5 (VG) or B49-14 (VG) - Body ground
Always
10 kΩ or higher
Reconnect the mass air flow meter sub-assembly connector.
Reconnect the ECM connector.
|
|
||||
| OK | |
|
| 19. REPLACE MASS AIR FLOW METER SUB-ASSEMBLY |
Replace the mass air flow meter sub-assembly (Click here).
- HINT:
- If the result of the inspection performed step 6 indicated no problem, proceed to the next step without replacing the mass air flow meter sub-assembly.
| NEXT | |
|
| 20. CONFIRM WHETHER MALFUNCTION HAS BEEN SUCCESSFULLY REPAIRED |
Connect the intelligent tester to the DLC3.
Turn the ignition switch on (IG).
Turn the tester on.
Clear DTCs (Click here).
Turn the ignition switch off.
Turn the ignition switch on (IG) and turn the tester on.
Start the engine and warm it up.
Drive the vehicle in accordance with the driving pattern described in Confirmation Driving Pattern.
Enter the following menus: Powertrain / Engine and ECT / DTC / Pending.
Read the pending DTCs.
- Result:
Result
Proceed to
DTC is not output
A
DTC P0171, P0172, P0174 or P0175 is output
B
|
|
||||
| A | ||
 |
||
| ||
| 21. INSPECT ENGINE ROOM JUNCTION BLOCK ASSEMBLY (A/F RELAY) |
Inspect the A/F relay (Click here).
|
|
||||
| OK | |
|
| 22. CHECK HARNESS AND CONNECTOR (AIR FUEL RATIO SENSOR - A/F RELAY) |
Disconnect the air fuel ratio sensor connector.
Remove the engine room junction block assembly from the engine room relay block.
Measure the resistance according to the value(s) in the table below.
- Standard resistance (Check for open):
- Bank 1:
Tester Connection
Condition
Specified Condition
B20-2 (+B) - 2A-4
Always
Below 1 Ω
- Bank 2:
Tester Connection
Condition
Specified Condition
B19-2 (+B) - 2A-4
Always
Below 1 Ω
- Standard resistance (Check for short):
- Bank 1:
Tester Connection
Condition
Specified Condition
B20-2 (+B) or 2A-4 - Body ground
Always
10 kΩ or higher
- Bank 2:
Tester Connection
Condition
Specified Condition
B19-2 (+B) or 2A-4 - Body ground
Always
10 kΩ or higher
Reconnect the air fuel ratio sensor connector.
Reinstall the engine room junction block assembly.
|
|
||||
| OK | ||
|
||
| ||