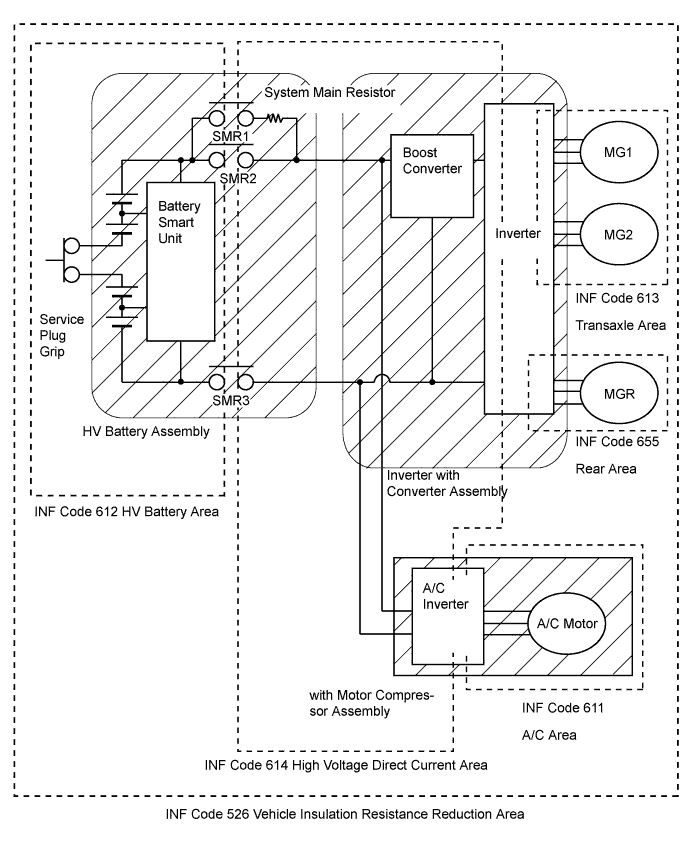
DTC P0AA6-526 Hybrid Battery Voltage System Isolation Fault |
DTC P0AA6-611 Hybrid Battery Voltage System Isolation Fault |
DTC P0AA6-612 Hybrid Battery Voltage System Isolation Fault |
DTC P0AA6-613 Hybrid Battery Voltage System Isolation Fault |
DTC P0AA6-614 Hybrid Battery Voltage System Isolation Fault |
DTC P0AA6-655 Hybrid Battery Voltage System Isolation Fault |
| DTC No. | INF Code | DTC Detection Condition | Trouble Area |
| P0AA6 | 526 (*1) | Insulation resistance between the high-voltage circuit and the body has decreased. |
|
| 611 (*2) | Insulation resistance of the with motor compressor assembly has decreased. | With motor compressor assembly | |
| 612 (*2) | Insulation resistance of the HV battery, battery smart unit, or HV relay assembly has decreased. |
| |
| 613 (*2) | Insulation resistance of the hybrid vehicle transaxle assembly or inverter with converter assembly has decreased. |
| |
| 614 (*2) | Insulation resistance of the inverter with converter assembly, HV relay assembly, No. 3 frame wire, No. 4 engine wire, or with motor compressor assembly has decreased. |
| |
| 655 (*2) | Insulation resistance of the rear traction motor with transaxle assembly, No. 3 frame wire, or inverter with converter assembly has decreased. |
|
| 1.CHECK DTC OUTPUT (HV) |
Connect the Techstream to the DLC3.
Turn the power switch on (IG).
Select the following menu items: Powertrain / Hybrid Control / Trouble Codes.
Check if DTCs are output.
| Output DTC | Proceed to |
| P0AA6 only is output | A |
| P0AA6 and P0A1D (hybrid vehicle control ECU malfunction) are output | B |
| P0AA6 and P0AA7 (malfunction in the battery smart unit) are output | C |
| P0AA6 and P0A1F (Battery Energy Control Module) are output | D |
|
| ||||
|
| ||||
|
| ||||
| A | |
 |
| 2.CHECK INFORMATION CODE |
Connect Techstream to the DLC3.
Turn the power switch on (IG).
Select the following menu items: Powertrain / Hybrid Control / Trouble Codes.
Access the freeze frame data of DTC P0AA6 and read the INF code.
| Output INF | Proceed to |
| 526 (decrease in the insulation resistance of the high-voltage circuit) only is output | A |
| 526 and 611 (decrease in the insulation resistance of the air conditioning area) are output | Refer to the troubleshooting procedures for P0AA6-611 (Heater and air conditioning system) |
| 526 and 612 (decrease in the insulation resistance of the battery area) are output | B |
| 526 and 613 (decrease in the insulation resistance of the transaxle area) are output | C |
| 526 and 614 (decrease in the insulation resistance of the high-voltage DC area) are output | D |
| 526 and 655 (decrease in the insulation resistance of the rear area) are output | E |
|
| ||||
|
| ||||
|
| ||||
|
| ||||
| A | |
|
| 3.CHECK WITH MOTOR COMPRESSOR ASSEMBLY |
Turn the power switch off.
 |
Remove the service plug grip (Click here).
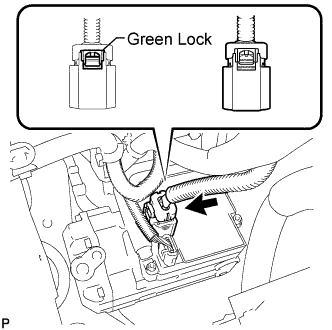
Disconnect the No. 4 engine wire from the with motor compressor assembly.
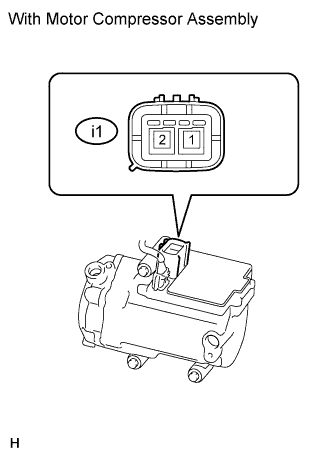 |
Using a megohmmeter set to 500 V, measure the resistance according to the value(s) in the table below.
| Tester Connection | Switch Condition | Specified Condition |
| i1-1 - Body ground | Power switch off | 3 MΩ or higher |
| i1-2 - Body ground | Power switch off | 3 MΩ or higher |
|
| ||||
| OK | |
|
| 4.CHECK HIGH VOLTAGE DIRECT CURRENT AREA, TRANSAXLE AREA, REAR MOTOR AREA |
Check that the service plug grip is not installed.
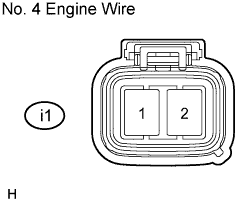 |
Using a megohmmeter set to 500 V, measure the resistance according to the value(s) in the table below.
| Tester Connection | Switch Condition | Specified Condition |
| i1-1 - Body ground | Power switch off | 1 MΩ or higher |
| i1-2 - Body ground | Power switch off | 1 MΩ or higher |
|
| ||||
| OK | |
|
| 5.CHECK HV BATTERY AREA |
Turn the power switch off.
Remove the service plug grip (Click here).
Remove the seat and HV battery cover (Click here).
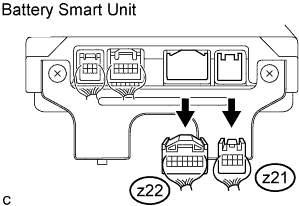 |
Disconnect the z21 and z22 connectors from the battery smart unit.
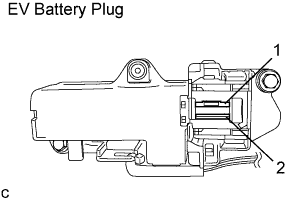 |
Using a megohmmeter set to 500 V, measure the resistance according to the value(s) in the table below.
| Tester Connection | Switch Condition | Specified Condition |
| EV battery plug 1 - Body ground | Power switch off | 10 MΩ or higher |
| EV battery plug 2 - Body ground | Power switch off | 10 MΩ or higher |
|
| ||||
| OK | ||
 | ||
| ||
| 6.CHECK HV RELAY ASSEMBLY |
Check that the service plug grip is not installed.
Connect the z21 and z22 connectors to the battery smart unit.
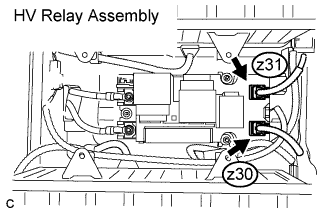 |
Disconnect the No. 2 main battery cable (negative side and positive side) from the HV relay assembly.
|
Using a megohmmeter set to 500 V, measure the resistance according to the value(s) in the table below.
| Tester Connection | Switch Condition | Specified Condition |
| EV battery plug 1 - Body ground | Power switch off | 10 MΩ or higher |
| EV battery plug 2 - Body ground | Power switch off | 10 MΩ or higher |
|
| ||||
| OK | ||
| ||
| ||
| 7.CHECK BATTERY CABLE AND SERVICE PLUG GRIP |
Check that the service plug grip is not installed.
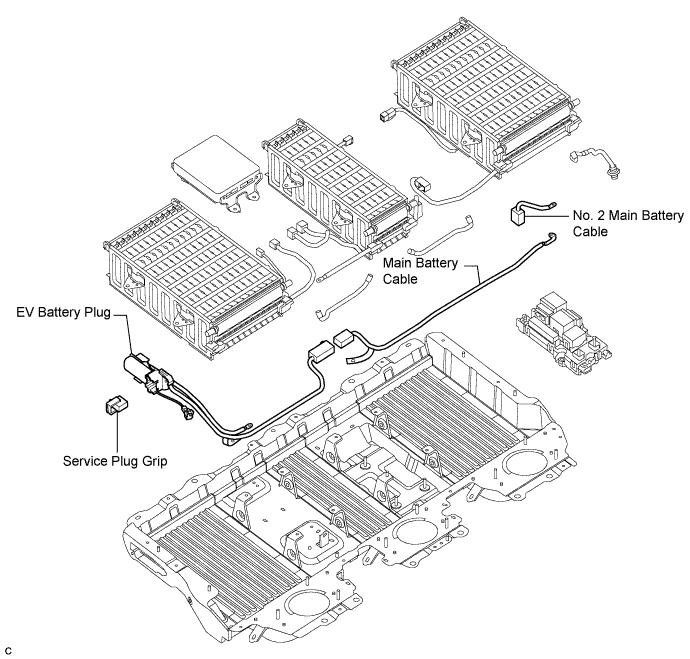
Remove the No. 2 main battery cable (negative side) (Click here), and visually check that there is no scratched or peeling insulation.
Remove the main battery cable (Click here), and visually check that there is no scratched or peeling insulation.
Remove the EV battery plug (Click here), and visually check that there is no scratched or peeling insulation.
Visually check that there are no scratched or peeling insulation on the removed service plug grip.
|
| ||||
| OK | ||
| ||
| ||
| 8.CHECK NO. 4 ENGINE WIRE |
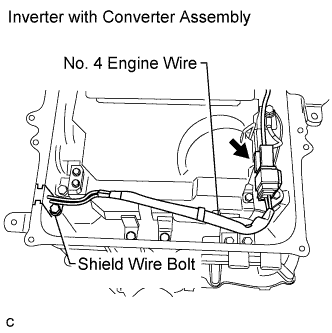 |
Check that the service plug grip is not installed.
Remove the inverter cover (Click here).
Disconnect the No. 4 engine wire connector from the inverter with converter assembly.
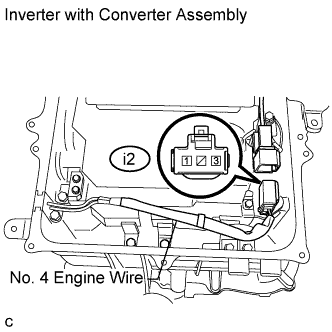 |
Using a megohmmeter set to 500 V, measure the resistance according to the value(s) in the table below.
| Tester Connection | Switch Condition | Specified Condition |
| i2-1 - Body ground | Power switch off | 10 MΩ or higher |
| i2-3 - Body ground | Power switch off | 10 MΩ or higher |
|
| ||||
| OK | |
|
| 9.CHECK HYBRID VEHICLE TRANSAXLE ASSEMBLY |
Check that the service plug grip is not installed.
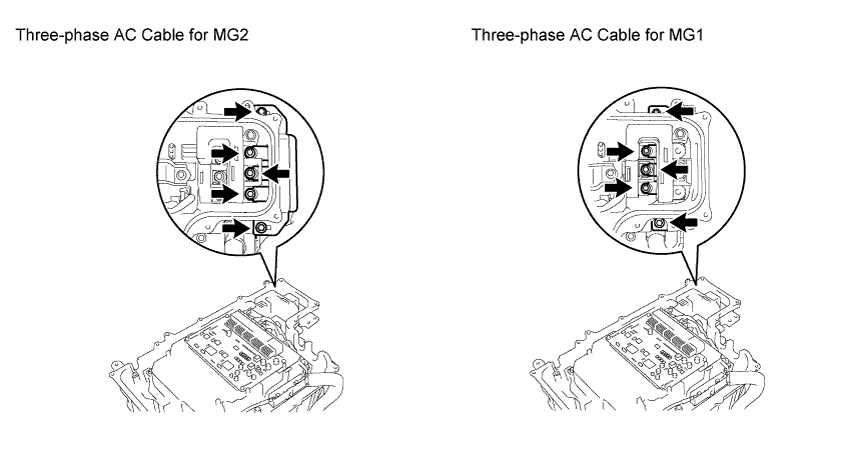
Disconnect the three-phase AC cable for MG2 and MG1 from the inverter with converter assembly.
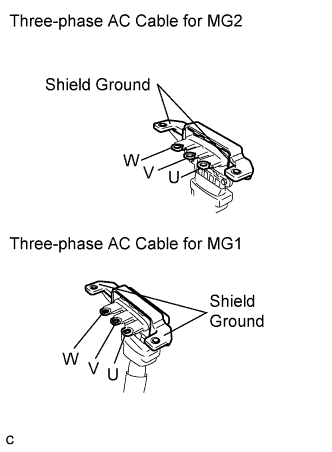 |
Using a megohmmeter set to 500 V, measure the resistance according to the value(s) in the table below.
| Tester Connection | Switch Condition | Specified Condition |
| Three-phase AC cable for MG2 U terminal - Body ground and shield ground | Power switch off | 100 MΩ or higher |
| Three-phase AC cable for MG2 V terminal - Body ground and shield ground | Power switch off | 100 MΩ or higher |
| Three-phase AC cable for MG2 W terminal - Body ground and shield ground | Power switch off | 100 MΩ or higher |
| Three-phase AC cable for MG1 U terminal - Body ground and shield ground | Power switch off | 100 MΩ or higher |
| Three-phase AC cable for MG1 V terminal - Body ground and shield ground | Power switch off | 100 MΩ or higher |
| Three-phase AC cable for MG1 W terminal - Body ground and shield ground | Power switch off | 100 MΩ or higher |
|
| ||||
| OK | |
|
| 10.CHECK REAR TRACTION MOTOR WITH TRANSAXLE ASSEMBLY |
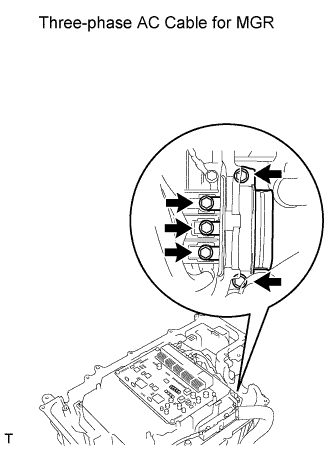 |
Check that the service plug grip is not installed.
Disconnect the No. 3 frame wire (rear motor cable) from the inverter with converter assembly.
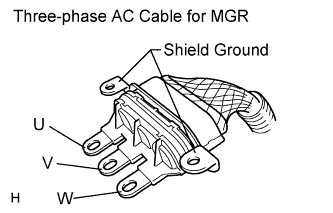 |
Using a megohmmeter set to 500 V, measure the resistance according to the value(s) in the table below.
| Tester Connection | Switch Condition | Specified Condition |
| Three-phase AC cable for MGR U terminal - Body ground and shield ground | Power switch off | 10 MΩ or higher |
| Three-phase AC cable for MGR V terminal - Body ground and shield ground | Power switch off | 10 MΩ or higher |
| Three-phase AC cable for MGR W terminal - Body ground and shield ground | Power switch off | 10 MΩ or higher |
|
| ||||
| OK | |
|
| 11.CHECK INVERTER WITH CONVERTER ASSEMBLY |
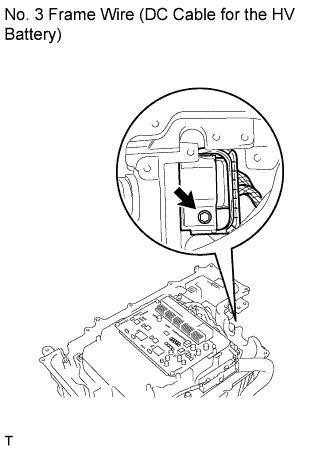 |
Check that the service plug grip is not installed.
Disconnect the No. 3 frame wire (DC cable for the HV battery) connector from the inverter with converter assembly.
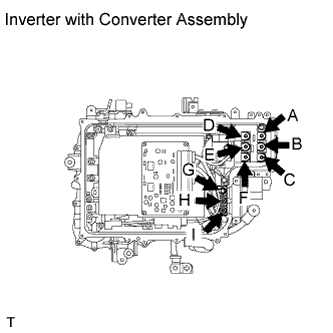 |
Using a megohmmeter set to 500 V, measure the resistance according to the value(s) in the table below.
| Tester Connection | Switch Condition | Specified Condition |
| A - Body ground | Power switch off | 1 MΩ or higher |
| B - Body ground | Power switch off | 1 MΩ or higher |
| C - Body ground | Power switch off | 1 MΩ or higher |
| D - Body ground | Power switch off | 1 MΩ or higher |
| E - Body ground | Power switch off | 1 MΩ or higher |
| F - Body ground | Power switch off | 1 MΩ or higher |
| G - Body ground | Power switch off | 1 MΩ or higher |
| H - Body ground | Power switch off | 1 MΩ or higher |
| I - Body ground | Power switch off | 1 MΩ or higher |
|
| ||||
| OK | |
|
| 12.CHECK NO. 3 FRAME WIRE |
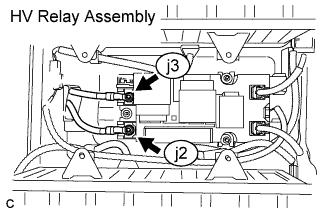 |
Check that the service plug grip is not installed.
Remove the seat and HV battery cover (Click here).
Disconnect the No. 3 frame wire (DC cable for the inverter with converter assembly) from the HV relay assembly.
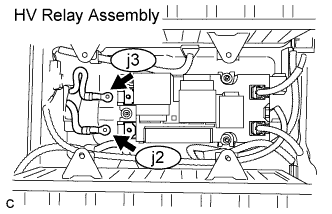 |
Using a megohmmeter set to 500 V, measure the resistance according to the value(s) in the table below.
| Tester Connection | Switch Condition | Specified Condition |
| j2-1 - Body ground | Power switch off | 10 MΩ or higher |
| j3-1 - Body ground | Power switch off | 10 MΩ or higher |
|
| ||||
| OK | ||
| ||
| ||
| 13.CHECK REAR TRACTION MOTOR WITH TRANSAXLE ASSEMBLY |
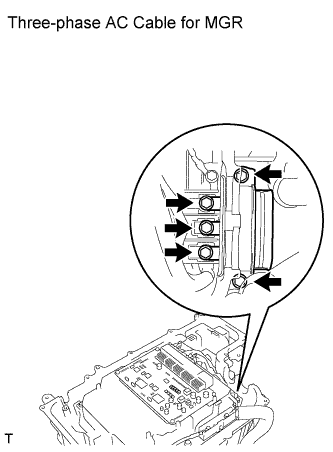 |
Turn the power switch off.
Remove the service plug grip (Click here).
Remove the inverter cover (Click here).
Disconnect the No. 3 frame wire (three-phase AC cable for the rear traction motor with transaxle assembly) from the inverter with converter assembly.
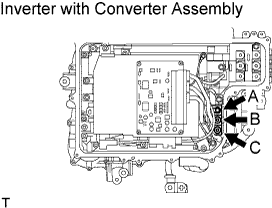 |
Using a megohmmeter set to 500 V, measure the resistance according to the value(s) in the table below.
| Tester Connection | Switch Condition | Specified Condition |
| A - Body ground | Power switch off | 1 MΩ or higher |
| B - Body ground | Power switch off | 1 MΩ or higher |
| C - Body ground | Power switch off | 1 MΩ or higher |
|
| ||||
| OK | |
|
| 14.CHECK REAR TRACTION MOTOR WITH TRANSAXLE ASSEMBLY |
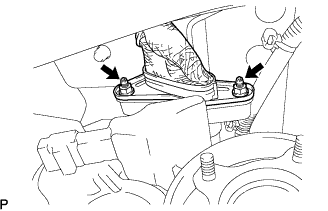 |
Check that the service plug grip is not installed.
Disconnect the No. 3 frame wire (three-phase AC cable for MGR) from the rear traction motor with transaxle assembly.
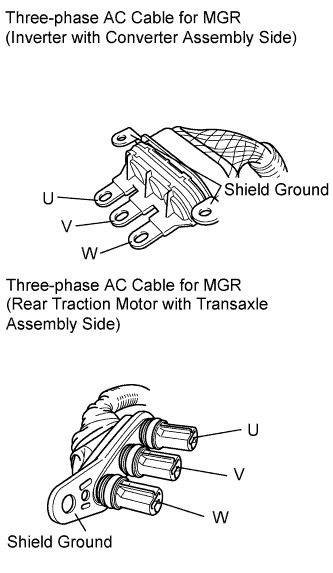 |
Using a megohmmeter set to 500 V, measure the resistance according to the value(s) in the table below.
| Tester Connection | Switch Condition | Specified Condition |
| U - Body ground and shield ground | Power switch off | 10 MΩ or higher |
| V - Body ground and shield ground | Power switch off | 10 MΩ or higher |
| W - Body ground and shield ground | Power switch off | 10 MΩ or higher |
|
| ||||
| OK | ||
| ||
| ||
| 15.CHECK HYBRID VEHICLE TRANSAXLE ASSEMBLY |
Turn the power switch off.
Remove the service plug grip (Click here).
Remove the inverter cover (Click here).
Disconnect the three-phase AC cable for the hybrid vehicle transaxle assembly (MG2 and MG1) from the inverter with converter assembly.
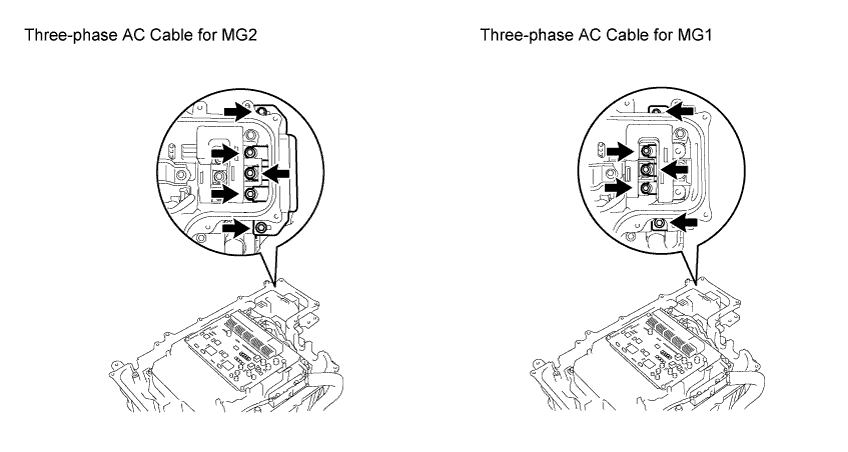
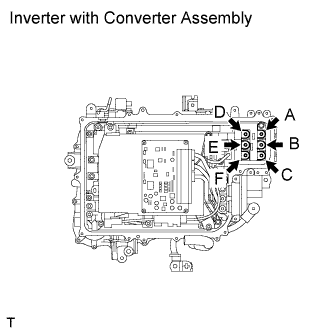 |
Using a megohmmeter set to 500 V, measure the resistance according to the value(s) in the table below.
| Tester Connection | Switch Condition | Specified Condition |
| A - Body ground | Power switch off | 1 MΩ or higher |
| B - Body ground | Power switch off | 1 MΩ or higher |
| C - Body ground | Power switch off | 1 MΩ or higher |
| D - Body ground | Power switch off | 1 MΩ or higher |
| E - Body ground | Power switch off | 1 MΩ or higher |
| F - Body ground | Power switch off | 1 MΩ or higher |
|
| ||||
| OK | ||
| ||
| ||
| 16.CHECK HIGH VOLTAGE DIRECT CURRENT AREA |
Turn the power switch off.
Remove the service plug grip (Click here).
Remove the inverter cover (Click here).
|
Disconnect the No. 3 frame wire (DC cable for the HV battery) from the inverter with converter assembly.
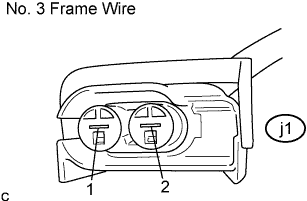 |
Using a megohmmeter set to 500 V, measure the resistance according to the value(s) in the table below.
| Tester Connection | Switch Condition | Specified Condition |
| (j1-1) - Body ground | Power switch off | 10 MΩ or higher |
| (j1-2) - Body ground | Power switch off | 10 MΩ or higher |
|
| ||||
| OK | |
|
| 17.CHECK WITH MOTOR COMPRESSOR ASSEMBLY |
Check that the service plug grip is not installed.
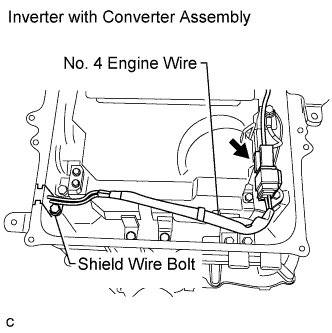 |
Disconnect the No. 4 engine wire from the inverter with converter assembly.
|
Using a megohmmeter set to 500 V, measure the resistance according to the value(s) in the table below.
| Tester Connection | Switch Condition | Specified Condition |
| i2-1 (-) - Body ground | Power switch off | 3 MΩ or higher |
| i2-3 (+) - Body ground | Power switch off | 3 MΩ or higher |
|
| ||||
| OK | ||
| ||
| ||
| 18.CHECK NO. 4 ENGINE WIRE |
|
Check that the service plug grip is not installed.
Disconnect the No. 4 engine wire from the with motor compressor assembly.
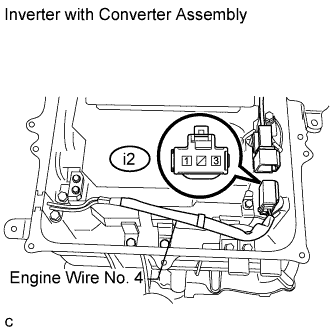 |
Using a megohmmeter set to 500 V, measure the resistance according to the value(s) in the table below.
| Tester Connection | Switch Condition | Specified Condition |
| i2-1 (-) - Body ground | Power switch off | 10 kΩ or higher |
| i2-3 (+) - Body ground | Power switch off | 10 kΩ or higher |
|
| ||||
| OK | ||
| ||
| ||
| 19.CHECK NO. 3 FRAME WIRE |
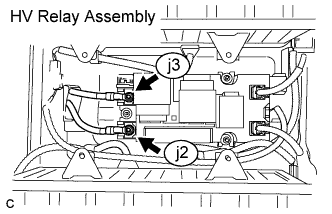 |
Check that the service plug grip is not installed.
Remove the seat and HV battery cover (Click here).
Disconnect the No. 3 frame wire (DC cable for the inverter with converter assembly) from the HV relay assembly.
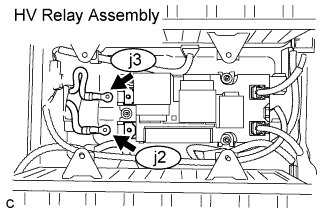 |
Using a megohmmeter set to 500 V, measure the resistance according to the value(s) in the table below.
| Tester Connection | Switch Condition | Specified Condition |
| (j2-1) - Body ground | Power switch off | 10 MΩ or higher |
| (j3-1) - Body ground | Power switch off | 10 MΩ or higher |
|
| ||||
| OK | ||
| ||
| ||

