MIRROR (EXT) POWER MIRROR CONTROL SYSTEM(w/o Memory) Power Retractable Mirrors do not Operate with Power Retract Mirror Switch
DESCRIPTION
The outer mirror switch assembly sends a mirror retract/return signal to the main body ECU (multiplex network body ECU) when the retractable outer mirror switch on the outer mirror switch assembly is operated. The main body ECU (multiplex network body ECU) retracts or returns the outer rear view mirror assemblies based on the signal.
WIRING DIAGRAM
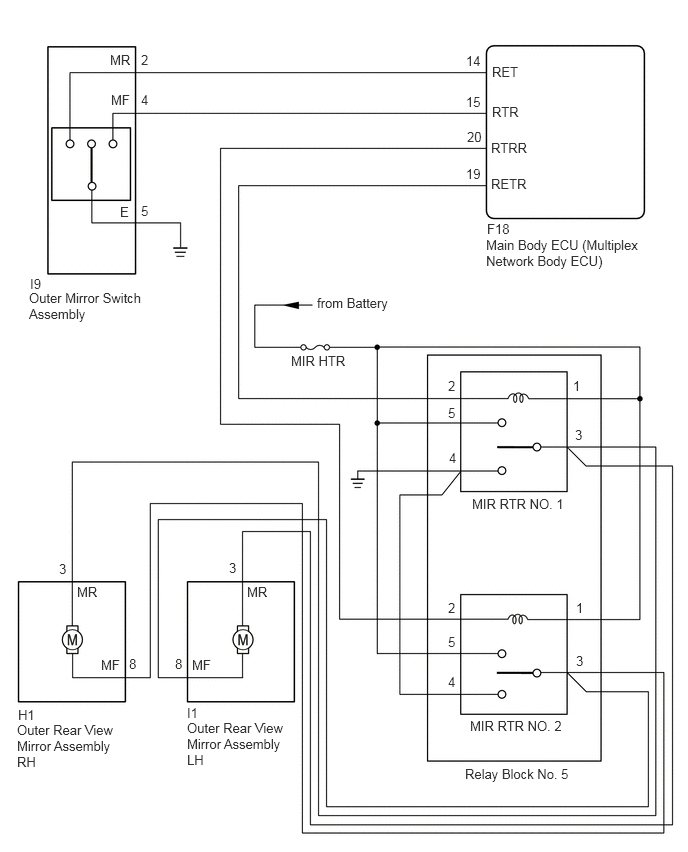
CAUTION / NOTICE / HINT
- NOTICE:
- ·
If the main body ECU (multiplex network body ECU) is replaced, refer to Service Bulletin.*
*: w/ Smart Entry and Start System
·Inspect the fuses for circuits related to this system before performing the following procedure.
·As the door control battery is installed between the vehicle battery and main body ECU (multiplex network body ECU), first perform the inspections in On-Vehicle Inspection to confirm that there are no malfunctions in the power source circuit for the main body ECU (multiplex network body ECU) before performing this troubleshooting procedure.*
Click hereVehicle Interior>DOOR LOCK>POWER DOOR LOCK CONTROL SYSTEM>ON-VEHICLE INSPECTION
*: for LHD
PROCEDURE
Connect the GTS to the DLC3.
Turn the ignition switch to ON.
Turn the GTS on.
Enter the following menus: Body Electrical / Main Body / Data List.
Read the Data List according to the display on the GTS.
- Body Electrical > Main Body > Data List
-
Tester Display Measurement Item Range Normal Condition Diagnostic Note Outer Mirror Fold SW Retractable outer mirror switch signal OFF or ON OFF: Retractable outer mirror switch off
ON: Retractable outer mirror switch on-
- Body Electrical > Main Body > Data List
-
Tester Display Outer Mirror Fold SW - 50003 123 104
- OK:
On the GTS screen, ON or OFF is displayed accordingly.
- Result:
Proceed to OK NG
OK
NG
Enter the following menus: Body Electrical / Main Body / Active Test.
Perform the Active Test according to the display on the GTS.
- Body Electrical > Main Body > Active Test
-
Tester Display Measurement Item Control Range Diagnostic Note Mirror Fold Retract mirror operation OFF or ON - Mirror Return Retract mirror operation OFF or ON -
- Body Electrical > Main Body > Active Test
-
Tester Display Mirror Fold - 50004 123 47
- Body Electrical > Main Body > Active Test
-
Tester Display Mirror Return - 50004 123 48
- Result:
Result Proceed to Both outer rear view mirror assemblies operate normally A Outer rear view mirror assembly LH does not operate normally B Outer rear view mirror assembly RH does not operate normally C Both outer rear view mirror assemblies do not operate normally D
A
B
C
D
Remove the outer rear view mirror assembly LH.
Click hereVehicle Exterior>MIRROR (EXT)>OUTER REAR VIEW MIRROR>REMOVAL
Inspect the outer rear view mirror assembly LH.
Click hereVehicle Exterior>MIRROR (EXT)>OUTER REAR VIEW MIRROR>INSPECTION
- Result:
Proceed to OK NG
OK
NG
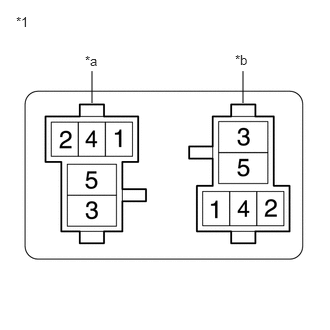
| *1 | Relay Block No. 5 |
| *a | MIR RTR NO. 1 Relay terminals |
| *b | MIR RTR NO. 2 Relay terminals |
Remove the MIR RTR NO. 1 relay from the relay block No. 5.
Remove the MIR RTR NO. 2 relay from the relay block No. 5.
Disconnect the I1 outer rear view mirror assembly LH connector.
Measure the resistance according to the value(s) in the table below.
- Standard Resistance:
Tester Connection Condition Specified Condition Relay block No. 5 MIR RTR NO. 1 relay terminal 3 - I1-3 (MR) Always Below 1 Ω Relay block No. 5 MIR RTR NO. 2 relay terminal 3 - I1-8 (MF) Always Below 1 Ω Relay block No. 5 MIR RTR NO. 1 relay terminal 3 or I1-3 (MR) - Body Ground Always 10 kΩ or higher Relay block No. 5 MIR RTR NO. 2 relay terminal 3 or I1-8 (MF) - Body Ground Always 10 kΩ or higher
- Result:
Proceed to OK NG
OK
Click hereGeneral>INTRODUCTION>HOW TO TROUBLESHOOT ECU CONTROLLED SYSTEMS>HOW TO PROCEED WITH TROUBLESHOOTING
NG
Remove the outer rear view mirror assembly RH.
Click hereVehicle Exterior>MIRROR (EXT)>OUTER REAR VIEW MIRROR>REMOVAL
Inspect the outer rear view mirror assembly RH.
Click hereVehicle Exterior>MIRROR (EXT)>OUTER REAR VIEW MIRROR>INSPECTION
- Result:
Proceed to OK NG
OK
NG
| *1 | Relay Block No. 5 |
| *a | MIR RTR NO. 1 Relay terminals |
| *b | MIR RTR NO. 2 Relay terminals |
Remove the MIR RTR NO. 1 relay from the relay block No. 5.
Remove the MIR RTR NO. 2 relay from the relay block No. 5.
Disconnect the H1 outer rear view mirror assembly RH connector.
Measure the resistance according to the value(s) in the table below.
- Standard Resistance:
Tester Connection Condition Specified Condition Relay block No. 5 MIR RTR NO. 1 relay terminal 3 - H1-3 (MR) Always Below 1 Ω Relay block No. 5 MIR RTR NO. 2 relay terminal 3 - H1-8 (MF) Always Below 1 Ω Relay block No. 5 MIR RTR NO. 1 relay terminal 3 or H1-3 (MR) - Body Ground Always 10 kΩ or higher Relay block No. 5 MIR RTR NO. 2 relay terminal 3 or H1-8 (MF) - Body Ground Always 10 kΩ or higher
- Result:
Proceed to OK NG
OK
Click hereGeneral>INTRODUCTION>HOW TO TROUBLESHOOT ECU CONTROLLED SYSTEMS>HOW TO PROCEED WITH TROUBLESHOOTING
NG
Inspect the MIR RTR NO. 1 relay.
Click hereVehicle Exterior>MIRROR (EXT)>RELAY>ON-VEHICLE INSPECTION
Inspect the MIR RTR NO. 2 relay.
Click hereVehicle Exterior>MIRROR (EXT)>RELAY>ON-VEHICLE INSPECTION
- Result:
Result Proceed to OK A NG (MIR RTR NO. 1 Relay) B NG (MIR RTR NO. 2 Relay) C
A
B
C
| *1 | Relay Block No. 5 |
| *a | MIR RTR NO. 1 Relay terminals |
| *b | MIR RTR NO. 2 Relay terminals |
Remove the MIR RTR NO. 1 relay from the relay block No. 5.
Remove the MIR RTR NO. 2 relay from the relay block No. 5.
Measure the voltage according to the value(s) in the table below.
- Standard Voltage:
Tester Connection Condition Specified Condition Relay block No. 5 MIR RTR NO. 1 relay terminal 1 - Body ground Always 11 to 14 V Relay block No. 5 MIR RTR NO. 2 relay terminal 1 - Body ground Always 11 to 14 V Relay block No. 5 MIR RTR NO. 1 relay terminal 5 - Body ground Always 11 to 14 V Relay block No. 5 MIR RTR NO. 2 relay terminal 5 - Body ground Always 11 to 14 V
Measure the resistance according to the value(s) in the table below.
- Standard Resistance:
Tester Connection Condition Specified Condition Relay block No. 5 MIR RTR NO. 1 relay terminal 4 - Body ground Always Below 1 Ω Relay block No. 5 MIR RTR NO. 2 relay terminal 4 - Body ground Always Below 1 Ω Relay block No. 5 MIR RTR NO. 1 relay terminal 4 - relay block No. 5 MIR RTR NO. 2 relay terminal 4 Always Below 1 Ω
- Result:
Proceed to OK NG
OK
NG
| *1 | Relay Block No. 5 |
| *a | MIR RTR NO. 1 Relay terminals |
| *b | MIR RTR NO. 2 Relay terminals |
Remove the MIR RTR NO. 1 relay from the relay block No. 5.
Remove the MIR RTR NO. 2 relay from the relay block No. 5.
Disconnect the F18 main body ECU (multiplex network body ECU) connector.
Measure the resistance according to the value(s) in the table below.
- Standard Resistance:
Tester Connection Condition Specified Condition Relay block No. 5 MIR RTR NO. 1 relay terminal 2 - F18-19 (RETR) Always Below 1 Ω Relay block No. 5 MIR RTR NO. 2 relay terminal 2 - F18-20 (RTRR) Always Below 1 Ω Relay block No. 5 MIR RTR NO. 1 relay terminal 2 or F18-19 (RETR) - Body Ground Always 10 kΩ or higher Relay block No. 5 MIR RTR NO. 2 relay terminal 2 or F18-20 (RTRR) - Body Ground Always 10 kΩ or higher
- Result:
Proceed to OK NG
OK
NG
| *1 | Relay Block No. 5 |
| *a | MIR RTR NO. 1 Relay terminals |
| *b | MIR RTR NO. 2 Relay terminals |
Remove the MIR RTR NO. 1 relay from the relay block No. 5.
Remove the MIR RTR NO. 2 relay from the relay block No. 5.
Disconnect the I1 outer rear view mirror assembly LH connector.
Disconnect the H1 outer rear view mirror assembly RH connector.
Measure the resistance according to the value(s) in the table below.
- Standard Resistance:
Tester Connection Condition Specified Condition Relay block No. 5 MIR RTR NO. 1 relay terminal 3 - I1-3 (MR) Always Below 1 Ω Relay block No. 5 MIR RTR NO. 1 relay terminal 3 - H1-3 (MR) Always Below 1 Ω Relay block No. 5 MIR RTR NO. 2 relay terminal 3 - I1-8 (MF) Always Below 1 Ω Relay block No. 5 MIR RTR NO. 2 relay terminal 3 - H1-8 (MF) Always Below 1 Ω Relay block No. 5 MIR RTR NO. 1 relay terminal 3 or H1-3 (MR) - Body Ground Always 10 kΩ or higher Relay block No. 5 MIR RTR NO. 1 relay terminal 3 or I1-3 (MR) - Body Ground Always 10 kΩ or higher Relay block No. 5 MIR RTR NO. 2 relay terminal 3 or H1-8 (MF) - Body Ground Always 10 kΩ or higher Relay block No. 5 MIR RTR NO. 2 relay terminal 3 or I1-8 (MF) - Body Ground Always 10 kΩ or higher
- Result:
Proceed to OK NG
OK
NG
Remove the outer mirror switch assembly.
Click hereVehicle Exterior>MIRROR (EXT)>OUTER MIRROR SWITCH>REMOVAL
Inspect the outer mirror switch assembly.
Click hereVehicle Exterior>MIRROR (EXT)>OUTER MIRROR SWITCH>INSPECTION
- Result:
Proceed to OK NG
OK
NG
Disconnect the I9 outer mirror switch assembly.
Disconnect the F18 main body ECU (multiplex network body ECU).
Measure the resistance according to the value(s) in the table below.
- Standard Resistance:
Tester Connection Condition Specified Condition I9-2 (MR) - F18-14 (RET) Always Below 1 Ω I9-2 (MR) or F18-14 (RET) - Body ground Always 10 kΩ or higher I9-5 (E) - Body ground Always Below 1 Ω
- Result:
Proceed to OK NG
OK
NG