DOOR / HATCH BACK DOOR CLOSER SYSTEM Back Door cannot be Opened
DESCRIPTION
When the back door cannot be opened, one of the following may be malfunctioning: 1) multiplex network door ECU, 2) back door lock assembly, 3) back door opener switch assembly, 4) main body ECU (multiplex network body ECU), or 5) certification ECU (smart key ECU assembly).
WIRING DIAGRAM
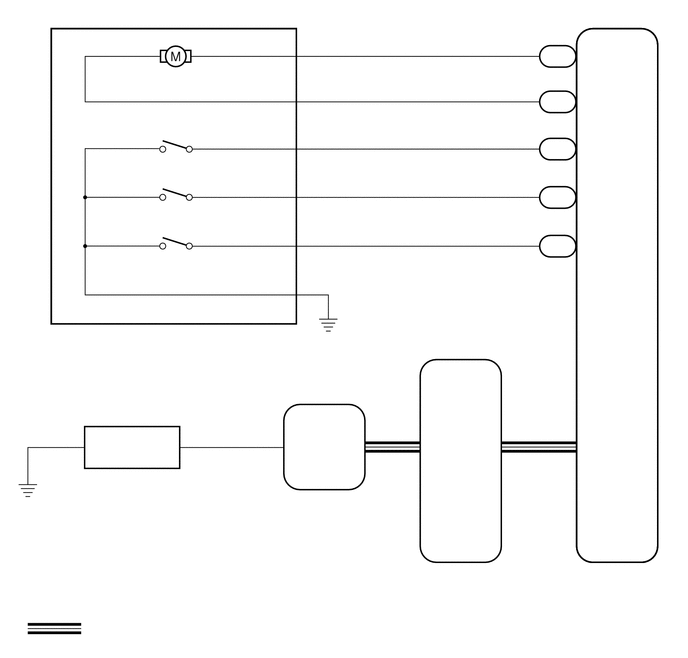
CAUTION / NOTICE / HINT
- NOTICE:
- ·
If the certification ECU (smart key ECU assembly) or main body ECU (multiplex network body ECU) is replaced, refer to Service Bulletin.
·The back door closer system uses the CAN communication system. First, confirm that there are no malfunctions in the CAN communication system. Refer to How to Proceed with Troubleshooting.
·As the door control battery is installed between the vehicle battery and main body ECU (multiplex network body ECU), first perform the inspections in On-Vehicle Inspection to confirm that there are no malfunctions in the power source circuit for the main body ECU (multiplex network body ECU) before performing this troubleshooting procedure.*
Click hereVehicle Interior>DOOR LOCK>POWER DOOR LOCK CONTROL SYSTEM>ON-VEHICLE INSPECTION
*: for LHD
PROCEDURE
Check for DTCs.
Click hereVehicle Exterior>DOOR / HATCH>BACK DOOR CLOSER SYSTEM>DTC CHECK / CLEAR
- Body Electrical > Back Door > Trouble Codes
- 50001 159
- Result:
Result Proceed to DTCs are not output A DTC B2250 is output B DTC B2251 is output C
A
B
C
Check the basic functions of the power door lock.
Click hereVehicle Interior>DOOR LOCK>POWER DOOR LOCK CONTROL SYSTEM>OPERATION CHECK
- OK:
The basic functions of the power door lock can be operated normally.
- Result:
Proceed to OK NG
OK
NG
Connect the GTS to the DLC3.
Turn the engine switch on (IG).
Turn the GTS on.
Enter the following menus: Body Electrical / Main Body / Data List.
Read the Data List according to the display on the GTS.
- Body Electrical > Main Body > Data List
-
Tester Display Measurement Item Range Normal Condition Diagnostic Note Back Door Open Back door condition signal Permit or Prohibit Permit: Back door unlocked
Prohibit: Back door locked-
- Body Electrical > Main Body > Data List
-
Tester Display Back Door Open - 50003 123 27
- OK:
On the GTS screen, Permit or Prohibit is displayed accordingly.
- Result:
Proceed to OK NG
OK
NG
Connect the GTS to the DLC3.
Turn the engine switch on (IG).
Turn the GTS on.
Enter the following menus: Body Electrical / Back Door / Data List.
Read the Data List according to the display on the GTS.
- Body Electrical > Back Door > Data List
-
Tester Display Measurement Item Range Normal Condition Diagnostic Note Door Lock Status Back door lock condition signal Lock or Unlock Lock: Back door locked
Unlock: Back door unlocked-
- Body Electrical > Back Door > Data List
-
Tester Display Door Lock Status - 50003 159 1
- OK:
On the GTS screen, Lock or Unlock is displayed accordingly.
- Result:
Proceed to OK NG
OK
NG
Connect the GTS to the DLC3.
Turn the engine switch on (IG).
Turn the GTS on.
Enter the following menus: Body Electrical / Entry & Start / Data List.
Read the Data List according to the display on the GTS.
- Body Electrical > Entry&Start > Data List
-
Tester Display Measurement Item Range Normal Condition Diagnostic Note Tr/B-Door Unlock SW Back door opener switch assembly signal ON or OFF ON: Back door opener switch assembly on
OFF: Back door opener switch assembly off-
- Body Electrical > Entry&Start > Data List
-
Tester Display Tr/B-Door Unlock SW - 50003 125 17
- OK:
On the GTS screen, ON or OFF is displayed accordingly.
- Result:
Proceed to OK NG
OK
NG
Remove the back door lock assembly.
Inspect the back door lock assembly.
Click hereVehicle Interior>DOOR LOCK>BACK DOOR LOCK>INSPECTION
- Result:
Proceed to OK NG
OK
NG
Disconnect the X19 back door lock assembly connector.
Disconnect the X6 and X7 multiplex network door ECU connectors.
Measure the resistance according to the value(s) in the table below.
- Standard Resistance:
Tester Connection Condition Specified Condition X19-1 (M+) - X7-10 (DC+) Always Below 1 Ω X19-2 (M-) - X7-9 (DC-) Always Below 1 Ω X19-3 (CTY) - X6-19 (FUL) Always Below 1 Ω X19-5 (CLS) - X6-21 (HAF) Always Below 1 Ω X19-6 (OPN) - X6-24 (POS) Always Below 1 Ω X19-4 (E) - Body ground Always Below 1 Ω X19-1 (M+) or X7-10 (DC+) - Body ground Always 10 kΩ or higher X19-2 (M-) or X7-9 (DC-) - Body ground Always 10 kΩ or higher X19-3 (CTY) or X6-19 (FUL) - Body ground Always 10 kΩ or higher X19-5 (CLS) or X6-21 (HAF) - Body ground Always 10 kΩ or higher X19-6 (OPN) or X6-24 (POS) - Body ground Always 10 kΩ or higher
- Result:
Proceed to OK NG
OK
NG
Temporarily replace the multiplex network door ECU with a new or known good one.
Click hereVehicle Exterior>DOOR / HATCH>BACK DOOR CLOSER ECU>REMOVAL
- Result:
Proceed to NEXT
NEXT
Check the back door open operation.
Click hereVehicle Interior>DOOR LOCK>POWER DOOR LOCK CONTROL SYSTEM>OPERATION CHECK
- Result:
Result Proceed to Back door can be opened A Back door cannot be opened B
A
B
Remove the back door opener switch assembly.
Click hereVehicle Exterior>DOOR / HATCH>BACK DOOR OPENER SWITCH>REMOVAL
Inspect the back door opener switch assembly.
Click hereVehicle Exterior>DOOR / HATCH>BACK DOOR OPENER SWITCH>INSPECTION
- Result:
Proceed to OK NG
OK
NG
Disconnect the q1 back door opener switch assembly connector.
Disconnect the F12 certification ECU (smart key ECU assembly) connector.
Measure the resistance according to the value(s) in the table below.
- Standard Resistance:
Tester Connection Condition Specified Condition q1-3 (BDSU) - F12-5 (TSW5) Always Below 1 Ω q1-2 (GND) - Body ground Always Below 1 Ω q1-3 (BDSU) or F12-5 (TSW5) - Body ground Always 10 kΩ or higher
- Result:
Proceed to OK NG
OK
NG