DRIVE SHAFT / PROPELLER SHAFT FRONT DRIVE SHAFT ASSEMBLY(for 2GR-FKS) INSTALLATION
CAUTION / NOTICE / HINT
- HINT:
- ·
Use the same procedure for the RH side and LH side.
·The procedure listed below is for the LH side.
PROCEDURE

 43420G
1.INSTALL FRONT DRIVE SHAFT HOLE SNAP RING (for LH Side)
Install a new front drive shaft hole snap ring.
- NOTICE:
-
Face the end gap of the front drive shaft hole snap ring downward.
43420
2.INSTALL FRONT DRIVE SHAFT ASSEMBLY LH
Coat the snap ring of the front drive inboard joint assembly with MP grease.
Coat the splines of the front drive inboard joint assembly with Toyota genuine ATF WS.
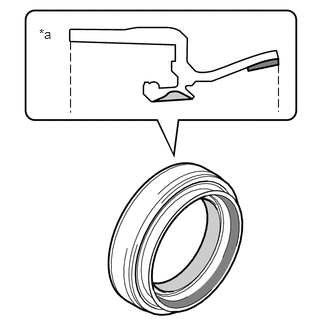
| *a | Cross Section of Front Drive Shaft Oil Seal LH |

|
MP Grease |

|
Toyota Genuine Oil Seal Side Lip Grease |
Coat the lip of the front drive shaft oil seal LH with MP grease and Toyota genuine oil seal side lip grease as shown in the illustration.
- HINT:
-
Apply a light coat of MP grease and Toyota genuine oil seal side lip grease to the entire circumference of the front drive shaft oil seal LH.
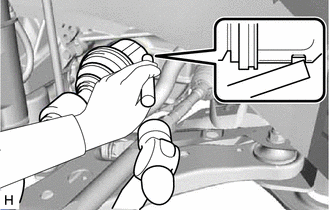
Align the inboard joint splines, and using a brass bar and a hammer, install the front drive shaft assembly LH.
- NOTICE:
- ·
Face the end gap of the front drive shaft hole snap ring downward.
·Do not damage the front drive shaft oil seal LH.
·Do not damage the front axle inboard joint boot.
·Make sure to center the front drive shaft assembly LH during installation to prevent damage to the front drive shaft hole snap ring.
- HINT:
-
Confirm whether the drive shaft is securely driven in by checking the reaction force and sound.
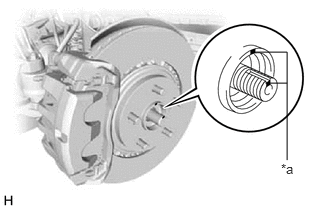
| *a | Matchmark |
Align the matchmarks and install the front drive shaft assembly LH to the front axle hub sub-assembly.
- NOTICE:
- ·
Do not push the front axle assembly further out of the vehicle than is necessary.
·Be careful not to damage the front axle outboard joint boot.
·Check for any foreign matter on the speed sensor rotor and insertion part.
·Do not damage the speed sensor rotor.
43410
3.INSTALL FRONT DRIVE SHAFT ASSEMBLY RH (for 2WD)
Coat the splines of the front drive inboard joint assembly with Toyota genuine ATF WS.
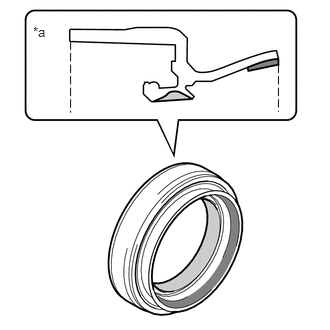
| *a | Cross Section of Front Drive Shaft Oil Seal RH |
|
|
MP Grease |
|
|
Toyota Genuine Oil Seal Side Lip Grease |
Coat the lip of the front drive shaft oil seal RH with MP grease and Toyota genuine oil seal side lip grease as shown in the illustration.
- HINT:
-
Apply a light coat of MP grease and Toyota genuine oil seal side lip grease to the entire circumference of the front drive shaft oil seal RH.
Align the inboard joint splines, and securely insert the front drive shaft assembly RH.
- NOTICE:
- ·
Do not damage the front drive shaft oil seal RH.
·Do not damage the front axle inboard joint boot.
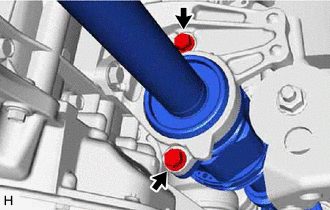
Install the front drive shaft assembly RH with the 2 bolts.
- Torque:
- 63.7 N*m (650 kgf*cm, 47 ft.*lbf)
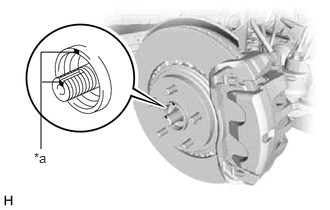
| *a | Matchmark |
Align the matchmarks and install the front drive shaft assembly RH to the front axle hub sub-assembly.
- NOTICE:
- ·
Do not push the front axle assembly further out of the vehicle than is necessary.
·Be careful not to damage the front axle outboard joint boot.
·Check for any foreign matter on the speed sensor rotor and insertion part.
·Do not damage the speed sensor rotor.
43410
4.INSTALL FRONT DRIVE SHAFT ASSEMBLY RH (for AWD)
Coat the splines of the front drive inboard joint assembly with Toyota genuine ATF WS.
Coat the lip of the transfer case oil seal RH with MP grease.
Install a new bearing bracket hole snap ring to the front drive shaft assembly RH.
Align the inboard joint splines, and securely insert the front drive shaft assembly RH.
- NOTICE:
- ·
Do not damage the transfer case oil seal RH.
·Do not damage the front axle inboard joint boot.
·When inserting the front drive shaft assembly RH, keep it level.
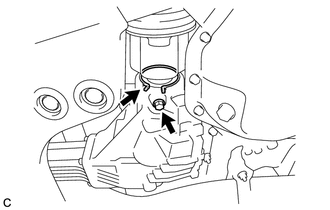
Install the bearing bracket hole snap ring and a new No. 1 drive shaft bearing bracket setting bolt.
- Torque:
- 32.4 N*m (330 kgf*cm, 24 ft.*lbf)
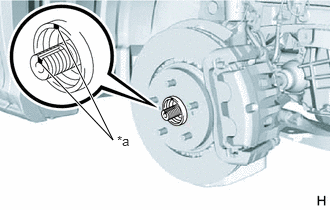
| *a | Matchmark |
Align the matchmarks and install the front drive shaft assembly RH to the front axle hub sub-assembly.
- NOTICE:
- ·
Do not damage the front disc brake dust cover.
·Be careful not to damage the front axle outboard joint boot.
·Check that there is no foreign matter on the contact surfaces.
·Do not push the front axle assembly further out of the vehicle than is necessary.
5.INSTALL ENGINE MOUNTING BRACKET RH (for AWD)
Temporarily install the engine mounting insulator RH with the 3 nuts.
Install the engine mounting bracket RH with the 3 bolts.
- Torque:
- 54 N*m (551 kgf*cm, 40 ft.*lbf)
6.INSTALL ENGINE MOUNTING INSULATOR RH (for AWD)
Fully tighten the engine mounting insulator RH with the 3 nuts.
- Torque:
- 99 N*m (1010 kgf*cm, 73 ft.*lbf)
Install the 2 hole plugs.
Install the engine mounting insulator RH with the nut.
- Torque:
- 95 N*m (969 kgf*cm, 70 ft.*lbf)
48069
7.CONNECT FRONT LOWER NO. 1 SUSPENSION ARM SUB-ASSEMBLY
48810
8.INSTALL FRONT STABILIZER LINK ASSEMBLY
45470
9.CONNECT TIE ROD ASSEMBLY
89543
10.INSTALL FRONT SPEED SENSOR
Install the front speed sensor to the steering knuckle with the bolt.
- Torque:
- 8.5 N*m (87 kgf*cm, 75 in.*lbf)
- NOTICE:
-
Do not twist the front speed sensor when installing it.
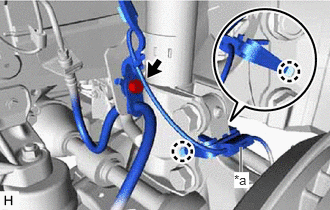
| *a | Sensor Clamp |
Install the front speed sensor and front flexible hose to the front shock absorber assembly with the bolt.
- Torque:
- 18.8 N*m (192 kgf*cm, 14 ft.*lbf)
- NOTICE:
-
Do not twist the front speed sensor and front flexible hose when installing them.
- HINT:
-
Install the front speed sensor harness bracket first and then the front flexible hose.
Engage the 2 claws to install the sensor clamp.
43502H
11.INSTALL FRONT AXLE SHAFT NUT
Clean the threaded parts on the front drive shaft assembly and a new front axle shaft nut using non-residue solvent.
- NOTICE:
- ·
Be sure to perform this work even when using a new front drive shaft assembly.
·Keep the threaded parts free of oil and foreign matter.
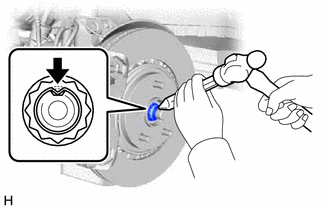
Using a 30 mm socket wrench, install the front axle shaft nut.
- Torque:
- 294 N*m (2998 kgf*cm, 217 ft.*lbf)
- HINT:
-
Keep depressing the brake pedal to prevent the drive shaft from rotating.
Using a chisel and a hammer, stake the front axle shaft nut.
12.ADD TRANSFER OIL (for AWD)
13.ADD AUTOMATIC TRANSAXLE FLUID
14.INSPECT TRANSFER OIL LEAK (for AWD)
53737B
15.INSTALL FRONT FENDER APRON SEAL LH
53736
16.INSTALL FRONT FENDER APRON SEAL RH (for AWD)
51441
17.INSTALL NO. 1 ENGINE UNDER COVER
18.INSTALL FRONT WHEELS
- Torque:
- 103 N*m (1050 kgf*cm, 76 ft.*lbf)
19.INSPECT AND ADJUST FRONT WHEEL ALIGNMENT
20.CHECK FOR SPEED SENSOR SIGNAL