2GR-FKS INTAKE / EXHAUST INTAKE MANIFOLD INSTALLATION
PROCEDURE

 1.INSTALL STUD BOLT
- HINT:
-
If a stud bolt is deformed or the threads are damaged, replace it.
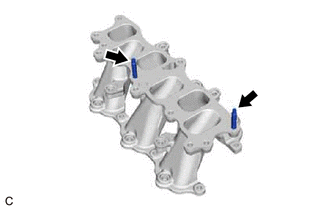
Using an E8 "TORX" socket wrench, install the 2 stud bolts to the intake manifold.
- Torque:
- 10 N*m (102 kgf*cm, 7 ft.*lbf)
17177
2.INSTALL NO. 1 INTAKE MANIFOLD TO HEAD GASKET
Install 2 new No. 1 intake manifold to head gaskets to each cylinder head sub-assembly.
- NOTICE:
- ·
Align the port holes of the No. 1 intake manifold to head gaskets and cylinder head sub-assembly.
·Make sure that the No. 1 intake manifold to head gaskets are installed in the correct direction.
17111
3.INSTALL INTAKE MANIFOLD
Temporarily install the intake manifold to the cylinder head sub-assembly with the 4 bolts and 4 nuts.
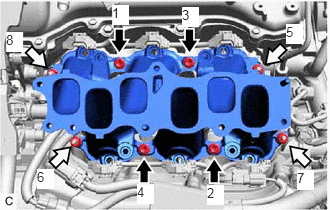

|
Bolt |

|
Nut |
Tighten the 4 bolts and 4 nuts in the order shown in the illustration.
- Torque:
- 21 N*m (214 kgf*cm, 15 ft.*lbf)
23291
4.INSTALL INJECTOR VIBRATION INSULATOR
23807V
5.INSTALL NO. 1 DELIVERY PIPE SPACER
23800
6.INSTALL FUEL DELIVERY PIPE WITH SENSOR ASSEMBLY
7.CONNECT FUEL TUBE SUB-ASSEMBLY
12327A
8.INSTALL NO. 2 ENGINE MOUNTING STAY RH
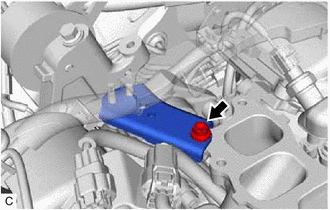
Install the No. 2 engine mounting stay RH to the intake manifold and engine mounting insulator sub-assembly RH with the bolt.
- Torque:
- 21 N*m (214 kgf*cm, 15 ft.*lbf)
Install the wire harness clamp bracket to the No. 2 engine mounting stay RH with the bolt.
- Torque:
- 10 N*m (102 kgf*cm, 7 ft.*lbf)
Engage the wire harness clamp to the wire harness clamp bracket.
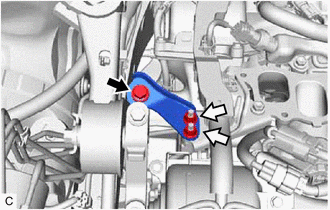
|
|
Bolt |
|
|
Nut |
Install the No. 2 engine mounting stay RH to the engine moving control rod with the bolt and 2 nuts.
- Torque:
- Bolt: : 38 N*m (387 kgf*cm, 28 ft.*lbf)
- Nut: : 23 N*m (235 kgf*cm, 17 ft.*lbf)
11254
9.INSTALL NO. 1 V-BANK COVER BRACKET
- HINT:
-
Perform this procedure only when replacement of the No. 1 V-bank cover bracket is necessary.
Install the 2 No. 1 V-bank cover brackets to the intake air surge tank assembly.
- Torque:
- 9.0 N*m (92 kgf*cm, 80 in.*lbf)
17176
10.INSTALL AIR SURGE TANK TO INTAKE MANIFOLD GASKET
Install a new air surge tank to intake manifold gasket to the intake air surge tank assembly.
17190
11.INSTALL INTAKE AIR SURGE TANK ASSEMBLY
- NOTICE:
-
Do not apply oil to the bolts and nuts as listed below:
Oil Application Prohibited Bolt and Nut Bolt and Nut for Intake Air Surge Tank Assembly and Intake Manifold
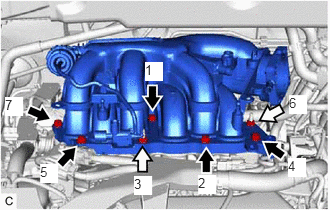
Temporarily install the intake air surge tank assembly to the intake manifold with the 5 bolts and 2 nuts.
Temporarily install the No. 2 surge tank stay to the intake air surge tank assembly and camshaft housing RH with the 2 bolts.
|
|
Bolt |
|
|
Nut |
Tighten the 5 bolts and 2 nuts in the order shown in the illustration.
- Torque:
- 21 N*m (214 kgf*cm, 15 ft.*lbf)
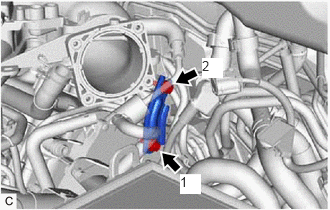
Tighten the 2 bolts in the order shown in the illustration.
- Torque:
- 21 N*m (214 kgf*cm, 15 ft.*lbf)
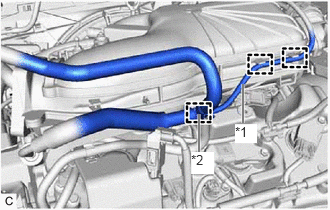
| *1 | Vacuum Hose Sub-assembly |
| *2 | No. 2 Air Tube |
Engage the clamp to connect the No. 2 air tube to the intake air surge tank assembly.
Engage the 2 clamps to connect the vacuum hose sub-assembly to the intake air surge tank assembly.
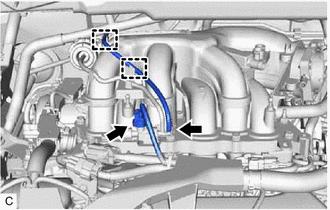
Engage the 2 clamps to connect the vacuum hose sub-assembly to the intake air surge tank assembly.
Connect the vacuum switching valve (for ACIS) connector.
25860
12.CONNECT PURGE VALVE (PURGE VSV)
Connect the purge valve (purge VSV) to the intake air surge tank assembly with the bolt.
- Torque:
- 21 N*m (214 kgf*cm, 15 ft.*lbf)
Connect the No. 1 fuel vapor feed hose to the intake air surge tank assembly.
12261
13.CONNECT VENTILATION HOSE
Connect the ventilation hose to the intake air surge tank assembly and slide the clip to secure it.
47233
14.INSTALL RESERVOIR BRACKET (for RHD)
47220D
15.INSTALL BRAKE MASTER CYLINDER RESERVOIR ASSEMBLY (for RHD)
22030
16.INSTALL THROTTLE BODY WITH MOTOR ASSEMBLY
55701J
17.INSTALL OUTER COWL TOP PANEL SUB-ASSEMBLY (for LHD)
55701J
18.INSTALL OUTER COWL TOP PANEL SUB-ASSEMBLY (for RHD)
19.INSTALL WINDSHIELD WIPER MOTOR AND LINK ASSEMBLY
20.CONNECT CABLE TO NEGATIVE BATTERY TERMINAL
- NOTICE:
-
When disconnecting the cable, some systems need to be initialized after the cable is reconnected.
-
Click hereGeneral>INTRODUCTION>REPAIR INSTRUCTION>INITIALIZATION
21.INSPECT FOR FUEL LEAK
11209
22.INSTALL V-BANK COVER SUB-ASSEMBLY