REAR SUSPENSION REAR COIL SPRING INSTALLATION
CAUTION / NOTICE / HINT
- HINT:
- ·
Use the same procedure for the RH side and LH side.
·The following procedure is for the LH side.
PROCEDURE

 48049A
1.INSTALL SPRING SEAT SUB-ASSEMBLY
- HINT:
-
Perform this procedure only when replacement of the spring seat sub-assembly is necessary.
Install the spring seat sub-assembly to the vehicle with the 3 bolts.
- Torque:
- 50 N*m (510 kgf*cm, 37 ft.*lbf)
48259A
2.INSTALL REAR UPPER COIL SPRING INSULATOR
Install the rear upper coil spring insulator to the spring seat sub-assembly.
48258C
3.INSTALL REAR LOWER COIL SPRING INSULATOR
for LH Side:
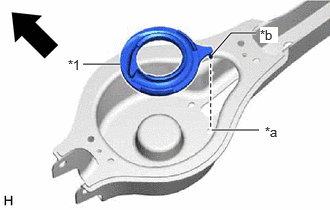
| *1 | Rear Lower Coil Spring Insulator LH |
| *a | Guide Hole |
| *b | Protrusion |

|
Front of the Vehicle |
Install the rear lower coil spring insulator LH to the rear No. 2 suspension arm assembly LH.
- NOTICE:
-
Securely insert the protrusion of the rear lower coil spring insulator LH into the guide hole of the rear No. 2 suspension arm assembly LH.
for RH Side:
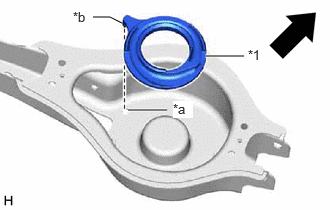
| *1 | Rear Lower Coil Spring Insulator RH |
| *a | Guide Hole |
| *b | Protrusion |
|
|
Front of the Vehicle |
Install the rear lower coil spring insulator RH to the rear No. 2 suspension arm assembly RH.
- NOTICE:
-
Securely insert the protrusion of the rear lower coil spring insulator RH into the guide hole of the rear No. 2 suspension arm assembly RH.
48231B
4.INSTALL REAR COIL SPRING
for LH Side:
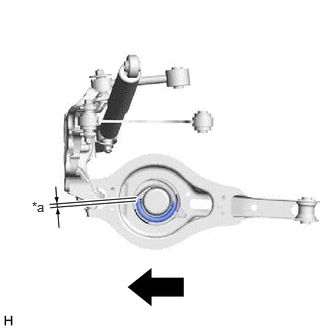
| *a | 20 mm (0.787 in.) or less |
|
|
Outside of the Vehicle |
Set the rear coil spring LH to the rear No. 2 suspension arm assembly LH.
- NOTICE:
- ·
The larger diameter end must face upward.
·Set the rear coil spring so that its lower end is within the range shown in the illustration.
·Install the rear lower coil spring insulator LH so that the dimension between the stopper and lower end of the rear coil spring LH is 20 mm (0.787 in.) or less.
for RH Side:
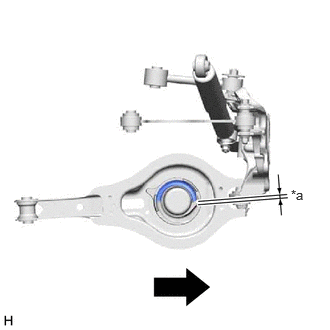
| *a | 20 mm (0.787 in.) or less |
|
|
Outside of the Vehicle |
Set the rear coil spring RH to the rear No. 2 suspension arm assembly RH.
- NOTICE:
- ·
The larger diameter end must face upward.
·Set the rear coil spring so that its lower end is within the range shown in the illustration.
·Install the rear lower coil spring insulator RH so that the dimension between the stopper and lower end of the rear coil spring RH is 20 mm (0.787 in.) or less.
Using a jack and wooden block, slowly jack up the rear No. 2 suspension arm assembly and then temporarily install the rear No. 2 suspension arm assembly to the rear axle carrier sub-assembly with the bolt and nut.
- CAUTION:
-
Do not jack up the rear No. 2 suspension arm assembly too high as the vehicle may fall.
- NOTICE:
- ·
Because the nut has its own stopper, do not turn the nut. Tighten the bolt with the nut secured.
·When jacking up the rear No. 2 suspension arm assembly, be sure to jack it up slowly.
·Make sure to perform this operation with the vehicle kept as low as possible.
·Insert the bolt with the threaded end facing the front of the vehicle.
5.STABILIZE SUSPENSION
48740F
6.INSTALL REAR NO. 2 SUSPENSION ARM ASSEMBLY
Install the rear No. 2 suspension arm assembly (rear axle carrier sub-assembly side) with the bolt.
Click hereSuspension>REAR SUSPENSION>REAR LOWER ARM>INSTALLATION
7.CONNECT REAR STABILIZER LINK ASSEMBLY
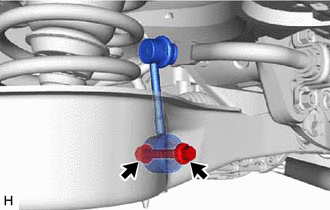
Connect the rear stabilizer link assembly to the rear No. 2 suspension arm assembly with the bolt and nut.
- Torque:
- 70 N*m (714 kgf*cm, 52 ft.*lbf)
- NOTICE:
- ·
Insert the bolt with the threaded end facing the front of the vehicle.
·Because the nut has its own stopper, do not turn the nut. Tighten the bolt with the nut secured.
48738
8.INSTALL REAR SUSPENSION ARM COVER
17430
9.INSTALL TAIL EXHAUST PIPE ASSEMBLY (for RH Side)
A25A-FXS, A25B-FXS: Click hereEngine / Hybrid System>A25A-FXS, A25B-FXS (INTAKE / EXHAUST)>EXHAUST PIPE>INSTALLATION
for 2GR-FKS: Click hereEngine / Hybrid System>2GR-FKS (INTAKE / EXHAUST)>EXHAUST PIPE>INSTALLATION
10.INSTALL REAR WHEEL
48740F
11.INSTALL REAR NO. 2 SUSPENSION ARM ASSEMBLY
Install the rear No. 2 suspension arm assembly (rear suspension member sub-assembly side) with the nut.
Click hereSuspension>REAR SUSPENSION>REAR LOWER ARM>INSTALLATION
12.INSPECT AND ADJUST REAR WHEEL ALIGNMENT
13.INSPECT FOR EXHAUST GAS LEAK (for RH Side)
A25A-FXS, A25B-FXS: Click hereEngine / Hybrid System>A25A-FXS, A25B-FXS (INTAKE / EXHAUST)>EXHAUST PIPE>INSTALLATION
for 2GR-FKS: Click hereEngine / Hybrid System>2GR-FKS (INTAKE / EXHAUST)>EXHAUST PIPE>INSTALLATION
14.PERFORM INITIALIZATION
| Parking Support Brake System | ( ) |
| Parking Assist Monitor System | ()
|
| Panoramic View Monitor System | ()
|