A25A-FXS, A25B-FXS FUEL FUEL TANK INSTALLATION
PROCEDURE

 77656B
1.INSTALL NO. 6 FUEL TANK CUSHION
- HINT:
-
Perform this procedure only when replacement of the No. 6 fuel tank cushion is necessary.
Install 5 new No. 6 fuel tank cushions to the fuel tank sub-assembly.
77606
2.INSTALL NO. 1 FUEL TANK PROTECTOR SUB-ASSEMBLY
Engage the 2 claws to install the No. 1 fuel tank protector sub-assembly to the fuel tank sub-assembly.
77642A
3.INSTALL NO. 2 FUEL TANK PROTECTOR
Engage the 2 clips to install the No. 2 fuel tank protector to the fuel tank sub-assembly.
77697
4.INSTALL NO. 1 FUEL TANK HEAT INSULATOR
Install the No. 1 fuel tank heat insulator to the fuel tank sub-assembly with the 3 clips.
5.INSTALL NO. 3 FUEL TUBE CLAMP
Engage the clamp to install the No. 3 fuel tube clamp to the fuel tank sub-assembly.
6.INSTALL FUEL TANK WIRE
Engage the 4 clamps to install the fuel tank wire to the fuel tank sub-assembly.
77018E
7.INSTALL FUEL TANK EVAPORATION VENT TUBE SUB-ASSEMBLY
Engage the 2 clamps to install the fuel tank evaporation vent tube sub-assembly to the fuel tank sub-assembly.
Engage the clamp to connect the fuel cut off valve with tube assembly to the fuel tank evaporation vent tube sub-assembly.
Click hereEngine / Hybrid System>A25A-FXS, A25B-FXS (FUEL)>FUEL SYSTEM>PRECAUTION
77209F
8.INSTALL FUEL TANK MAIN TUBE SUB-ASSEMBLY
Engage the 2 clamps to install the fuel tank main tube sub-assembly to the fuel tank sub-assembly.
77020A
9.INSTALL FUEL SUCTION TUBE WITH PUMP AND GAUGE ASSEMBLY
77144
10.INSTALL FUEL PUMP GAUGE RETAINER
77209F
11.CONNECT FUEL TANK MAIN TUBE SUB-ASSEMBLY
77018E
12.CONNECT FUEL TANK EVAPORATION VENT TUBE SUB-ASSEMBLY
13.CONNECT FUEL TANK WIRE
77001A
14.INSTALL FUEL TANK SUB-ASSEMBLY
- CAUTION:
-
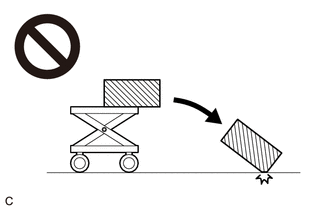
-
The fuel tank sub-assembly is very heavy. Be sure to follow the procedure described in the repair manual, or the fuel tank sub-assembly may fall off the engine lifter.
Set the fuel tank sub-assembly on an engine lifter.
- NOTICE:
-
Using height adjustment attachments and plate lift attachments, keep the fuel tank sub-assembly horizontal.
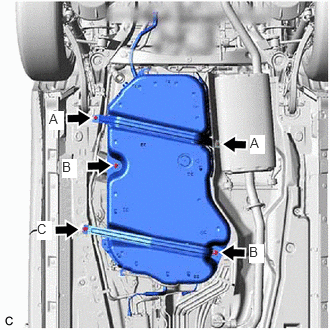
Using the engine lifter, slowly raise the fuel tank sub-assembly, and then temporarily install the fuel tank sub-assembly, No. 1 fuel tank band sub-assembly and No. 2 fuel tank band sub-assembly with the 5 bolts.
- Bolt Length:
Bolt Width Across Flats A 14 mm (0.551 in.) B 12 mm (0.472 in.) C 12 mm (0.472 in.) or 14 mm (0.551 in.)
- NOTICE:
- ·
Be careful not to drop the fuel tank sub-assembly.
·When installing the fuel tank sub-assembly, tilt it slightly to prevent it from interfering with the surrounding parts.
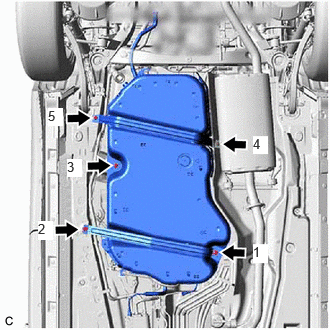
Tighten the 5 bolts in the order shown in the illustration.
- Torque:
- 45 N*m (459 kgf*cm, 33 ft.*lbf)
Connect the 2 No. 2 floor wire connectors.
Connect the fuel tank breather tube sub-assembly to the fuel tank filler pipe sub-assembly.
Click hereEngine / Hybrid System>A25A-FXS, A25B-FXS (FUEL)>FUEL SYSTEM>PRECAUTION
77201E
15.CONNECT FUEL TANK FILLER PIPE SUB-ASSEMBLY
Connect the fuel tank filler pipe sub-assembly to the fuel tank sub-assembly.
Click hereEngine / Hybrid System>A25A-FXS, A25B-FXS (FUEL)>FUEL SYSTEM>PRECAUTION
77209F
16.CONNECT FUEL TANK MAIN TUBE SUB-ASSEMBLY
Connect the fuel tank main tube sub-assembly to the fuel pipe.
Click hereEngine / Hybrid System>A25A-FXS, A25B-FXS (FUEL)>FUEL SYSTEM>PRECAUTION
77018E
17.CONNECT FUEL TANK EVAPORATION VENT TUBE SUB-ASSEMBLY
Connect the fuel tank evaporation vent tube sub-assembly to the canister (charcoal canister assembly).
Click hereEngine / Hybrid System>A25A-FXS, A25B-FXS (FUEL)>FUEL SYSTEM>PRECAUTION
58166A
18.INSTALL FRONT FLOOR COVER LH
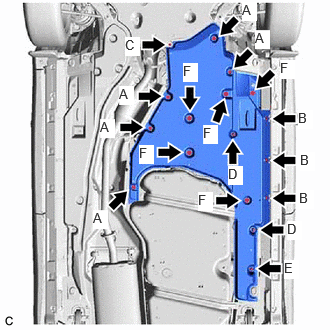
Install the front floor cover LH with the 5 grommets (F), 2 clips (D) and clip (E).
Install the 5 bolts (A), 3 screws (B) and screw (C).
- Torque:
- Bolt : 7.5 N*m (76 kgf*cm, 66 in.*lbf)
19.CONNECT CABLE TO NEGATIVE AUXILIARY BATTERY TERMINAL
58441L
20.INSTALL BATTERY SERVICE HOLE COVER
21.ADD FUEL
22.INSPECT FOR FUEL LEAK