2GR-FKS ENGINE MECHANICAL ENGINE UNIT INSTALLATION
PROCEDURE

 16522
1.INSTALL WATER FILLER BRACKET
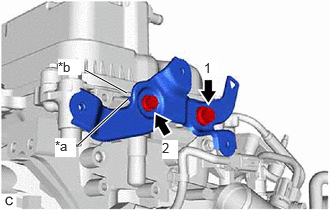
| *a | Stopper |
| *b | Protrusion |
Temporarily install the water filler bracket to the camshaft housing sub-assembly LH with the 2 bolts.
Fully tighten the 2 bolts in the order shown in the illustration.
- Torque:
- 8.0 N*m (82 kgf*cm, 71 in.*lbf)
- NOTICE:
-
Make sure that the stopper of the water filler bracket is pressed against the protrusion of the camshaft housing sub-assembly LH when fully tightening the 2 bolts.
2.INSTALL WIRE HARNESS CLAMP BRACKET
Install the wire harness clamp bracket to the camshaft housing sub-assembly with the bolt.
- Torque:
- 30 N*m (306 kgf*cm, 22 ft.*lbf)
Install the wire harness clamp bracket to the camshaft housing sub-assembly LH with the bolt.
- Torque:
- 30 N*m (306 kgf*cm, 22 ft.*lbf)
43457
3.INSTALL DRIVE SHAFT BEARING BRACKET
Install the drive shaft bearing bracket to the cylinder block sub-assembly with the 3 bolts.
- Torque:
- 63.7 N*m (650 kgf*cm, 47 ft.*lbf)
- NOTICE:
-
Make sure that there is no oil on the threads of the bolts.
12585
4.INSTALL NO. 5 CYLINDER BLOCK INSULATOR
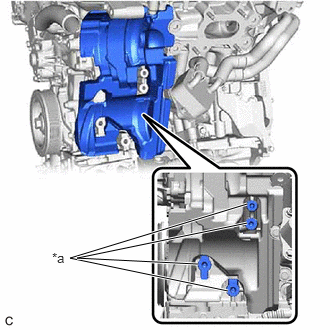
| *a | Fastener Surface |
Install the No. 5 cylinder block insulator to the engine assembly.
- NOTICE:
-
Make sure that the No. 5 cylinder block insulator is not covering any fastener surface.
11452
5.INSTALL ENGINE OIL LEVEL DIPSTICK GUIDE
Install a new engine oil level dipstick guide O-ring to the engine oil level dipstick guide.
Apply a light coat of engine oil to the engine oil level dipstick guide O-ring.
Insert the engine oil level dipstick guide end into the oil pan sub-assembly.
Install the engine oil level dipstick guide to the camshaft housing sub-assembly LH with the bolt.
- Torque:
- 21 N*m (214 kgf*cm, 15 ft.*lbf)
Install the engine oil level dipstick to the engine oil level dipstick guide.
16173
6.INSTALL WATER PUMP PULLEY
16620
7.INSTALL V-RIBBED BELT TENSIONER ASSEMBLY
Install the V-ribbed belt tensioner assembly with the 2 bolts.
- Torque:
- 43 N*m (438 kgf*cm, 32 ft.*lbf)
16604
8.INSTALL NO. 2 IDLER PULLEY SUB-ASSEMBLY
88431
9.INSTALL NO. 1 COMPRESSOR MOUNTING BRACKET
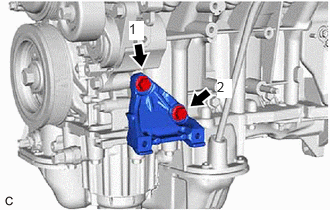
Temporarily install the No. 1 compressor mounting bracket to the cylinder block sub-assembly with the 2 bolts.
Fully tighten the 2 bolts in the order shown in the illustration.
- Torque:
- 43 N*m (438 kgf*cm, 32 ft.*lbf)
10.INSTALL COMPRESSOR AND MAGNETIC CLUTCH
27020
11.INSTALL GENERATOR ASSEMBLY
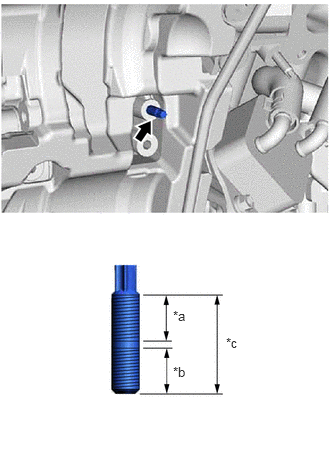
| *a | 14 mm (0.551 in.) |
| *b | 13 mm (0.512 in.) |
| *c | 29 mm (1.14 in.) |
w/ Stud Bolt
Using an E8 "TORX" socket wrench, install the stud bolt to the cylinder block sub-assembly.
- Torque:
- 6.0 N*m (61 kgf*cm, 53 in.*lbf)
Install the generator assembly.
Click herePower Source / Network>2GR-FKS (BATTERY / CHARGING)>GENERATOR>INSTALLATION
16361A
12.INSTALL V-RIBBED BELT
12262
13.INSTALL NO. 2 VENTILATION HOSE
Install the No. 2 ventilation hose to the cylinder head cover sub-assembly and slide the clip to secure it.
12261
14.INSTALL VENTILATION HOSE
Install the ventilation hose to the PCV valve (ventilation valve sub-assembly) and slide the clip to secure it.
16264
15.INSTALL NO. 2 WATER BY-PASS HOSE
Install the No. 2 water by-pass hose to the water outlet and slide the clip to secure it.
16267
16.INSTALL NO. 3 WATER BY-PASS HOSE
Install the No. 3 water by-pass hose to the water inlet pipe and slide the clip to secure it.
16260
17.INSTALL WATER BY-PASS HOSE ASSEMBLY
Install the water by-pass hose assembly to the water inlet pipe and slide the clip to secure it.
29300
18.INSTALL VACUUM PUMP ASSEMBLY
19500
19.INSTALL IGNITION COIL ASSEMBLY
82219A
20.INSTALL SENSOR WIRE
Engage the 2 clamps and install the sensor wire with the bolt.
- Torque:
- 10 N*m (102 kgf*cm, 7 ft.*lbf)
89615
21.INSTALL KNOCK CONTROL SENSOR