P810 HYBRID TRANSMISSION / TRANSAXLE OIL COOLER(for Water Cooled Type) INSTALLATION
PROCEDURE

 G125A
1.INSTALL MOTOR COOLING COOLER
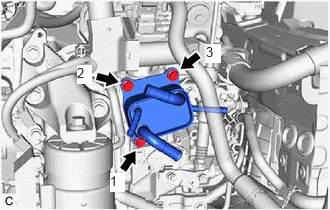
Temporarily install the motor cooling cooler to the No. 1 transmission control cable bracket with the 3 bolts.
Tighten the 3 bolts in the order shown in the illustration.
- Torque:
- 11.5 N*m (117 kgf*cm, 8 ft.*lbf)
G1271C
2.CONNECT NO. 1 MOTOR COOLING HOSE
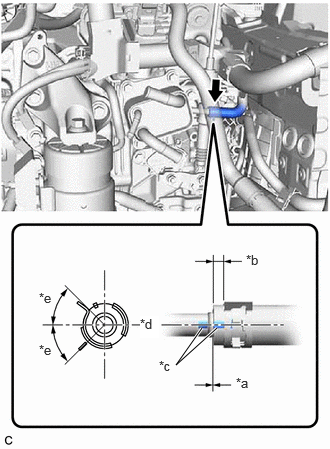
| *a | 0 to 3 mm (0 to 0.118 in.) |
| *b | 2 to 7 mm (0.0787 to 0.276 in.) |
| *c | Paint Mark |
| *d | Center of Paint Mark |
| *e | 45° (Claw of Clip Location) |
Install the No. 1 motor cooling hose to the motor cooling cooler, and slide the clip to secure it.
- NOTICE:
- ·
Be careful not to deform the motor cooling cooler.
·Make sure to align the paint mark of the No. 1 motor cooling hose with the paint mark of the motor cooling cooler.
·Make sure that the claws of the clip are within the location shown in the illustration.
32930G
3.CONNECT NO. 2 TRANSMISSION OIL COOLER HOSE ASSEMBLY
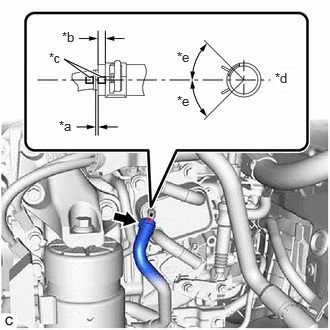
| *a | 0 to 3 mm (0 to 0.118 in.) |
| *b | 2 to 7 mm (0.0787 to 0.276 in.) |
| *c | Paint Mark |
| *d | Center of Paint Mark |
| *e | 45° (Claw of Clip Location) |
Connect the No. 2 transmission oil cooler hose assembly to the motor cooling cooler and slide the clip to secure it.
- NOTICE:
- ·
Make sure to slide the No. 2 transmission oil cooler hose assembly until it contacts the hose stopper of the motor cooling cooler.
·Make sure to align the paint mark of the No. 2 transmission oil cooler hose assembly with the paint mark of the motor cooling cooler.
·Make sure that the claws of the clip are within the location shown in the illustration.
G9229A
4.CONNECT NO. 5 INVERTER COOLING HOSE
G9225K
5.CONNECT NO. 1 INVERTER COOLING HOSE
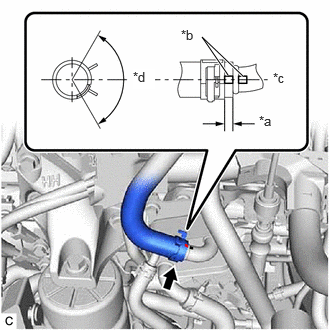
| *a | 2 to 7 mm (0.0787 to 0.276 in.) |
| *b | Paint Mark |
| *c | Center of Paint Mark |
| *d | 120° (Claw of Clip Location) |
Connect the No. 1 inverter cooling hose to the motor cooling cooler, and slide the clip to secure it.
- NOTICE:
- ·
Be careful not to deform the motor cooling cooler.
·Make sure to align the paint mark of the No. 1 inverter cooling hose with the paint mark of the motor cooling cooler.
·Make sure that the claws of the clip are within the location shown in the illustration.
6.INSTALL AIR CLEANER ASSEMBLY WITH AIR CLEANER HOSE
17750A
7.INSTALL INLET AIR CLEANER ASSEMBLY
53295E
8.INSTALL COOL AIR INTAKE DUCT SEAL
12601B
9.INSTALL NO. 1 ENGINE COVER SUB-ASSEMBLY
10.INSPECT HYBRID TRANSAXLE FLUID
11.INSPECT FOR HYBRID TRANSAXLE FLUID LEAK
12.ADD COOLANT (for Inverter)
13.INSPECT FOR COOLANT LEAK (for Inverter)
51420
14.INSTALL NO. 2 ENGINE UNDER COVER ASSEMBLY
51441
15.INSTALL NO. 1 ENGINE UNDER COVER
53851D
16.INSTALL FRONT WHEEL OPENING EXTENSION PAD RH
53852B
17.INSTALL FRONT WHEEL OPENING EXTENSION PAD LH