DOOR LOCK FRONT DOOR LOCK REMOVAL
CAUTION / NOTICE / HINT
The necessary procedures (adjustment, calibration, initialization, or registration) that must be performed after parts are removed and installed, or replaced during front door lock with motor assembly removal/installation are shown below.
| Replaced Part or Performed Procedure | Necessary Procedure | Effect/Inoperative Function when Necessary Procedure not Performed | Link |
|---|---|---|---|
|
*1: Learning can also be performed using the GTS. Click here( |
|||
| Disconnect cable from negative auxiliary battery terminal | Perform steering sensor zero point calibration | Lane Control System | ( ) |
| Parking Support Brake System*1 | |||
| Pre-collision System | |||
| Memorize steering angle neutral point | Parking Assist Monitor System | ()
|
|
| Panoramic View Monitor System | ()
|
||
| Initialize back door lock | Power Door Lock Control System | ()
|
|
| Reset back door close position | Power Back Door System | ()
|
|
- NOTICE:
-
After the ignition switch is turned off, the radio and display receiver assembly or the radio receiver assembly records various types of memory and settings. As a result, after turning the ignition switch off, make sure to wait at least 120 seconds before disconnecting the cable from the negative (-) auxiliary battery terminal.
| Replaced Part or Performed Procedure | Necessary Procedure | Effect/Inoperative Function when Necessary Procedure not Performed | Link |
|---|---|---|---|
|
*1: Learning can also be performed using the GTS. Click here( |
|||
| Disconnect cable from negative auxiliary battery terminal | Idle the engine for approximately 5 to 60 minutes or drive the vehicle until stop and start control is permitted | Stop and Start System | ()
|
| Perform steering sensor zero point calibration | Lane Control System | ()
|
|
| Parking Support Brake System*1 | |||
| Pre-collision System | |||
| Memorize steering angle neutral point | Parking Assist Monitor System | ()
|
|
| Panoramic View Monitor System | ()
|
||
| Initialize back door lock | Power Door Lock Control System | ()
|
|
| Reset back door close position | Power Back Door System | ()
|
|
- NOTICE:
-
After the ignition switch is turned off, the radio and display receiver assembly or the radio receiver assembly records various types of memory and settings. As a result, after turning the ignition switch off, make sure to wait at least 120 seconds before disconnecting the cable from the negative (-) auxiliary battery terminal.
- HINT:
- ·
Use the same procedure for the RH side and LH side.
·The following procedure is for the LH side.
PROCEDURE

 1. PRECAUTION
- NOTICE:
-
After turning the ignition switch off, waiting time may be required before disconnecting the cable from the negative (-) auxiliary battery terminal. Therefore, make sure to read the disconnecting the cable from the negative (-) auxiliary battery terminal notices before proceeding with work.
58441L
2.REMOVE BATTERY SERVICE HOLE COVER (for HV Model)
3.DISCONNECT CABLE FROM NEGATIVE AUXILIARY BATTERY TERMINAL
for 2GR-FKS:
Click hereGeneral>MAINTENANCE>2GR-FKS BATTERY>REMOVAL
for A25A-FXS, A25B-FXS:
Click hereGeneral>MAINTENANCE>A25A-FXS, A25B-FXS AUXILIARY BATTERY>REMOVAL
67492A
4.REMOVE FRONT DOOR LOWER FRAME BRACKET GARNISH
5.REMOVE MULTIPLEX NETWORK MASTER SWITCH ASSEMBLY WITH FRONT DOOR UPPER ARMREST BASE PANEL (for Driver Side)
6.REMOVE POWER WINDOW REGULATOR SWITCH ASSEMBLY WITH FRONT DOOR UPPER ARMREST BASE PANEL (for Front Passenger Side)
69278B
7.REMOVE FRONT DOOR INSIDE HANDLE BEZEL
81230N
8.REMOVE COURTESY LIGHT ASSEMBLY
67602
9.REMOVE FRONT DOOR TRIM BOARD SUB-ASSEMBLY
67869J
10.REMOVE FRONT DOOR WEATHERSTRIP CLIP
67832
11.REMOVE FRONT DOOR SERVICE HOLE COVER
69040A
12.REMOVE FRONT DOOR LOCK WITH MOTOR ASSEMBLY
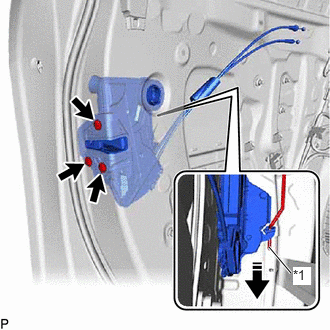
| *1 | Front Door Lock Open Rod |

|
Remove in this Direction |
Using a T30 "TORX" socket wrench, remove the 3 screws.
Slide the front door lock with motor assembly downward as shown in the illustration to disconnect the front door lock open rod and remove the front door lock with motor assembly and cables as a unit.
When reusing the front door lock with motor assembly:
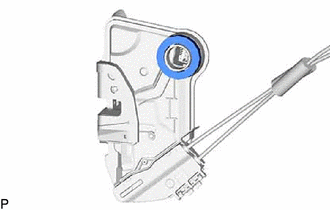
Remove the door lock wiring harness seal from the front door lock with motor assembly.
69036A
13.REMOVE FRONT DOOR LOCK COVER SUB-ASSEMBLY
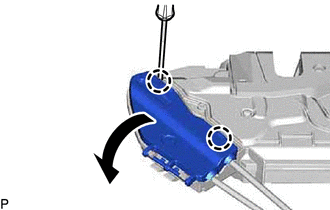
Using a screwdriver, disengage the 2 claws as shown in the illustration.
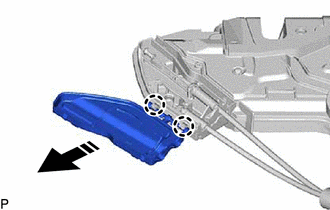
|
|
Remove in this Direction |
Disengage the 2 claws to remove the front door lock cover sub-assembly as shown in the illustration.
69720B
14.REMOVE FRONT DOOR LOCK REMOTE CONTROL CABLE ASSEMBLY
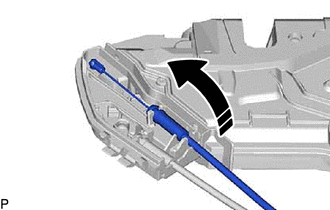
|
|
Remove in this Direction |
Remove the front door lock remote control cable assembly as shown in the illustration.
69760C
15.REMOVE FRONT DOOR INSIDE LOCKING CABLE ASSEMBLY
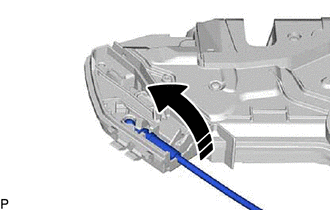
|
|
Remove in this Direction |
Remove the front door inside locking cable assembly as shown in the illustration.