DIFFERENTIAL CARRIER ASSEMBLY > INSTALLATION |
| 1. INSTALL REAR DIFFERENTIAL CARRIER ASSEMBLY |
Clean the contact surfaces of the differential carrier and axle housing.
Install the differential carrier and a new gasket with the 10 nuts and washers.
| 2. INSTALL REAR AXLE SHAFT WITH BACKING PLATE LH |
| 3. INSTALL REAR AXLE SHAFT WITH BACKING PLATE RH |
| 4. INSTALL REAR PROPELLER SHAFT ASSEMBLY |
| 5. ADD DIFFERENTIAL OIL |
|
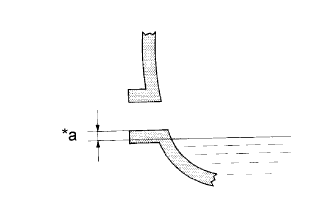
Add differential oil so that the oil level is within 5 mm (0 to 0.196 in.) from the bottom lip of the differential filler plug hole.
| Temperature | Viscosity |
| Above -18°C (0°F) | SAE 90 |
| Below -18°C (0°F) | SAE 80W-90 or SAE 80W |
| Item | Specified Condition |
| Front differential (4WD) | Hypoid gear oil API GL-4 or GL-5 |
| Rear differential | Hypoid gear oil API GL-5 |
| Item | Specified Condition |
| Standard | 3.30 to 3.40 liters (3.49 to 3.59 US qts., 2.90 to 2.99 Imp. qts.) |
| w/ Differential lock | 2.85 to 2.95 liters (3.01 to 3.12 US qts., 2.51 to 2.60 Imp. qts.) |
| Made for DANA | 2.40 to 2.50 liters (2.54 to 2.64 US qts., 2.11 to 2.20 Imp. qts.) |
Check for oil leakage when the oil level is low.
for front differential:
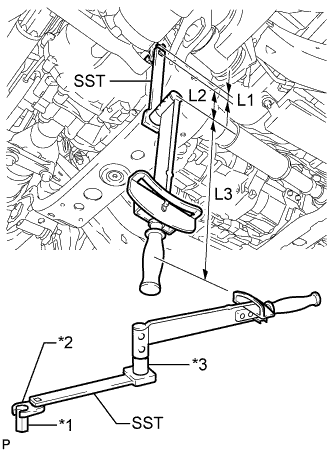 |
Using SST and the 10 mm straight hexagon wrench, 10 mm union nut wrench and socket adaptor, install a new gasket and the differential filler plug.
| *1 | 10 mm Straight Hexagon Wrench |
| *2 | 10 mm Union Nut Wrench |
| *3 | Socket Adaptor |
for rear differential:
Install a new gasket and the differential filler plug.
| 6. BLEED AIR FROM BRAKE LINE |
w/ VSC:
(Click here)
w/o VSC:
(Click here)
| 7. ADJUST PARKING BRAKE |
| 8. INSTALL REAR WHEEL |
| 9. CHECK ABS SPEED SENSOR SIGNAL |
w/ VSC:
(Click here )
w/o VSC:
(Click here)