ENGINE ASSEMBLY > INSTALLATION |
| 1. INSTALL NO. 1 FRONT ENGINE MOUNTING BRACKET RH |
Install the No. 1 front engine mounting bracket with the 4 bolts.
| 2. INSTALL NO. 1 FRONT ENGINE MOUNTING BRACKET LH |
Install the No. 1 front engine mounting bracket with the 4 bolts.
| 3. INSTALL FRONT ENGINE MOUNTING INSULATOR |
Install the 2 front engine mounting insulators with the 2 nuts.
| 4. INSTALL ENGINE COOLANT TEMPERATURE SENSOR |
Using a 19 mm deep socket wrench, install a new gasket and the engine coolant temperature sensor.
| 5. INSTALL CAMSHAFT POSITION SENSOR |
Install the camshaft position sensor with the bolt.
| 6. INSTALL CRANKSHAFT POSITION SENSOR |
Install the crankshaft position sensor with the bolt.
| 7. INSTALL VANE PUMP ASSEMBLY |
Install a new O-ring to the vane pump.
Install the vane pump with the 2 nuts.
| 8. INSTALL VACUUM PUMP ASSEMBLY |
Install 2 new O-rings to the vacuum pump.
Install the vacuum pump with the 2 nuts.
| 9. INSTALL OIL COOLER COVER SUB-ASSEMBLY |
Install a new gasket and the oil cooler cover with the 13 bolts and 2 nuts.
Connect the oil pressure connector and install the wire harness.
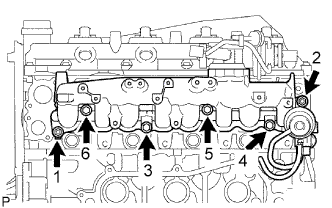
| 10. INSTALL INTAKE MANIFOLD |
|
Install a new gasket and the intake manifold to the cylinder head with the 4 bolts and 2 nuts in the order shown in the illustration.
| 11. INSTALL ENGINE OIL LEVEL DIPSTICK GUIDE |
Apply clean engine oil to a new O-ring.
Install the O-ring to the engine oil level dipstick guide.
Install the engine oil level dipstick guide with the bolt.
| 12. INSTALL ENGINE OIL LEVEL DIPSTICK |
| 13. INSTALL FUEL SUPPLY PUMP ASSEMBLY |
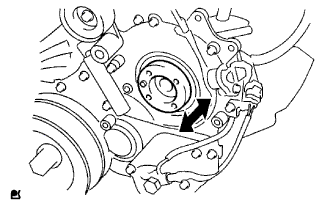 |
Check that the supply pump gear in the timing gear case moves back and forth smoothly.
Install a new O-ring to the pump.
Apply a light coat of engine oil to the O-ring.
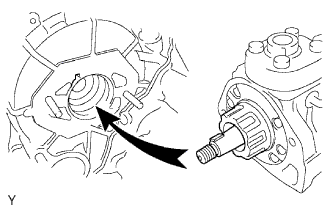 |
Align the set key on the drive shaft with the groove of the injection gear.
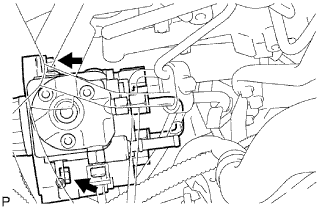 |
Install the pump with the 2 nuts.
Set a new O-ring before installing the set nut.
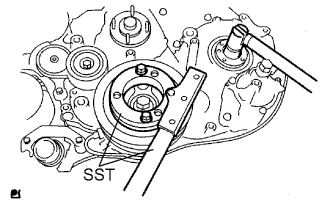 |
Using SST, hold the crankshaft pulley and install the set nut.
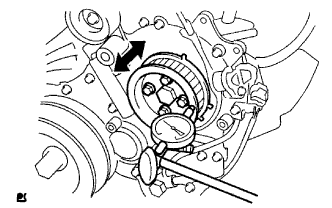 |
Move the pump drive shaft pulley back and forth to check the thrust clearance of the injection pump drive shaft.
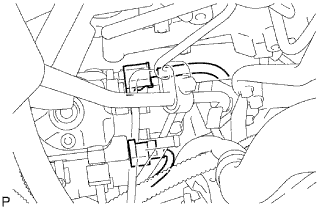 |
Connect the 2 connectors.
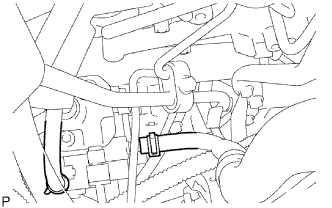 |
Connect the 2 fuel hoses.
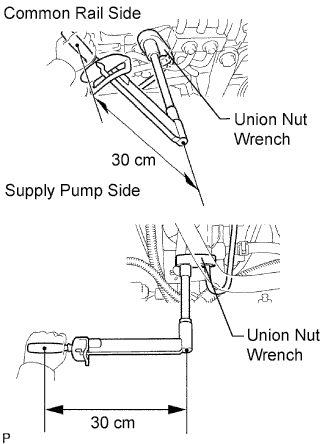 |
Temporarily install the fuel inlet pipe with the union nuts.
Using union nut wrench, tighten the injection pipe union nut on the common rail side.
Using union nut wrench, tighten the injection pipe union nut on the supply pump side.
Install the oil dipstick guide with the bolt.
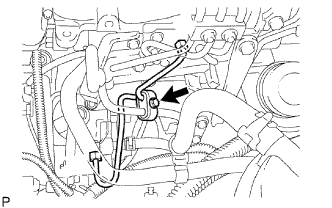 |
Install the clamp with the bolt.
| 14. INSTALL COMMON RAIL ASSEMBLY |
Install the common rail and No. 2 intake manifold insulator with the 2 bolts.
Connect the 2 connectors.
| 15. INSTALL FUEL INLET PIPE SUB-ASSEMBLY |
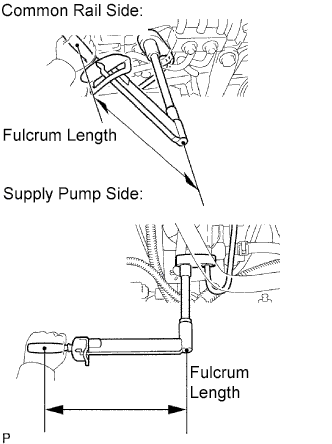 |
Temporarily install the fuel inlet pipe with the union nuts.
Using a 17 mm union nut wrench, tighten the fuel inlet pipe union nut on the common rail side.
Using a 17 mm union nut wrench, tighten the fuel inlet pipe union nut on the supply pump side.
Install a new O-ring to the engine oil level dipstick guide.
Install the engine oil level dipstick guide with the bolt.
Install the clamp with the bolt.
Install the engine oil level dipstick.
| 16. INSTALL NO. 2 NOZZLE LEAKAGE PIPE ASSEMBLY |
Temporarily install the No. 2 nozzle leakage pipe with the 3 bolts.
Temporarily install a new gasket and the union bolt.
Tighten the 3 bolts and union bolt.
Connect the 3 fuel hoses.
| 17. INSTALL NO. 4 INJECTION PIPE SUB-ASSEMBLY |
Temporarily install the No. 4 injection pipe with the union nuts.
Install the 2 bolts.
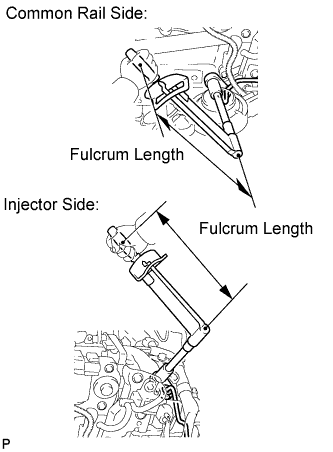 |
Using a 17 mm union nut wrench, tighten the injection pipe union nut on the common rail side.
Using a 17 mm union nut wrench, tighten the injection pipe union nuts on the injector side.
| 18. INSTALL NO. 1, NO. 2 AND NO. 3 INJECTION PIPE SUB-ASSEMBLY |
Temporarily install the No. 1, No. 2 and No. 3 injection pipes with the union nuts.
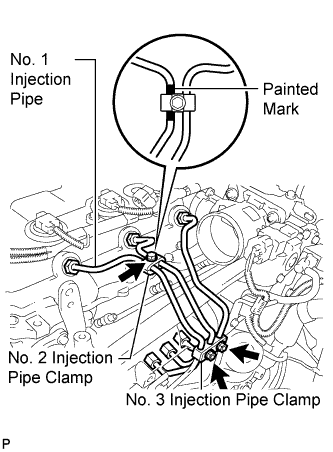 |
Install the No. 2 and No. 3 injection pipe clamps with the bolt and 2 nuts, as shown in the illustration.
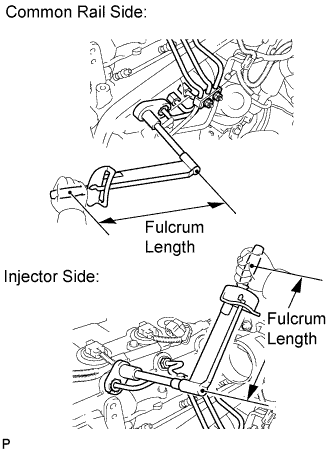 |
Using a 17 mm union nut wrench, tighten the injection pipe union nuts on the common rail side.
Using a 17 mm union nut wrench, tighten the injection pipe union nuts on the injector side.
| 19. INSTALL OIL FILTER SUB-ASSEMBLY |
Check and clean the oil filter installation surface.
Apply clean engine oil to the gasket of a new oil filter.
Lightly screw the oil filter into place by hand. Tighten it until the gasket contacts the seat.
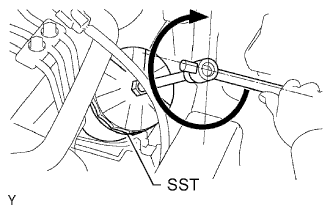 |
Using SST, tighten the oil filter. Depending on the work space available, choose from the following.
If enough space is available, use a torque wrench to tighten the oil filter.
If enough space is not available to use a torque wrench, tighten the oil filter 3/4 turn by hand or with a common wrench.
| 20. INSTALL EGR VALVE ASSEMBLY |
Install a new gasket and the EGR valve.
| 21. INSTALL NO. 1 EGR PIPE SUB-ASSEMBLY |
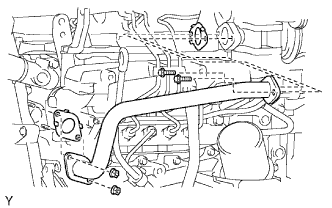 |
Install 2 new gaskets and the pipe with the 2 nuts and 2 bolts.
| 22. INSTALL INTAKE AIR CONNECTOR |
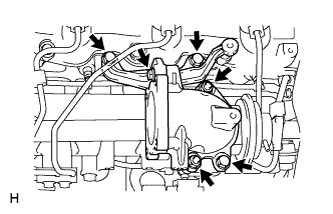 |
Install a new gasket and the air connector with the 2 nuts and bolt.
| 23. INSTALL NO. 2 INTAKE AIR CONNECTOR BRACKET |
Install the No. 2 intake air connector bracket with the 3 bolts.
| 24. INSTALL VACUUM SWITCHING VALVE BRACKET |
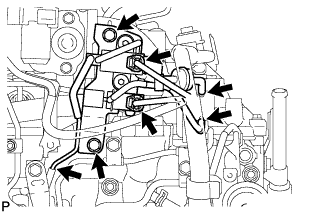 |
Install the vacuum switching valve bracket with the 2 bolts.
Connect the vacuum hose at the 3 points as shown in the illustration.
Connect the 2 connectors.
| 25. INSTALL DIESEL THROTTLE BODY ASSEMBLY |
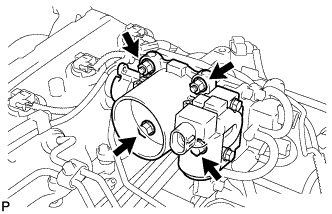 |
Install a new gasket and the throttle body with the 2 bolts and 2 nuts.
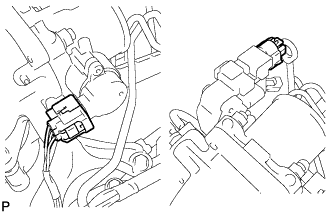 |
Connect the throttle control motor connector.
Connect the throttle position sensor connector.
| 26. INSTALL MANIFOLD STAY |
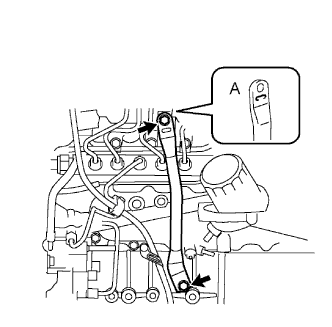 |
Install the manifold stay with the 2 bolts.
| 27. INSTALL GLOW PLUG ASSEMBLY |
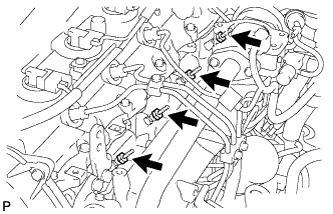 |
Using a 12 mm deep socket wrench, install the 4 glow plugs.
| 28. INSTALL NO. 1 GLOW PLUG CONNECTOR |
Install the glow plug connector by uniformly tightening the 4 nuts.
Install the 4 screw grommets.
Install the wire harness with the nut.
| 29. INSTALL WATER OUTLET |
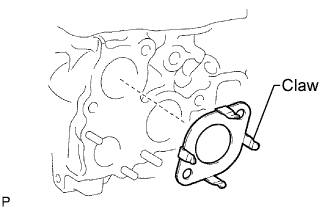 |
Install a new gasket to the cylinder head, as shown in the illustration.
Install the water outlet with the 2 bolts.
| 30. INSTALL THERMOSTAT |
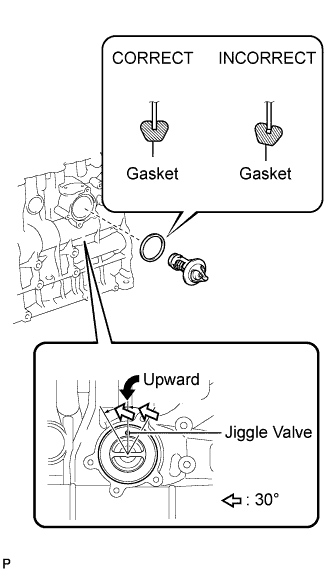 |
Install a new gasket to the thermostat.
Insert the thermostat into the cylinder block with the jiggle valve facing straight upward.
| 31. INSTALL WATER INLET |
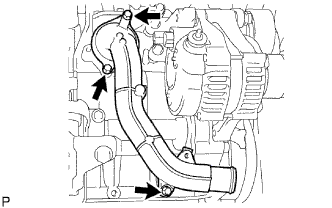 |
Install the inlet with the 3 bolts.
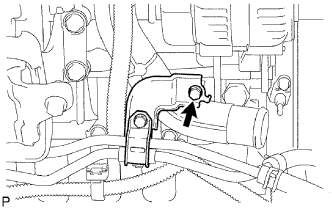 |
for Automatic transmission:
Connect the clamp to the inlet with the bolt.
| 32. INSTALL NO. 1 COMPRESSOR MOUNTING BRACKET |
Install the No. 1 compressor mounting bracket with the 4 bolts.
| 33. INSTALL NO. 1 INTERCOOLER SUPPORT BRACKET |
Install the No. 1 intercooler support bracket with the 2 bolts.
| 34. INSTALL NO. 2 INTERCOOLER SUPPORT BRACKET |
Install the No. 2 intercooler support bracket with the 2 bolts.
| 35. INSTALL V-RIBBED BELT TENSIONER ASSEMBLY |
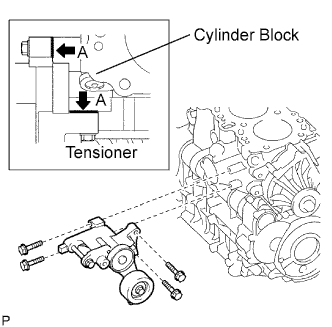 |
Install the V-ribbed belt tensioner with the 4 bolts.
| 36. INSTALL GENERATOR BRACKET |
Install the generator bracket with the bolt.
| 37. INSTALL GENERATOR ASSEMBLY |
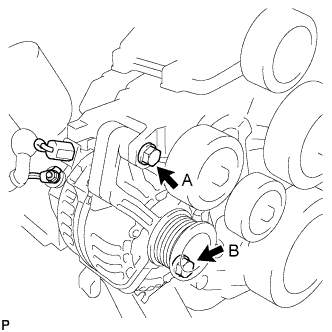 |
Install the generator with the 2 bolts.
Install the generator wire with the nut.
Install the terminal cap.
Connect the generator connector.
| 38. INSTALL NO. 2 IDLE PULLEY ASSEMBLY |
Install the spacer, No. 2 idle pulley and pulley plate with the bolt.
| 39. INSTALL EXHAUST MANIFOLD WITH TURBOCHARGER |
Install a new gasket and exhaust manifold with turbocharger to the cylinder head with the 8 collars, 8 spacers and 8 new nuts.
| 40. CONNECT TURBO OIL INLET PIPE SUB-ASSEMBLY |
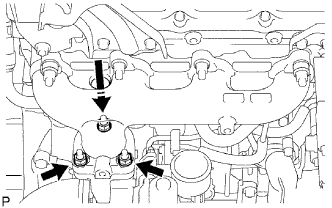 |
Temporarily install a new gasket and the turbocharger with 3 new nuts.
Temporarily install the turbo oil pipe.
Install a new gasket and the oil pipe with the 2 nuts, but only loosely install the nuts.
Install a new gasket and the oil pipe with the 2 bolts, but only loosely install the bolts.
Install a new gasket and the oil pipe with the union bolt, but only loosely install the union bolt.
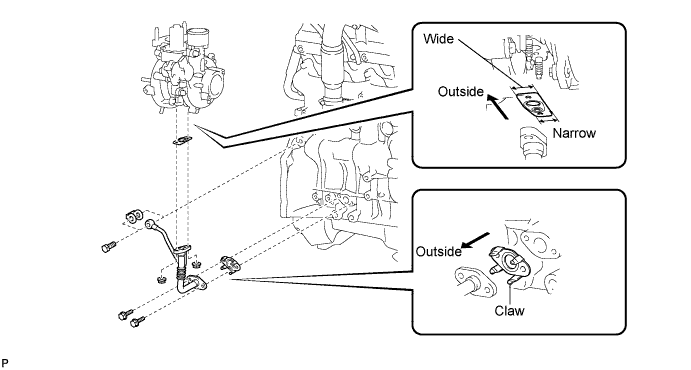
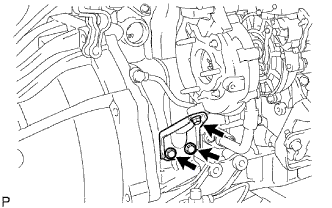 |
Temporarily install the turbocharger stay with the 3 bolts.
Tighten the 3 nuts of the turbocharger.
Tighten the 2 nuts and 2 bolts of the oil pipe, and the union bolt.
Tighten the 3 bolts of the turbocharger stay.
| 41. INSTALL TURBINE OUTLET ELBOW |
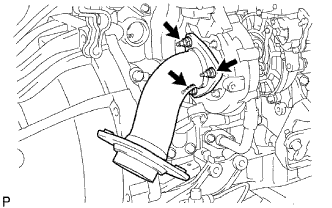 |
Install a new gasket and the outlet elbow with the 3 nuts.
| 42. INSTALL NO. 1 TURBO WATER HOSE |
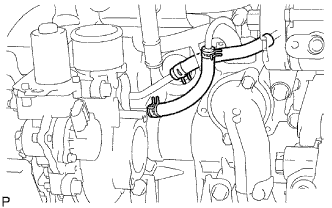 |
Connect the 2 hoses to the 2 tubes.
Move the 2 clamps to the locations where the hoses and tubes are connected.
| 43. INSTALL NO. 1 TURBO INSULATOR |
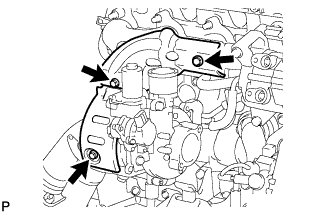 |
Temporarily install the turbo insulator with the bolt.
| 44. INSTALL NO. 1 EXHAUST MANIFOLD HEAT INSULATOR |
Temporarily install the heat insulator with the 2 bolts.
Tighten the bolt of the turbo insulator, and the 2 bolts of the heat insulator.
| 45. INSTALL COMPRESSOR INLET ELBOW |
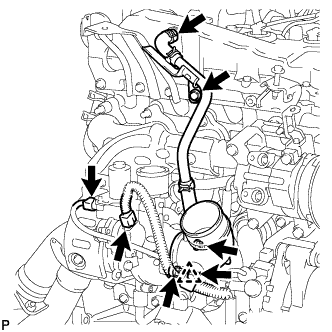 |
Install a new gasket and inlet elbow with the 2 nuts.
Connect the ventilation pipe to the cylinder head cover.
Move the clamp to the joint pipe of the hose.
Install the ventilation pipe with the bolt.
Connect the 2 connectors to the turbocharger.
Install the harness clamp's clip to the inlet elbow.
| 46. INSTALL CRANKSHAFT PULLEY |
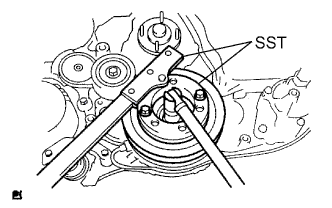 |
Align the pulley set key with the key groove of the pulley and install the pulley.
Using SST, install the pulley bolt.
| 47. INSTALL TIMING BELT |
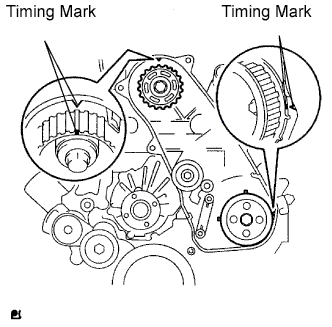 |
Check that the timing marks are aligned as shown in the illustration.
Using a 10 mm hexagon wrench, install the timing belt idler pulley and new washer with the bolt.
Check that the idler pulley moves smoothly.
If it does not move smoothly, check the idler sub-assembly and washer.
Install the timing belt to the pump drive shaft pulley, camshaft timing pulley and No. 1 timing belt idler in sequence.
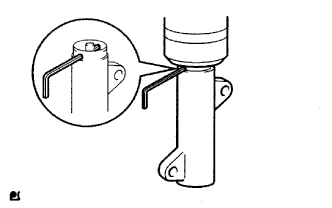 |
Place the tensioner upright. Then set a press to the top of the tensioner.
Using the press, slowly push in the push rod using 981 to 9,807 N (100 to 1,000 kgf, 220 to 2,205 lbf) of force.
Align the holes of the push rod and housing. Then pass a 1.5 mm hexagon wrench through the holes to keep the setting position of the push rod.
Install the timing belt tensioner with the 2 bolts while pushing the idler pulley toward the timing belt.
Tighten the 2 bolts.
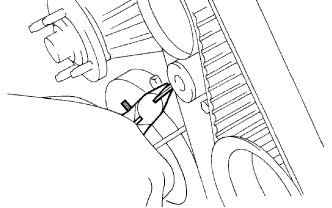 |
Remove the 1.5 mm hexagon wrench from the tensioner.
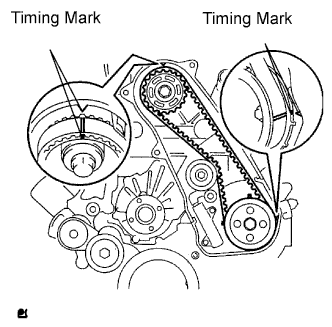 |
Turn the crankshaft clockwise 720° and check that the timing marks are aligned as shown in the illustration.
| 48. INSTALL NO. 1 TIMING BELT COVER |
Install the timing belt cover with the 6 bolts.
Install the wire harness clamp.
Install the water hose clamp with the bolt.
| 49. INSTALL ENGINE WIRE |
Install the engine wire to the engine.
| 50. REMOVE ENGINE FROM ENGINE STAND |
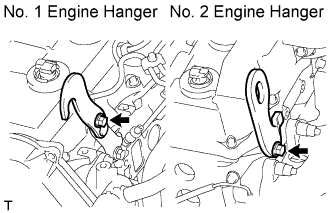 |
Install a No. 1 engine hanger and No. 2 engine hanger with 2 bolts as shown in the illustration.
| No. 1 engine hanger | 12284-30020 |
| No. 2 engine hanger | 12282-67030 |
| Bolt | 91552-81014 and 91642-81030 |
Attach an engine sling device and hang the engine with a chain block.
Remove the engine from the engine stand.
| 51. INSTALL ENGINE ASSEMBLY |
Slowly lower the engine into the engine compartment.
Install the engine with the 4 bolts and 4 nuts.
Remove the 2 bolts and 2 engine hangers.
| 52. INSTALL REAR END PLATE |
Install the rear end plate with the bolt.
| 53. INSTALL PUMP IMPELLER DRIVE PLATE (for Automatic Transmission) |
Clean the bolts and their holes.
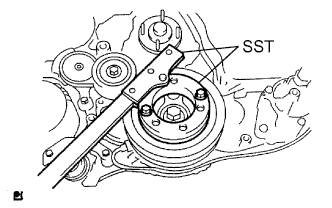 |
Using SST, hold the crankshaft pulley.
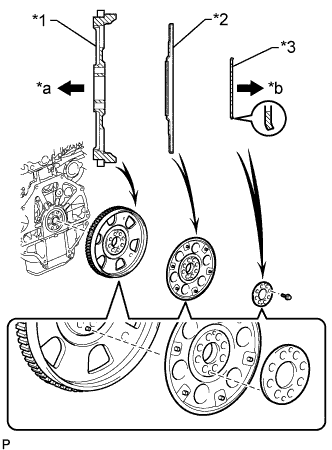 |
Install the flywheel and ring gear, the pump impeller drive plate and the rear drive plate spacer to the crankshaft.
| *1 | Flywheel and Ring Gear |
| *2 | Pump Impeller Drive Plate |
| *3 | Rear Drive Plate Spacer |
| *a | Engine Side |
| *b | Transmission Side |
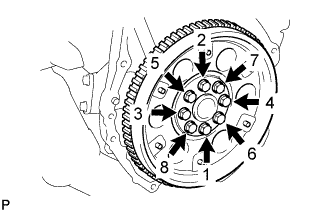 |
Install and uniformly tighten and tighten the 8 bolts in several steps in the sequence shown in the illustration.
| 54. INSTALL FLYWHEEL SUB-ASSEMBLY (for Manual Transmission) |
Clean the bolts and their holes.
Apply adhesive to 2 or 3 threads of the ends of the bolts.
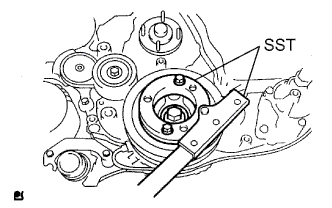 |
Using SST, hold the crankshaft pulley.
Install the flywheel to the crankshaft.
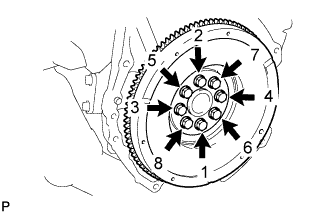 |
Uniformly install and tighten the 8 bolts in the sequence shown in the illustration.
| 55. INSTALL CLUTCH DISC ASSEMBLY (for Manual Transmission) |
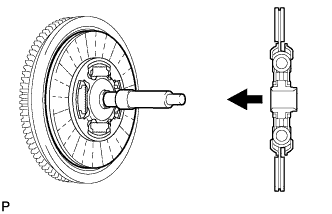 |
Insert SST into the clutch disc. Then insert SST (together with the clutch disc) into the flywheel.
| 56. INSTALL CLUTCH COVER ASSEMBLY (for Manual Transmission) |
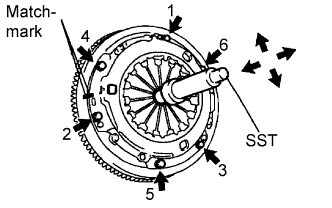 |
Align the matchmarks on the clutch cover and flywheel.
Loosely install the 6 bolts.
Tighten the 6 bolts as described below.
Determine the first bolt to be tightened by choosing the bolt closest to the knock pin.
Uniformly tighten the 6 bolts in diametrically opposite pairs relative to the position of the first bolt. Use the illustration as a reference.
Lightly move SST up and down, and right and left.
Check that the disc is in the center, and then tighten the bolts.
| 57. INSPECT AND ADJUST CLUTCH COVER ASSEMBLY (for Manual Transmission) |
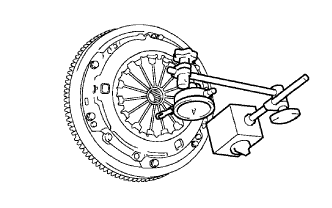 |
Using a dial indicator with roller instrument, measure the diaphragm spring tip alignment.
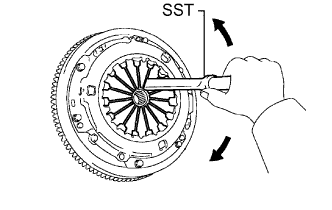 |
| 58. INSTALL AUTOMATIC TRANSMISSION ASSEMBLY (for Automatic Transmission) |
| 59. INSTALL MANUAL TRANSMISSION ASSEMBLY (for Manual Transmission) |
| 60. CONNECT COOLER COMPRESSOR ASSEMBLY |
Connect the cooler compressor with the 4 bolts.
| 61. CONNECT HEATER HOSE |
Connect the 2 heater hoses.
| 62. CONNECT HOSES AND CONNECTORS |
Using a union nut wrench, connect the pressure feed tube.
Connect the 2 fuel hoses.
Connect the vacuum pump hose.
Connect the oil reservoir to pump hose.
Connect the turbo motor driver connector.
Connect the 3 TCM connectors.
Connect the 4 ECM connectors.
Connect the 3 EDU connectors.
Connect the ground cable with the bolt.
Connect the 2 engine room junction block connectors.
Connect the engine room junction block wire with the nut.
Install the side relay block cover.
Install the upper relay block cover.
| 63. INSTALL GLOVE COMPARTMENT DOOR ASSEMBLY |
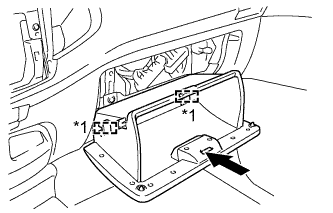 |
Attach the 2 hinges to install the glove compartment door.
| *1 | Hinge |
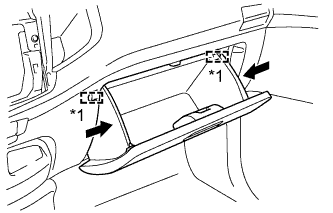 |
While pushing in the sides of the glove compartment door as indicated by the arrows in the illustration, close the door to engage it to the 2 stoppers.
| *1 | Stopper |
| 64. INSTALL PROPELLER WITH CENTER BEARING SHAFT ASSEMBLY |
| 65. INSTALL FRONT PROPELLER SHAFT ASSEMBLY (for 4WD) |
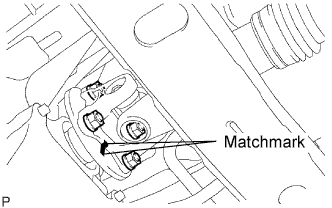 |
Align the matchmarks on the yoke and transfer flange.
Connect the propeller shaft with the 4 washers and 4 nuts.
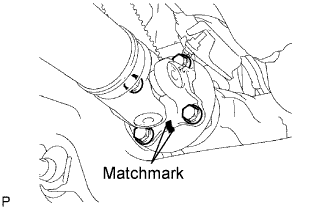 |
Align the matchmarks on the yoke and differential flange.
Install the front propeller shaft with the 4 bolts, 4 washers and 4 nuts.
| 66. INSTALL FRONT EXHAUST PIPE ASSEMBLY |
| 67. INSTALL STARTER ASSEMBLY |
| 68. INSTALL INTERCOOLER ASSEMBLY WITH INTAKE AIR CONNECTOR |
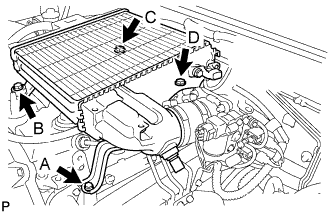 |
Install the intake air connector to the air hoses.
Install the CAC with the 4 bolts.
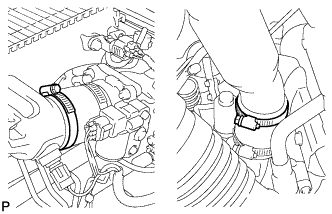 |
Tighten the 2 clamps.
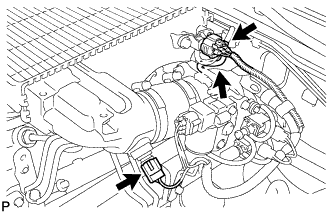 |
Connect the vacuum hose to the manifold absolute pressure sensor.
Connect the IAT sensor connector.
Connect the manifold absolute diesel pressure sensor connector.
| 69. INSTALL NO. 1 ENGINE COVER SUB-ASSEMBLY |
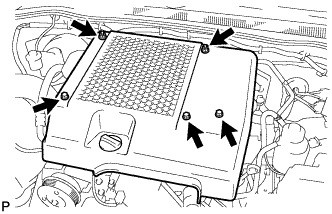 |
Install the engine cover with the 3 bolts and 2 nuts.
| 70. INSTALL RADIATOR ASSEMBLY |
| 71. INSTALL AIR CLEANER ASSEMBLY |
Install the cleaner with the 2 bolts.
Connect the connector to the MAF meter.
Connect the hose and tighten the hose clamp.
| 72. INSTALL BATTERY TRAY |
| 73. INSTALL BATTERY |
| 74. INSTALL BATTERY CLAMP SUB-ASSEMBLY |
Install the battery clamp with the bolt and nut.
| 75. ADD MANUAL TRANSMISSION OIL (for Manual Transmission) |
| 76. ADD AUTOMATIC TRANSMISSION FLUID (for Automatic Transmission) |
| 77. ADD ENGINE OIL |
Wipe the oil pan and drain plug.
Install a new gasket and the drain plug.
Add new oil.
| Item | Specified Condition |
| Drain and refill with oil filter change | 6.9 liters (7.3 US qts, 6.1 Imp. qts) |
| Drain and refill without oil filter change | 6.6 liters (7.0 US qts, 5.8 Imp. qts) |
| Dry fill | 7.4 liters (7.8 US qts, 6.5 Imp. qts) |
Install the oil filler cap.
| 78. INSTALL HOOD SUB-ASSEMBLY |
Install the hood with the 4 bolts.
Connect the washer nozzle hose.
Adjust the hood (Click here).
| 79. CONNECT CABLE TO NEGATIVE BATTERY TERMINAL |
| 80. ADD ENGINE COOLANT |
Tighten the radiator drain cock plug by hand.
Tighten the cylinder block drain cock plug.
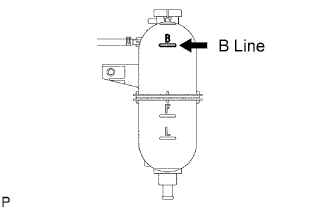 |
Fill the radiator with TOYOTA Super Long Life Coolant (SLLC) to the reservoir tank's B line.
| Item | Specified Condition |
| Manual transmission | 9.8 liters (10.4 US qts, 8.6 Imp. qts) |
| Automatic transmission | 11.1 liters (11.7 US qts, 9.8 Imp. qts) |
Press the inlet and outlet radiator hoses several times by hand, and then check the level of the coolant.
If the coolant level drops below the B line, add TOYOTA SLLC to the B line.
Install the radiator reservoir cap.
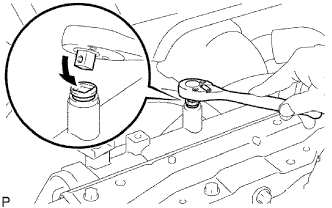 |
Using a wrench, install the vent plug.
Bleed air from the cooling system.
Warm up the engine until the thermostat opens. While the thermostat is open, circulate the coolant for several minutes.
Maintain the engine speed at 2,500 to 3,000 rpm.
Press the inlet and outlet radiator hoses several times by hand to bleed air.
Stop the engine and wait until the coolant cools down to ambient temperature.
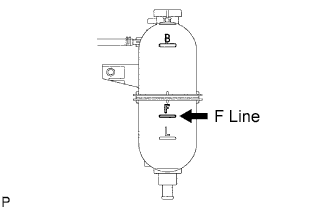 |
After the coolant cools down, check that the coolant level is at the F line.
If the coolant level is below the F line, add TOYOTA SLLC to the F line.
| 81. BLEED AIR FROM FUEL SYSTEM |
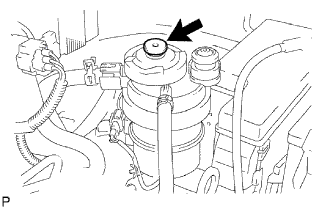 |
Using the hand pump mounted on the fuel filter cap, bleed the air from the fuel system. Continue pumping until the pump resistance increases.
Start the engine.
When the engine can be started, proceed to the next step.
If the engine cannot be started, bleed the air again using the hand pump until the hand pump resistance increases (refer to the procedures above). Then start the engine.
Turn the ignition switch off.
Connect the intelligent tester to the DLC3.
Turn the ignition switch to ON and turn the intelligent tester on.
Clear the DTCs (Click here).
Start the engine.*1
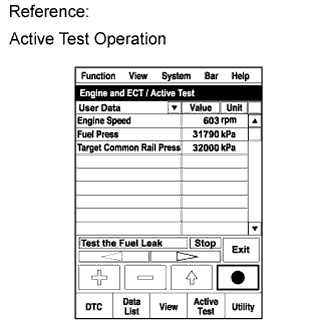 |
Enter the following menus: Powertrain / Engine and ECT / Active Test / Test the Fuel Leak.*2
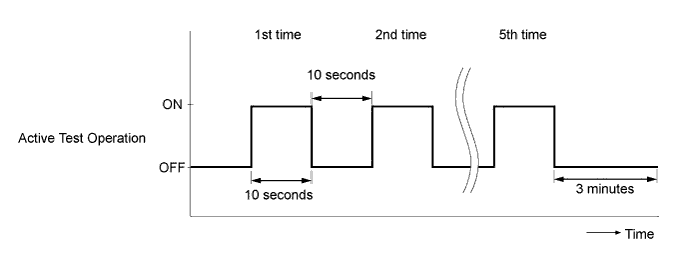
Perform the following test 5 times with on/off intervals of 10 seconds: Active Test / Test the Fuel Leak.*3
Allow the engine to idle for 3 minutes or more after performing the Active Test for the fifth time.
Enter the following menus: Powertrain / Engine and ECT / DTC.
Read Current DTCs.
Clear the DTCs (Click here).
Repeat steps *1 to *3.
Enter the following menus: Powertrain / Engine and ECT / DTC.
Read Current DTCs.
| 82. BLEED AIR FROM POWER STEERING SYSTEM |
Check the fluid level.
Jack up the front of the vehicle and support it with stands.
Turn the steering wheel.
With the engine stopped, turn the steering wheel slowly from lock to lock several times.
Lower the vehicle.
Start the engine. Run the engine at idle for a few minutes.
Turn the steering wheel.
With the engine idling, turn the steering wheel to the left or right full lock position and hold it there for 2 to 3 seconds. Then turn the steering wheel to the opposite full lock position and hold it there for 2 to 3 seconds.
Repeat the step above several times.
Stop the engine.
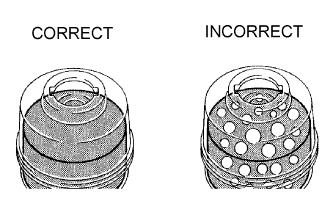 |
Check for foaming or emulsification. If the system has to be bled twice because of foaming or emulsification, check for fluid leaks in the system.
Check the fluid level.
| 83. INSPECT FOR POWER STEERING FLUID LEVEL |
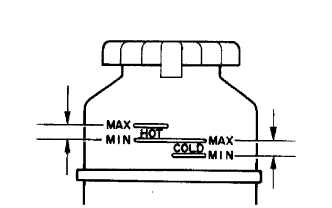 |
Keep the vehicle level.
With the engine stopped, check the power steering fluid level in the oil reservoir. If necessary, add power steering fluid.
Start the engine and run it at idle.
Turn the steering wheel to the left or right full lock position, and then turn the steering wheel to the opposite full lock position. Repeat this several times to raise fluid temperature.
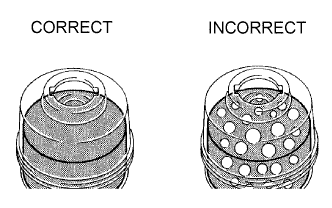 |
Check for foaming or emulsification. If foaming or emulsification is identified, bleed air from the power steering system.
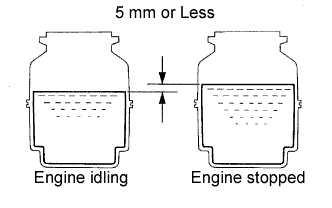 |
With the engine idling, measure the fluid level in the oil reservoir.
Stop the engine.
Wait a few minutes and remeasure the fluid level in the oil reservoir.
Check the fluid level.
| 84. PERFORM REGISTRATION |
Perform registration of the injector compensation codes .
Perform pilot quantity learning .
| 85. INSPECT FOR AUTOMATIC TRANSMISSION FLUID LEVEL (for Automatic Transmission) |
| 86. INSPECT FOR OIL LEAK |
| 87. INSPECT FOR COOLANT LEAK |
| 88. INSPECT FOR EXHAUST GAS LEAK |
| 89. INSPECT FOR FUEL LEAK |
Check that there are no leaks from any part of the fuel system when the engine is stopped. If there is fuel leakage, repair or replace parts as necessary.
Start the engine and check that there are no leaks from any part of the fuel system. If there is fuel leakage, repair or replace parts as necessary.
Disconnect the return hose from the common rail.
Start the engine and check for fuel leaks from the return pipe.
If there is fuel leakage, replace the common rail.
Connect the intelligent tester to the DLC3.
Start the engine and push the intelligent tester main switch on.
Select the Fuel Leak test from the Active Test mode on the intelligent tester.
If the intelligent tester is not available, fully depress the accelerator pedal quickly. Increase the engine speed to the maximum and maintain that speed for 2 seconds. Repeat this operation several times.
Check that there are no leaks from any part of the fuel system.
Reconnect the return hose to the common rail.
| 90. CHECK ENGINE IDLE SPEED AND MAXIMUM SPEED |
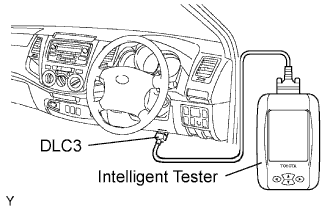 |
Connect the intelligent tester to the DLC3.
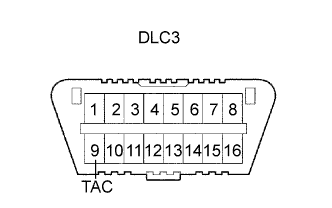 |
If an intelligent tester is not available, connect a tester probe of a tachometer to terminal 9 (TAC) of the DLC3 with SST.
Check the idle speed.
Start the engine and measure the idle speed.
Check the maximum speed.
Start the engine.
Fully depress the accelerator pedal.
Measure the maximum speed.
If the tester probe of the tachometer is connected to the DLC3, disconnect the tester probe with SST from terminal 9 of the DLC3.
Disconnect the intelligent tester from the DLC3.
| 91. INSPECT OIL LEVEL |
Warm up the engine, stop the engine and wait for 5 minutes. The oil level should be between the dipstick's low and full level marks.
If the oil level is low, check for leakage and add oil up to the full level mark.
| 92. INSTALL NO. 2 ENGINE UNDER COVER |
Install the under cover with the 4 bolts.
| 93. INSTALL NO. 1 ENGINE UNDER COVER |
Install the under cover with the 8 bolts.