P0400 Exhaust Gas Recirculation Flow
Diagnostic trouble codes · Vehicles built Jun 2011 – Jul 2012
Versions by build date: Jun 2011 – Jul 2012 Aug 2012 – Jul 2013 Aug 2013 – Jul 2014 from Aug 2014
DESCRIPTION
The EGR system recirculates exhaust gases, and adjusts the volume of the exhaust gases to the proper level depending on driving conditions. The recirculated gas mixes with the intake air, allowing the EGR system to slow down engine combustion and lower the combustion temperature. This helps reduce NOx emissions.In order to increase circulation efficiency, the ECM adjusts the lift amount of the EGR valve and throttle valve.
| DTC No. |
DTC Detection Condition |
Trouble Area |
| P0400 |
When either condition below is met:
|
|
- HINT:
- DTC detection is not performed for 4 seconds after the brake switch is turned ON and OFF.
MONITOR DESCRIPTION
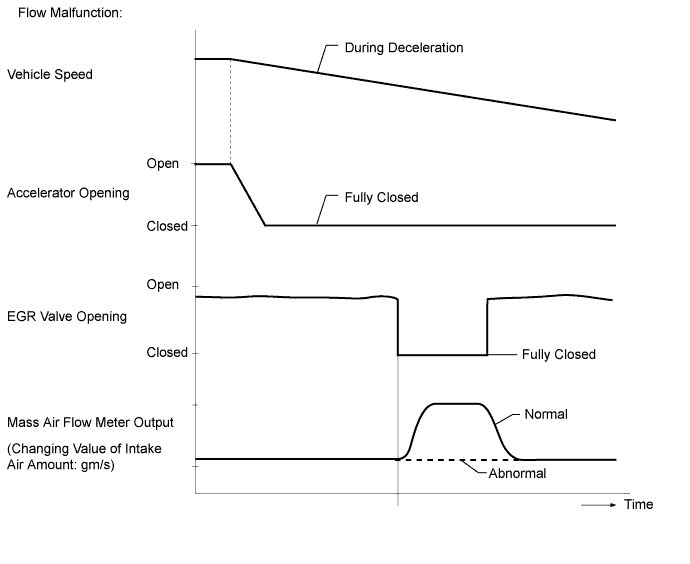
- If the EGR valve assembly is forcibly operated but the intake air amount does not vary, the ECM determines that the EGR valve assembly is malfunctioning. The ECM then illuminates the MIL.
- If the EGR valve is forcibly operated during deceleration but the intake air amount does not vary, the ECM determines that the EGR valve is malfunctioning. The ECM then illuminates the MIL (2 trip detection logic).

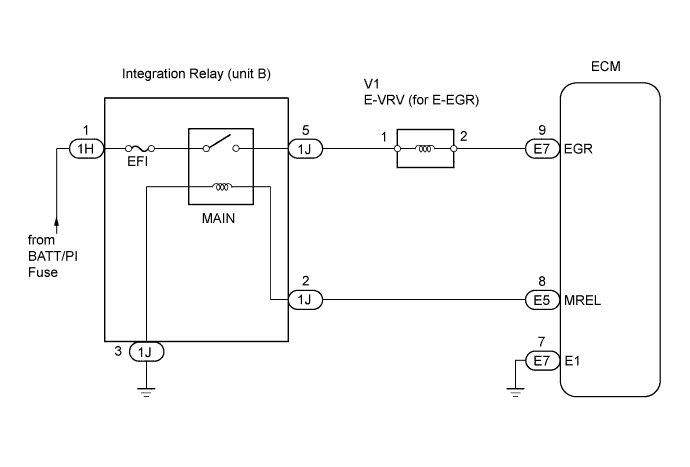
WIRING DIAGRAM
INSPECTION PROCEDURE
- HINT:
- Read freeze frame data using the intelligent tester. Freeze frame data records the engine conditions when a malfunction is detected. When troubleshooting, freeze frame data can help determine if the vehicle was moving or stationary, if the engine was warmed up or not, and other data from the time the malfunction occurred.
- NOTICE:
- After replacing the ECM, the new ECM needs registration (Click here) and initialization (Click here).
| 1. CHECK OTHER DTC OUTPUT |

Connect the intelligent tester to the DLC3.
Turn the ignition switch ON and turn the intelligent tester ON.
Enter the following menus: Powertrain / Engine and ECT / DTC.
Read DTCs.
- Result:
Display (DTC output)
Proceed to
P0400
A
P0400 and other DTCs
B
- HINT:
- If codes other than P0400 are output, perform troubleshooting for those DTCs first.
|
|
||||

| A | |
 |
| 2. PERFORM ACTIVE TEST USING INTELLIGENT TESTER (ACTIVATE THE EGR VALVE CLOSE) |
Connect the intelligent tester to the DLC3.
Start the engine and warm it up (engine coolant temperature is 70°C (158°F) or higher) with the A/C switch and all accessory switches off.
Turn the ignition switch off. Wait for 30 seconds, and then restart the engine.
Turn the tester on.
Select the following menus: Powertrain / Engine and ECT / Data List / MAF.
Read the MAF value displayed on the tester while the engine is idling.
Select the following menus: Powertrain / Engine and ECT / Active Test / Activate the EGR Valve Close.
Read the MAF value when the EGR valve is closed using the Active Test function.
- HINT:
- If idling continues for 15 minutes or more, the EGR valve target opening angle becomes 0% (EGR valve fully closed). As this makes diagnosis impossible, it becomes necessary to drive the vehicle or restart the engine.
- Before performing the diagnosis, confirm that the EGR valve target opening angle is not 0%.
- If idling continues for 15 minutes or more, the EGR valve target opening angle becomes 0% (EGR valve fully closed). As this makes diagnosis impossible, it becomes necessary to drive the vehicle or restart the engine.
- Result:
Active Test
Result
Proceed to
Activate the EGR Valve Close:
Off (Open) to on (Closed)
MAF value does not change
A
MAF value changes
B
- NOTICE:
- As the measured values may differ from those shown below due to factors such as differences in measuring environments and changes in vehicle condition due to aging, do not use these values to determine whether the vehicle is malfunctioning or not.
- HINT:
- The problem may be a temporary one, due to the entry of deposits or foreign matter. Check that there are no deposits or foreign matter in the E-VRV or mass air flow meter.
- Reference:
EGR Valve Condition (Opening)
Measuring Condition
MAF (Reference)
Open (55%)
- Atmosphere pressure: 101 kPa
- Intake air temperature: 30°C (86°F)
- Engine coolant temperature: 88°C (190°F)
3.0 to 9.0 gm/s
Closed (0%)
13 to 20 gm/s
- Atmosphere pressure: 101 kPa
|
|
||||

| A | |
|
| 3. INSPECT VACUUM PUMP ASSEMBLY |
Check the negative pressure of the vacuum pump.
- Standard:
- More than 86.7 kPa (650 mmHg, 26 in.Hg)
|
|
||||
| OK | |
|
| 4. CHECK VACUUM HOSE |
Check the vacuum hoses.
- OK:
- The hoses are not damaged and securely connected.
|
|
||||
| OK | |
|
| 5. INSPECT E-VRV FOR EGR |
Inspect the E-VRV (Click here).
|
|
||||
| OK | |
|
| 6. CHECK WIRE HARNESS (E-VRV FOR EGR - ECM) |
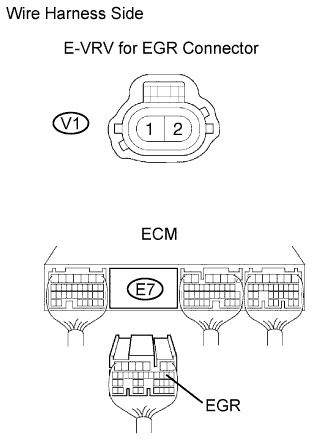 |
Disconnect the V1 E-VRV connector.
Disconnect the E7 ECM connector.
Measure the resistance of the wire harness side connectors.
- Standard resistance:
Tester Connection
Specified Condition
E7-9 (EGR) - V1-2
Below 1 Ω
E7-9 (EGR) or V1-2 - Body ground
10 kΩ or higher
|
|
||||
| OK | |
|
| 7. CHECK WIRE HARNESS (E-VRV FOR EGR - INTEGRATION RELAY (MAIN RELAY)) |
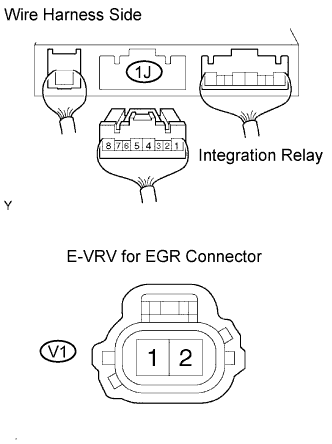 |
Remove the integration relay from the engine room junction block.
Disconnect the 1J integration relay connector.
Disconnect the V1 E-VRV connector.
Measure the resistance of the wire harness side connectors.
- Standard resistance:
Tester Connection
Specified Condition
1J-5 - V1-1
Below 1 Ω
1J-5 or V1-1 - Body ground
10 kΩ or higher
|
|
||||
| OK | |
|
| 8. INSPECT EGR VALVE ASSEMBLY |
Inspect the EGR valve assembly (Click here).
- HINT:
- If there are any deposits adhering to the valve, clean the valve.
- When inspecting the EGR valve, make sure that the valve is fully closed.
- If there are any deposits adhering to the valve, clean the valve.
|
|
||||
|
|
||||
| 9. REPLACE EGR VALVE ASSEMBLY |
Replace the EGR valve assembly (Click here).
| NEXT | |
|
| 10. CHECK FOR BLOCKAGE IN EGR GAS PASSAGE (EXHAUST MANIFOLD - EGR VALVE ASSEMBLY) |
Check for blockage in the EGR gas passage between the exhaust manifold and EGR valve assembly.
- OK:
- No blockage in the EGR gas passage
Result Result
Proceed to
NG
A
OK
B
|
|
||||
| A | |
|
| 11. REPAIR OR REPLACE MALFUNCTIONING PARTS, COMPONENT AND AREA |
Repair or replace the malfunctioning parts, component and area.
| NEXT | |
|
| 12. CHECK WHETHER DTC OUTPUT RECURS |
Connect the intelligent tester to the DLC3.
Turn the ignition switch to ON and turn the tester on.
Start the engine and warm it up until the engine coolant temperature reaches 80°C (176°F).
Move the shift lever to 2nd gear and decelerate from a speed of 50 km/h (31 mph) or more (fully closing the accelerator for approximately 5 seconds or more).
Select the following menu items: Powertrain / Engine and ECT / DTC.
Read the DTC.
Result Display (DTC Output)
Proceed to
P0400
A
No output
B
|
|
||||
| A | |
|
| 13. REPLACE ECM |
Replace the ECM (Click here).
| NEXT | |
|
| 14. CONFIRM WHETHER MALFUNCTION HAS BEEN SUCCESSFULLY REPAIRED |
Connect the intelligent tester to the DLC3.
Turn the ignition switch to ON and turn the tester on.
Start the engine and warm it up until the engine coolant temperature reaches 80°C (176°F).
Move the shift lever to 2nd gear and decelerate from a speed of 50 km/h (31 mph) or more (fully closing the accelerator for approximately 5 seconds or more).
Select the following menu items: Powertrain / Engine and ECT / DTC.
Confirm that the DTC is not output again.
- HINT:
- If the DTC is output again, the mass air flow meter may be malfunctioning.
| NEXT | ||
 |
||
| ||