1KD-FTV ENGINE MECHANICAL ENGINE ASSEMBLY(w/o Glow Plug Controller) INSTALLATION
CAUTION / NOTICE / HINT
- NOTICE:
- ·
When replacing the injectors (including shuffling the injectors between the cylinders), common rail or cylinder head, it is necessary to replace the injection pipes with new ones.
·When replacing the fuel supply pump, common rail, cylinder block, cylinder head, cylinder head gasket or timing gear case, it is necessary to replace the fuel inlet pipe with a new one.
·After removing the injection pipes, clean them with a brush and compressed air.
PROCEDURE

 1.INSTALL FRONT ENGINE MOUNTING INSULATOR
Install the 2 front engine mounting insulators with the 2 nuts.
- Torque:
- 48 N*m (489 kgf*cm, 35 ft.*lbf)
2.INSTALL ENGINE WIRE
Install the engine wire to the engine.
3.INSTALL ENGINE HANGERS
4.REMOVE ENGINE FROM ENGINE STAND
Attach an engine sling device and hang the engine with a chain block.
Remove the engine from the engine stand.
5.INSTALL ENGINE ASSEMBLY
Slowly lower the engine into the engine compartment.
Install the engine with the 4 bolts and 4 nuts.
- Torque:
- 38 N*m (387 kgf*cm, 28 ft.*lbf)
Remove the 2 bolts and 2 engine hangers.
6.INSTALL REAR END PLATE
Install the rear end plate with the bolt.
- Torque:
- 8.0 N*m (82 kgf*cm, 71 in.*lbf)
7.INSTALL PUMP IMPELLER DRIVE PLATE (for Automatic Transmission)
Clean the bolts and their holes.
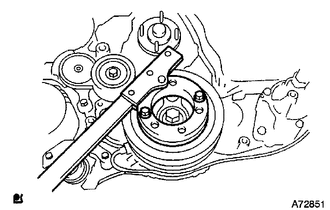
Using SST, hold the crankshaft pulley.
- SST
- 09213-58014
09330-00021
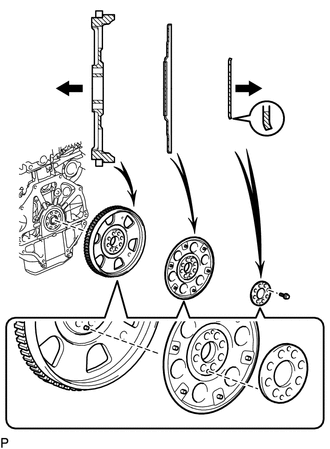
| *1 | Flywheel and Ring Gear |
| *2 | Pump Impeller Drive Plate |
| *3 | Rear Drive Plate Spacer |
| *a | Engine Side |
| *b | Transmission Side |
Install the flywheel and ring gear, the pump impeller drive plate and the rear drive plate spacer to the crankshaft.
- NOTICE:
-
Align either hole in the pump impeller drive plate and either hole in the rear drive plate spacer with the knock pin of the flywheel and ring gear, and then install the flywheel and ring gear, the pump impeller drive plate and the rear drive plate spacer to the crankshaft.
- HINT:
-
As the rear drive plate spacer and pump impeller drive plate are not reversible, be sure to install them in the direction shown in the illustration.
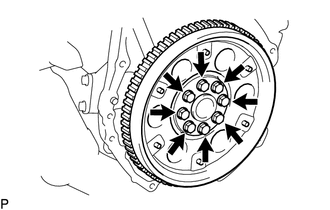
Install and uniformly tighten and tighten the 8 bolts in several steps in the sequence shown in the illustration.
- Torque:
- 178 N*m (1815 kgf*cm, 131 ft.*lbf)
- NOTICE:
-
Do not start the engine for at least an hour after installing the flywheel and ring gear.
8.INSTALL FLYWHEEL SUB-ASSEMBLY (for Manual Transmission)
Clean the bolts and their holes.
Apply adhesive to 2 or 3 threads at the end of each bolt.
- Adhesive:
Toyota Genuine Adhesive 1324, Three Bond 1324 or equivalent
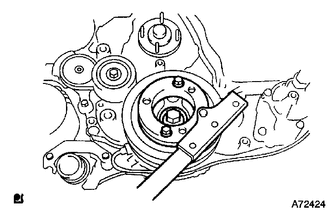
Using SST, hold the crankshaft pulley.
- SST
- 09213-58014
09330-00021
Install the flywheel to the crankshaft.
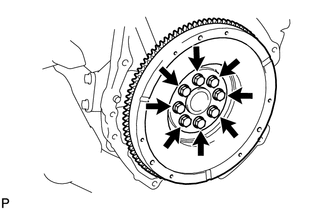
Install and uniformly tighten the 8 bolts in the sequence shown in the illustration.
- Torque:
- 178 N*m (1815 kgf*cm, 131 ft.*lbf)
- NOTICE:
-
Do not start the engine for at least 1 hour after installation.
9.INSTALL CLUTCH DISC ASSEMBLY (for Manual Transmission)
10.INSTALL CLUTCH COVER ASSEMBLY (for Manual Transmission)
11.INSPECT AND ADJUST CLUTCH COVER ASSEMBLY (for Manual Transmission)
12.INSTALL REAR NO. 1 ENGINE MOUNTING INSULATOR
- HINT:
-
Perform this procedure only when replacement of the rear No. 1 engine mounting insulator is necessary.
Install the rear No. 1 engine mounting insulator with the 4 bolts.
- Torque:
- 47 N*m (479 kgf*cm, 35 ft.*lbf)
13.INSTALL AUTOMATIC TRANSMISSION ASSEMBLY (for Automatic Transmission)
14.INSTALL DRIVE PLATE AND TORQUECONVERTER SETTING BOLT (for Automatic Transmission)
15.INSTALL MANUAL TRANSMISSION ASSEMBLY (for Manual Transmission)
16.CONNECT COOLER COMPRESSOR ASSEMBLY (w/ Air Conditioning System)
Connect the cooler compressor with the 4 bolts.
- Torque:
- 25 N*m (250 kgf*cm, 18 ft.*lbf)
17.CONNECT WIRE HARNESS
Connect the 4 ECM connectors.
for Automatic Transmission:
Connect the 3 TCM connectors.
Connect the turbo motor driver connector.
for 4WD:
Connect the 4WD control ECU connector.
Connect the 3 injector driver connectors.
Attach the clamp and connect the wire harness with the 2 nuts.
- Torque:
- 13 N*m (131 kgf*cm, 9 ft.*lbf)
Connect the ground cable with the bolt.
- Torque:
- 30 N*m (306 kgf*cm, 22 ft.*lbf)
Connect the 2 engine room junction block connectors.
Connect the engine room junction block wire with the nut.
- Torque:
- 13 N*m (133 kgf*cm, 10 ft.*lbf)
Install the side engine room relay block cover.
Install the upper relay block cover.
18.INSTALL GLOVE COMPARTMENT DOOR ASSEMBLY
19.CONNECT UNION TO CONNECTOR TUBE HOSE
Connect the union to connector tube hose.
20.CONNECT FUEL HOSE
Connect the 2 fuel hoses.
21.CONNECT PRESSURE FEED TUBE ASSEMBLY
Connect the pressure feed tube.
- Torque:
- 44 N*m (449 kgf*cm, 32 ft.*lbf)
- NOTICE:
-
Use the formula to calculate special torque values for situations where a union nut wrench is combined with a torque wrench (See page General>INTRODUCTION>REPAIR INSTRUCTION>PRECAUTION).
Connect the oil reservoir to pump hose.
22.CONNECT HEATER HOSE
Connect the 2 heater hoses.
23.INSTALL PROPELLER WITH CENTER BEARING SHAFT ASSEMBLY
24.INSTALL FRONT PROPELLER SHAFT ASSEMBLY (for 4WD)
25.INSTALL FRONT EXHAUST PIPE ASSEMBLY
26.INSTALL STARTER ASSEMBLY
27.INSTALL RADIATOR ASSEMBLY
28.INSTALL INTERCOOLER ASSEMBLY WITH INTAKE AIR CONNECTOR
29.INSTALL AIR CLEANER ASSEMBLY
Connect the air cleaner hose.
Install the cleaner with the 2 bolts.
- Torque:
- 14 N*m (143 kgf*cm, 10 ft.*lbf)
Tighten the hose clamp.
Connect the connector to the mass air flow meter connector.
30.INSTALL BATTERY TRAY
31.INSTALL BATTERY
32.INSTALL BATTERY CLAMP SUB-ASSEMBLY
Install the battery clamp with the bolt and nut.
- Torque:
- 5.4 N*m (55 kgf*cm, 48 in.*lbf)
33.ADD POWER STEERING FLUID
34.ADD TRANSMISSION FLUID (for Automatic Transmission)
35.ADD TRANSMISSION OIL (for Manual Transmission)
37.INSTALL HOOD SUB-ASSEMBLY
Install the hood with the 4 bolts.
- Torque:
- 13 N*m (133 kgf*cm, 10 ft.*lbf)
Connect the washer nozzle hose.
Adjust the hood (See page Vehicle Exterior>DOOR / HATCH>HOOD>ADJUSTMENT).
38.CONNECT CABLE TO NEGATIVE BATTERY TERMINAL
- NOTICE:
-
When disconnecting the cable, some systems need to be initialized after the cable is reconnected (See page General>INTRODUCTION>REPAIR INSTRUCTION>INITIALIZATION).
39.BLEED AIR FROM FUEL SYSTEM
40.ADD ENGINE COOLANT
41.BLEED AIR FROM POWER STEERING SYSTEM
42.INSPECT POWER STEERING FLUID LEVEL
43.PERFORM REGISTRATION
Perform registration of the injector compensation codes (See page Engine / Hybrid System>1KD-FTV ENGINE CONTROL>ECD SYSTEM(w/ EGR Cooler)>REGISTRATION).
Perform pilot quantity learning (See page Engine / Hybrid System>1KD-FTV ENGINE CONTROL>ECD SYSTEM(w/ EGR Cooler)>REGISTRATION).
44.INSPECT FOR COOLANT LEAK
45.INSPECT FOR OIL LEAK
46.INSPECT FOR EXHAUST GAS LEAK
47.INSPECT FOR FUEL LEAK
48.CHECK ENGINE IDLE SPEED AND MAXIMUM SPEED
49.INSPECT ENGINE OIL LEVEL
50.INSTALL NO. 2 ENGINE UNDER COVER
- Torque:
- 28 N*m (286 kgf*cm, 21 ft.*lbf)
51.INSTALL NO. 1 ENGINE UNDER COVER
- Torque:
- 28 N*m (286 kgf*cm, 21 ft.*lbf)